< Previous | Contents | Next >
Managing Proxies from the Blackmagic Proxy Generator
There are two options to help manage your proxy files once they’ve been created. The Processing mode must be stopped for them to be available.
— Delete Proxies: This option deletes all proxy files (and the Proxy folder) from the selected watch folders.
![]()
— Extract Proxies: This option copies all proxy files from the selected watch folders to a new destination in the file system dialog. This is useful to create a separate proxy-only folder that you can hand over to another person on a portable hard drive or upload onto cloud storage.
Linking Proxies from the Blackmagic Proxy Generator in DaVinci Resolve
Once your proxies are created they are linked automatically to their original source media in DaVinci Resolve when you import the original clips in the watch folder into the Media Pool. You can also link and unlink them manually as explained in the Managing Proxy Media section later in this chapter.
Generating Proxy Media in Other Applications
Proxy files can also be generated in applications outside of DaVinci Resolve, such as other NLEs or various media asset management systems. To properly link the proxy to its source media in DaVinci Resolve, the proxy file must meet the following criteria:
— Proxy files must have identical timecode to the source file.
— Proxy files must have the same file name as the source file (excluding extensions).
— Proxy files must have the same frame rate as the source file.
— The format and codec used for proxy files must be supported in DaVinci Resolve.
If your proxy file meets these criteria, you’ll be able to manually link proxy media created in other applications to source clips in the Media Pool as described below.
Managing Proxy Media
You can check the status and location of all your proxy media in the List view of the Media Pool. Right- click on any column heading and click the checkboxes of “Proxy” and “Proxy Media Path.”
— Proxy: This column shows the current proxy status.
— None: Indicates no proxy media has been created.
— Offline: Indicates a proxy has been created but cannot be found in the Proxy Media path.
— (Resolution): A number indicating the resolution of the created proxy and that it is online.
— Proxy Media Path: The location of where DaVinci Resolve is looking for the proxy file. If this location is incorrect, you can relink the proxy to a new path manually.

The proxy columns in List view, showing Proxy Media status and location
Linking Clips to Proxy Media
If you’ve created proxy media in another application, or moved the internally created proxy media out of its default location in “ProxyMedia,“ you’ll need to manually link the proxies to their source media files in your Media Pool.
1 Select one or more clips in the Media Pool you wish to link proxy media to.
2 Right-click one of the selected clips, and choose “Link Proxy Media” from the contextual menu.
![]()
3 Use the file browser to find the specific proxy file or directory (in the case of multiple clips) to set a new Proxy Media path, and click Open. If you select an incorrect file or directory, a warning dialog box will appear and no linking will occur.
4 If the linking was successful, the proxy media icon will show up on the clip’s thumbnail in the Media Pool.
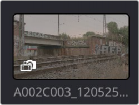
The Proxy Icon showing in the lower left corner of the thumbnail, indicating proxy media is linked for this clip
1 Select a clip or clips in the Media Pool you wish to unlink proxy media from.
2 Right-click on any clip and select “Unlink Proxy Media” from the contextual menu. This will remove the metadata link from proxy to source and will set the status in the Proxy column to “None.”

NOTE: Unlinking a proxy file does not delete it. The proxy file remains on the hard drive where it was created. As of this writing, proxy files must be deleted manually using your OS file system outside of DaVinci Resolve.
NOTE: Unlinking a proxy file does not delete it. The proxy file remains on the hard drive where it was created. As of this writing, proxy files must be deleted manually using your OS file system outside of DaVinci Resolve.
NOTE: Unlinking a proxy file does not delete it. The proxy file remains on the hard drive where it was created. As of this writing, proxy files must be deleted manually using your OS file system outside of DaVinci Resolve.
Re-generating Proxy Media
You can generate more than one proxy file per clip. This can be useful if you want to set multiple Camera Raw parameters and choose between them, or to create proxy files of different resolutions.
1 Make your desired changes to the current clip’s settings.
2 Right-click on the same clip and select “Generate Proxy Media” from the contextual menu.
A new proxy file is created in the same directory as the previously linked proxy file, and its file name is appended with “_s00x” to differentiate it. The latest proxy generated is automatically linked to the source file, but previous proxy versions are retained on disk, so you can then manually relink the different versions as needed.