
< Previous | Contents | Next >
Wiping Between Clips in the Timeline
If you want to wipe the current clip against another clip in the Timeline without saving a still to the Gallery first, there’s a special procedure you can follow.
1 Click the thumbnail of the first clip you want to compare.
2 (Optional) A “Gang timeline wipe with current clip” option, available from the Viewer option menu, lets you maintain the offset between the current clip and a timeline clip you’re wiping against when you move the current clip selection to other clips. With this option enabled, the offset between the timeline wiped clip and the current clip is maintained when you move the clip selection. You can step the timeline reference clip forward one frame by pressing Command-Option-Right Arrow, and back one frame by pressing Command-Option-Left Arrow. This allows for precise positioning. When this option is disabled, the timeline wiped clip stays where it is regardless of what clip you select.
3 Right-click the thumbnail of the second clip you want to compare against, and choose Wipe Timeline Clip from the contextual menu.
NOTE: Wipe Timeline Clip only appears in the contextual menu if you right-click on a thumbnail in the Timeline that has not been selected as the current clip.
NOTE: Wipe Timeline Clip only appears in the contextual menu if you right-click on a thumbnail in the Timeline that has not been selected as the current clip.
NOTE: Wipe Timeline Clip only appears in the contextual menu if you right-click on a thumbnail in the Timeline that has not been selected as the current clip.
Both clips appear split screened against one another.
Change a Timeline Wipe Using the Timelines Album of the Gallery
While you’re using the Wipe Timeline Clip to show a wipe of the current clip against any other clip in the Timeline, you can open the Timelines album of the Gallery and click different clips to change which timeline clip you’re wiping against (outlined in blue) without changing the current clip (outlined in orange).
Using Split Screen Modes
![]()
A set of split screen modes provides additional ways of comparing multiple images in the Viewer at the same time. These provide side-by-side and grid comparisons of multiple shots and multiple versions, all of which are output to video for monitoring on your external video display. For example, you can use the Split Screen Versions mode to display every single version that’s applied to the current clip in
a grid, for easy evaluation. The currently selected clip in the Timeline is highlighted in gray, so you can keep track of what you’re doing.
— Click the Split Screen button on the top Viewer toolbar, and choose a split screen method from the drop-down menu that appears in the Viewer toolbar at the right.
— Choose an option from the Split Screen submenu in the Viewer’s option menu.
— Press Option-Command-W to turn Split Screen on and off, using the last selected option.

NOTE: When any of the split screen modes are selected, you cannot see any other onscreen controls in the Viewer, such as Power Window shapes, until you first disable split screen.
NOTE: When any of the split screen modes are selected, you cannot see any other onscreen controls in the Viewer, such as Power Window shapes, until you first disable split screen.
NOTE: When any of the split screen modes are selected, you cannot see any other onscreen controls in the Viewer, such as Power Window shapes, until you first disable split screen.
— Right-click the Viewer and choose an option from the Split Screen submenu in the contextual menu.
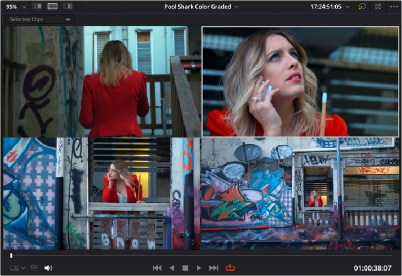
Four shots shown in a grid using the Split Screen > Selected Clips mode
Viewing and Choosing the Current Selection
In any of the split screen modes, the current selection is indicated by a gray outline. This outline can be disabled for a more direct comparison by choosing Split Screen > Show Outline in the Viewer’s option menu to toggle the outline off and on.
In certain modes, you can also double-click a particular frame of the split screen view to change the current clip, choose the active version, or apply a gallery grade.
Available Split Screen Modes
You can choose from among the following split screen modes:
— Current Group: Shows up to 16 clips that share the same group as the current clip. Double- clicking a frame does nothing in this mode.
![]()
— Highlight Modes: Shows a four-up display that lets you simultaneously see (clockwise) the clip’s RGB image, the gray matte, the high contrast matte, and a difference matte generated by the node’s input compared against its output. Double-clicking a frame does nothing in this mode.
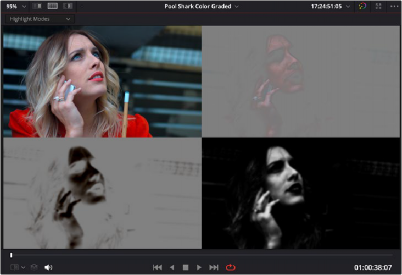
Viewing a key using the Split Screen > Highlight Modes
— Neighbor Clips: Shows four clips that immediately surround the current clip. The previous two clips appear as the upper left- and right-hand clips, the current clip appears at the lower left- hand corner, and the next clip appears at the lower right. Double-clicking a frame does nothing in this mode. The “Neighboring Clips in Split Screen” parameter in the Color panel of the User Preferences lets you customize how many neighboring clips appear in this mode.
— Playheads: Shows simultaneous comparisons in the Color page Viewer of up to four playheads displayed in the Mini-timeline when you choose multiple playheads from the Color > Active Playhead submenu. For every playhead you expose (up to 4), the frame at each playhead will be displayed in a 2-up, 3-up, or 4-up grid. An outline in the Viewer (if enabled) shows which playhead is currently active. This is useful both for comparing multiple clips, as well as for comparing different frames within the same clip. Switching between the active playheads can be done by clicking on the clips in the split screen Viewer
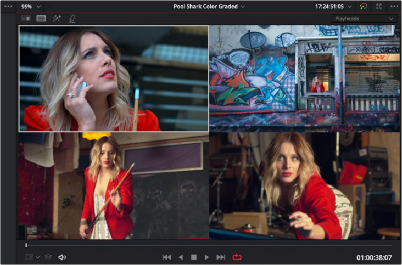
Placing three playheads in the Mini-timeline
— Selected Album: When you choose this option, a split screen of the grades of every still in that album are shown in the Viewer as they appear applied to the current clip. Double-clicking a frame applies that gallery grade to the current clip. Up to 16 grades will be shown.
— Selected Clips: Shows all currently selected clips in the Timeline, up to 16 at one time. Clicking a clip moves the playhead to the first frame of that clip.
![]()
— Selected LUTs: Lets you simultaneously display previews of different LUTs effect on the current clip as a split screen in the Viewer by using the LUTs browser to Command-click up to 16 LUTs you want to preview.
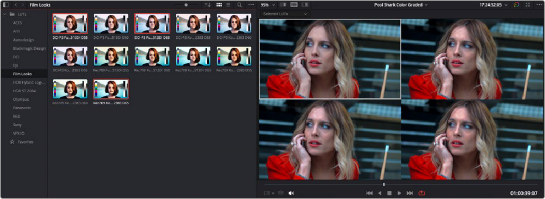
The Selected LUTs split screen option lets you preview a bunch of LUT looks at once