< Previous | Contents | Next >
— Commands for viewing clip details, editing Clip Attributes, and finding clips in the Media Pool
— A command for updating clip thumbnails that are slow to update on their own
These capabilities are described in more detail in the other chapters of this manual, but it’s important to know that artists working on the Color page have many clip management options available to them, without needing to go to other pages.
Sorting and Filtering Clips in the Thumbnail Timeline
By default, the Thumbnail Timeline displays every clip of the currently selected edit in the Edit page, sorted in A mode (the record order of your edit). However, the sort order and contents of the Timeline can be changed and filtered to make it easier for you to find specific groups of clips for grading.
Changing Timelines
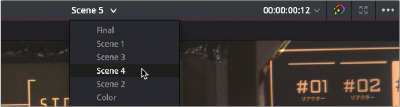
If you’re working on a project that has more than one timeline, you can switch timelines right from within the Color page.
— Choose another timeline from the Timelines drop-down menu at the top of the Viewer.
Timeline selection at the top center of the Viewer
![]()
— Press the MODES button above the fourth trackball on the Center panel, then press the SWITCH TIMELINE soft key. Press MODES to return to the main page of controls when you’re done.
A and C Mode Sorting
By default, the Timeline is set to Record mode sorting, otherwise known as A mode sorting. In this mode, clips appear in the Timeline according to the order in which they were edited. This lets you see the order of clips as they’ll appear in the final program.

A Mode sorting, i.e., record order
However, you can change the sort order of the clips in the Timeline to Source mode, or C mode sorting. In C mode sorting, all clips are rearranged in ascending order from left to right according to their source timecode, and their record timecode is temporarily ignored.

C Mode sorting, i.e., source clip order
Sorting by C mode makes it easy to identify a range of similar clips. For example, if you’re working on a narrative project, clips from each angle of coverage in the scene will naturally cluster together. In another example, sorting by C mode in a documentary will arrange all of a particular subject’s head
shots from a specific interview contiguously, one after another, since they all come from the same range of timecode on the same source tape. In both examples, the close proximity of similar clips to one another that C mode creates makes it easy to copy grades among them, ripple changes, or group them.
When you’re finished, you can switch the Timeline back to A sort mode, and all of the clips will go back to being arranged in the order in which they were edited.
— Choose an option from the View > Timeline Thumbnail Mode submenu.
— Press Command-Page Down to toggle to C mode sorting.
— Press A/C MODE on the T-bar panel of the DaVinci control panel.
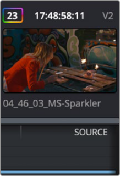
— While in C mode, the word “SOURCE” appears at the right in the Timeline Ruler of the Mini-Timeline.
![]()
Source mode indicated at the right of the Timeline ruler
A checkbox in the Conform Options group in the General Options panel of the Project Settings lets you change the behavior of C mode sorting. Opening the Settings window and clicking the General Options panel of the Project Settings reveals the Sort Timeline Using Reel Name and Timecode checkbox.

General Options panel of the Project Settings