< Previous | Contents | Next >
Additionally, the Luma (Y) Lift/Gamma/Gain sliders allow easy Y-only adjustments to contrast, where an increase in contrast results in perceptually diminished color saturation. These correspond to the three knobs arranged vertically to the left of the Trackball panel of the DaVinci Advanced control panel, or the three left-most knobs of the DaVinci Micro or Mini control panels.
Making Y-only adjustments to contrast is a great way to increase contrast when you’re going for muted saturation or a gritty look. This kind of adjustment is also useful in situations where you’re trying to increase shadow density without increasing image colorfulness.
Log Wheels Mode
The Shadow/Midtone/Highlight color balance and Master Wheel controls operate independently of the Lift/Gamma/Gain color balance and Master Wheel controls found in the Primaries mode. While the Log mode uses the same types of controls as the Primaries mode, the way each control affects the image is very different.
— Choose an option from the mode drop-down, click the right mode button, or press Option-Z.
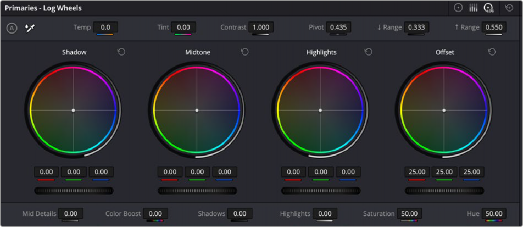
![]()
Log color balance controls, with behavior that is very different from the Wheels mode color balance controls
There are two ways of using the Log mode controls. The first takes advantage of the way these controls work to make fast, filmic adjustments to log-encoded media prior to it being normalized or “de-logged” by operations that are performed using nodes appearing after it in the image processing pipeline of your node tree. Normalizing or de-logging the image can be done via Color Space Transform operations, LUTs, and manual adjustments if you’re grading using DaVinci YRGB color science. If you’re using color management, they can be done via the Output Color Space setting of Resolve Color Management (RCM), or via the ACES Output Device Transform (ODT).
The other way of using the Log controls is to take advantage of the more restrictive, but adjustable tonal range of the Shadow/Midtone/Highlight controls to stylize normalized clips by tinting or adjusting the contrast of tonally-specific regions of the image.

Whether or Not to Use Legacy Log Grading Ranges and Curve
DaVinci Resolve 12.5 introduced a modification to the Log grading controls that provides smoother, more pleasing results using the same controls. To maintain backward compatibility with older projects, a “Use legacy Log grading ranges and curve” checkbox in the General Options panel of the Project Settings lets you switch your project between the older Log control behavior and the newer one. Older projects that are opened in DaVinci Resolve have this checkbox turned on by default, while new projects have this turned off by default.