
< Previous | Contents | Next >
Generally speaking, if you’re using the HDR palette to do primary grading, you’ll probably want to begin with the Global controls. By default, these are found at the right of the Controls panel.
The graphical Global control cluster at the right of the HDR palette
These controls let you take the initial step of making an overall adjustment to the image. To adjust color, you have a color balance wheel, temp and tint sliders (to the left and right of the wheel, and also numerically below), and saturation adjustments. To adjust image contrast, a Global Exposure control lets you stretch overall image contrast up to brighten the image, or compress it down to darken it, relative to the current Black Offset level, which pins pixels corresponding to minimum black in place. A pair of Contrast/Pivot controls at the bottom of this palette let you manipulate overall color contrast by stretching highlights and shadows out or in relative to the pivot point, expressed in stops.
While Global color adjustments are somewhat similar to the offset, temp, and tint controls found in the Color Wheels or Log Wheels controls, there are important differences, described in detail below. The Global Exposure control, on the other hand, operates very differently from Master Offset.
![]()
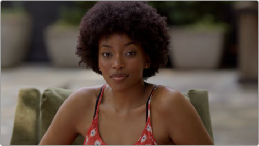
— Global Color Balance: A color balance control lets you simultaneously adjust the red, green, and blue channels, somewhat linearly throughout the tonal range of the image, to freely rebalance the color. However, RCMv2 automatically maintains a smooth saturation and exposure rolloff
in the maximum highlights and minimum shadows, so this effect becomes less pronounced in the blackest blacks and the whitest whites of the image (this appears more pronounced in test gradients than real world images). While adjustments made with this control won’t lower the value of the darkest pixels in the image below the Black Offset level, individual color channels may dip below this level in order to preserve colorfulness in darker shadows. The resulting color
adjustments made with this control are similar to how optical color filters placed over a lens would affect an image.
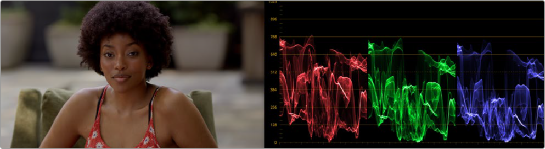
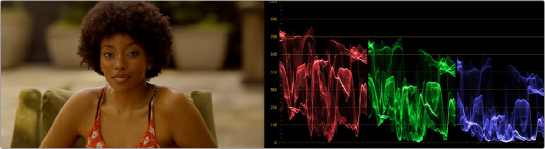
(Top) The original image, (Bottom) A Global Color Balance adjustment affecting the overall image, with a rolloff seen in the shadows and highlights of the superimposed ramp gradient
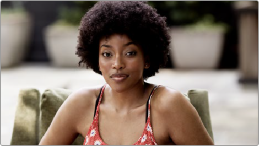
— Global Exposure: Brightens or darkens the entire image. Dragging to the right stretches image contrast by raising the highlights while keeping the shadows pinned relative to the Black Offset value. Dragging to the left lowers image contrast by lowering the highlights while keeping shadows pinned relative to the Black Offset value. For more explanation about the function of Black Offset, see the following section.
![]()
Keep in mind that all contrast adjustments in the HDR palette keep saturation constant as contrast increases or decreases. This means that, when making large contrast adjustments to HDR images, image saturation will remain perceptually the same.
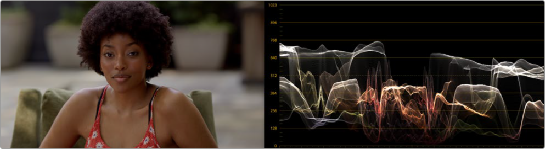
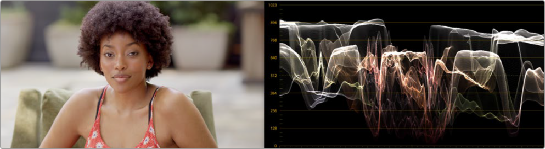
(Top) The original image, (Bottom) Raising Global Exposure
— Global Saturation: Raises or lowers the intensity of color throughout the image. Since contrast adjustments don’t affect saturation, you must exercise manual control over any desired changes to image saturation.
— Global Color Balance Value Fields: Two numeric values represent how the color balance controls center handle position is represented. There are two ways of numerically showing this: as X and
Y, or as Angle and Strength. You can choose either method from the HDR palette’s Option menu; whichever method you choose determines how the center handle of all color balance controls is manipulated if you adjust these values directly.
At the bottom of the HDR palette, additional Global Temp and Tint, Hue, Midtone Detail, and Contrast/ Pivot controls let you make other kinds of global adjustments to image color, detail, and contrast,
in ways that are very similar to the identically named controls in the Color Wheels or Log Wheels controls. Additionally, there’s a Black Offset control that lets you set the minimum allowable black level in the current shot.
![]()
Global controls found at the bottom of the HDR palette
— Temp: This global temp adjustment lets you warm or cool the image with a range from -4000 to +4000 based on a kelvin scale. Adjustment follows the spectral locus line in the CIE graph: the intensity of adjustment is naturalistic. To minimize visual artifacts, this control is capable of warming the image more aggressively than cooling it.
— Tint: This global tint adjustment lets you add “plus green” or “minus green” adjustments with a range from -100 to +100 on an arbitrary scale.
— Hue: Rotates all hues of the image around the full perimeter of the color wheel. The default setting of 50 shows the original distribution of hues. Raising or lowering this value rotates all hues forward or backward along the hue distribution as seen on a color wheel.
![]()
— Midtone Detail: When this parameter is raised, the contrast of regions of the image with high edge detail is raised to increase the perception of image sharpness. The effect is sometimes referred to as definition. When this parameter is lowered to a negative value, regions of the image with low amounts of detail are softened, while areas of high detail are left alone. 0 is unity. The range is –100 through +100.
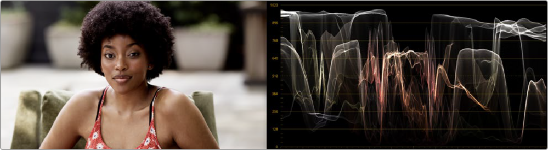
— Contrast: This one parameter lets you increase or reduce the distance between the darkest and lightest values of an image, raising or lowering image contrast. The effect is similar to using the Lift and Gain master controls to make simultaneous opposing adjustments. Bright and dark parts of the image are pushed apart or brought together about a center point defined by the Pivot parameter. Unlike the Contrast control in the Primaries palette, the Contrast control in the HDR palette ignores the “Use S-curve for contrast” setting in the General Options panel of the Project Settings.
Keep in mind that all contrast adjustments in the HDR palette keep saturation constant as contrast increases or decreases. This means that, even when making large contrast adjustments to HDR images, image saturation will remain perceptually the same to your eye, with small changes made to the actual saturation of the image in order to maintain this perception. Be aware that the tone mapping settings in RCMv2 will have an effect on how much saturation is maintained in the top highlights and bottom shadows of the image, versus being automatically rolled off at the outer boundaries of the signal.
(Left) The original image, (Right) Raising Contrast, saturation is kept perceptually constant, except at the outer boundaries of the signal in the top highlights and bottom shadows (depending on how you have your tone mapping set in RCM).
— Pivot: Changes the center of tonality about which dark and bright parts of the image are stretched or narrowed during a contrast adjustment. This lets you change how contrast is distributed among the shadows and highlights. The default value of 0 pushes highlights above 50% gray higher, and shadows below 50% gray lower, in equal proportion to one another. Changing the pivot point changes the percentage of image tonality about which contrast is either expanded or compressed.
Darker images may require a lower Pivot value to push more levels up and avoid crushing the shadows too much when stretching image contrast, while lighter images may benefit from a higher Pivot value to push levels down and increase shadow density.

![]()
(Top) Altering contrast by raising Pivot, which redistributes most of the contrast expansion down towards shadows, (Bottom) Altering contrast by lowering Pivot, which redistributes most of the contrast expansion up towards the highlights
— Black Offset: Defines the darkest allowable part of the image. No adjustment by any other control in the HDR palette will ever go below this level, except for the occasional color channel if the shadows become extremely saturated. For more detailed information on this extremely important control, see the very next section.