
< Previous | Contents | Next >
Of all the Global controls, the Black Offset control is one of the most deceptively important. Black Offset lets you define the darkest pixels of the image. Adjustments made to Black Offset do not offset the entire signal, they only affect the very darkest portion of the signal, letting you raise or lower
the black point of the image while smoothly blending the resulting adjustment into the unadjusted portion of the image. The result is that you can compress or expand the bottom of your signal.
If you raise Black Offset, you can add “flaring” to the image, similarly to how light flaring within a lens might lighten the darkest part of the image.
(Left) The original image, (Right) Raising Black Offset in order to add flaring to the darkest pixels of the image
Alternately, you can lower Black Offset to lower the very darkest pixels in the image. If the source image is dark enough, this control can lower the darkest pixels below 0, however this image detail is preserved in the color image processing pipeline
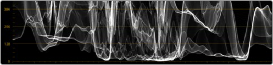
The most important thing to understand about this control is that level to which you set Black Offset becomes the new level at which Global exposure adjustments are made. In the following example, the first image shows the original color of a clip that was exposed to be dark. In the second image, Black Offset is adjusted to raise the darkest parts of the image, compressing them relative to the midtones and introducing a pleasing flaring effect to the shadows.


![]()
(Left) The original image; (Right) The image with Black Offset raised
In the following image, Global Exposure is raised, and you can see in the Waveform scope that the exposure change stretches the contrast of the image up, with the darkest pixels “locked” to the Black Offset you set.
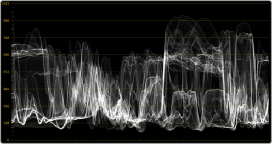

(Left) Before, (Right) After raising Global Exposure to stretch image contrast out from the Black Offset level; notice that the bottom of the signal continues “touching” the same level after global exposure is raised.