
< Previous | Contents | Next >
The Curves palette, selectable via one of the toolbar buttons above the Center Palette panel of the Color page, has six modes that provide different curve-based methods of manipulating the color and contrast of an image. Each curve lets you adjust a customizable region of the image based either on image tonality (zones of lightness or darkness), hue (specific colors), or saturation (intensity of color). All curves can be adjusted using either the pointer, or knobs on the DaVinci Resolve Mini or Advanced control panel.
TIP: All curves in DaVinci Resolve can be used to affect the overall image, or limited to affect only a specific portion of the image as a part of a secondary operation using qualifiers, windows, imported mattes, or any combination of the three.
TIP: All curves in DaVinci Resolve can be used to affect the overall image, or limited to affect only a specific portion of the image as a part of a secondary operation using qualifiers, windows, imported mattes, or any combination of the three.
TIP: All curves in DaVinci Resolve can be used to affect the overall image, or limited to affect only a specific portion of the image as a part of a secondary operation using qualifiers, windows, imported mattes, or any combination of the three.
The Curves palette is color-space-aware when you’re using Resolve Color Management (RCM) or ACES. What this means is that the overall range of each curve better fits the overall data range of the current clip no matter what Timeline Color Space you’re using, for both SDR and HDR mastering. This makes curves adjustments easier, more specific, and a more consistent experience, no matter what your workflow happens to be.
Adjusting Curves Using the Mouse
All Color curves in DaVinci Resolve use the following controls for basic on-screen adjustment using the pointer, controlled either with your mouse, pen, or other input device of choice.
— To add a control point: Click anywhere on a curve. A control point is added at the position of the mouse where you clicked, and the curve is altered, if necessary, to match the new control point’s position.
— To add a control point without altering the curve: Hold the Shift key down, and click anywhere on or around a curve. A control point is added to the curve at the position of the pointer where you clicked, but the curve is not altered.
![]()
— To snap a control point to the neutral diagonal of the curve: (Custom curve only) Hold the Option key down while dragging any control point on the curve. A diagonal line appears indicating the neutral state of the image, and the control point will snap to it. When you release the Option key and then press the Option key again after releasing, the diagonal guide line disappears.
Snapping a curve’s control point back to its neutral position by holding down the Option key
— To remove a control point: Right-click any control point to make it disappear.
— To reset a single color channel curve to a completely neutral setting: Click the reset button to the right of that color channel’s intensity slider.
— To reset all color channel curves: Click the Reset Custom Curve button at the upper right-hand corner of the Curves palette.
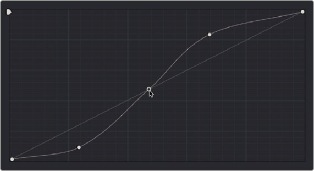
By default, a control point influences the portion of each curve that falls between its neighboring two control points.
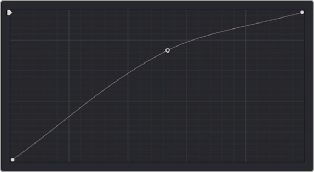
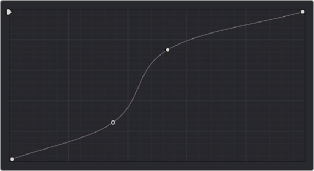
Control point adjustments affect the entire portion of a curve between adjacent control points.
In the top screenshot, you can see that the control point at the position of the pointer is affecting the larger part of the curve that falls between the lower left-hand control point (which is there by default), and a user-created control point placed up within the highlights of the curve.
![]()
In the bottom screenshot, an additional control point to the left of the one being adjusted limits the area of the curve that is adjusted. By careful placement of additional control points, you can make extremely targeted adjustments to images using the Custom curves.

NOTE: The HSL curves also have an optional adjustment mode using Bezier curves that will be covered in those sections.
NOTE: The HSL curves also have an optional adjustment mode using Bezier curves that will be covered in those sections.
NOTE: The HSL curves also have an optional adjustment mode using Bezier curves that will be covered in those sections.
This example highlights the importance of using control points to “lock off” portions of a curve at a neutral or nearly neutral position to prevent changes to specific portions of an image, even while using other control points to make changes.