
< Previous | Contents | Next >
8 The three most common methods of key refinement using the Matte Finesse controls are to increase Clean Black to fill in “holes” in the parts of the image you’re omitting (the background), increase Clean White to close holes in the part of the image you’re isolating (the foreground), and then use Blur Radius and In/Out Ratio controls to blur the edge of the key and push it in and out. Using these controls, you can vastly improve nearly any key without the need to endlessly readjust the Qualifier controls.
More information about using the Matte Finesse controls appears later in this chapter.
9 When you’re finished, click the Highlight control to turn the highlight off, and make whatever adjustment you need. In this example, the orange of the helicopter will be adjusted using the Hue control to make it blue instead.
Adjusting the orange color of the helicopter to be blue instead
![]()
Basic Qualification Using the HSL Qualifier
The HSL qualifier is one of the most flexible tools in DaVinci Resolve. Using any combination of sampled hue, saturation, and luma, you can isolate different ranges of color and contrast for specific adjustment. HSL is a general-purpose keyer, meaning you can key any color you like; it’s not restricted to blue or green.
The most straightforward way to use any qualifier is to sample the image in the Viewer. A set of four controls let you sample pixels within the image in different ways. When you sample one or more pixels, the Hue, Saturation, and Luma values are analyzed, and set different ranges in each of the Hue, Saturation, and Luma qualifier controls. There are a number of different eyedropper controls available to control how you sample color in the image.

— Sample Eyedropper: The first control you use whenever sampling the image. It defines the initial range of the qualification; you must use this tool before any of the others. Clicking once with this tool selects a single pixel value, while clicking and dragging selects a range of image values that add together.
Color Picker button

— Add/Subtract Color Range: These two controls let you add areas of the image to, or subtract them from, the currently selected inner range of values that define the core of the key. As with the eyedropper, you can click on single pixels, or drag over a range of color.
Add and Subtract color buttons

— Add/Subtract Softness: These two controls let you redefine the softness that transitions from the inner range of the key, falling off towards the outer edge of the key. Just like the other controls, you can click on single pixels, or drag over a range of color.
Add and Subtract qualifier softness

NOTE: When you select one of the sampling controls, it remains selected until you select another sampling control. If you select another clip in the Timeline, then click in the Viewer to sample a key and nothing happens, make sure that you select the Eyedropper control in the Qualifier palette.
NOTE: When you select one of the sampling controls, it remains selected until you select another sampling control. If you select another clip in the Timeline, then click in the Viewer to sample a key and nothing happens, make sure that you select the Eyedropper control in the Qualifier palette.
NOTE: When you select one of the sampling controls, it remains selected until you select another sampling control. If you select another clip in the Timeline, then click in the Viewer to sample a key and nothing happens, make sure that you select the Eyedropper control in the Qualifier palette.
![]()
If you’re working with the DaVinci Resolve onscreen interface, the easiest way to qualify a subject is to use the pointer in conjunction with the sampling controls.
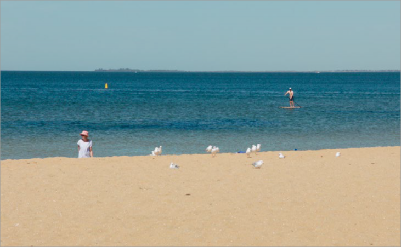
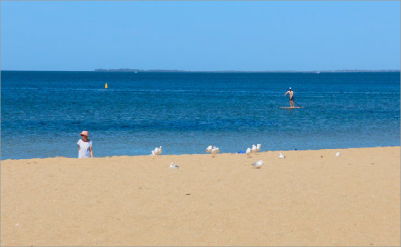
Example image to qualify
1 Open the Qualifier palette, choose HSL from the mode drop-down, and click the eyedropper.
2 Either click a pixel of the part of the image you want to isolate, or click and drag across a range of pixels within that subject.
Picking to qualify the ocean
3 To see the key you’re creating as you work, click the Highlight button in the Viewer Options toolbar at the top of the Viewer.
By default, the area of the image you’re isolating appears in color, while the area of the image being excluded appears solid gray.
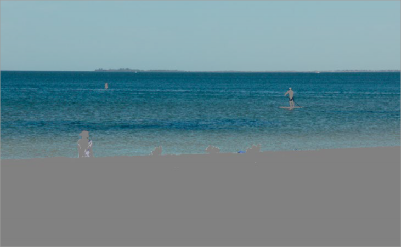
Viewer image with highlight turned on, isolated region appears in color, omitted region appears gray
![]()
Even though the highlight obscures the rest of the image, this doesn’t prevent you from using the sampling tools to select pixels you can’t see.
4 To subtract from the inner range of the key you’re creating, click the minus Color Range control, and click or drag across the portion of the keyed image that you’d like to exclude.
5 To add softness to the outer range of the key you’re creating, click the plus Softness control and then click or drag across the portion of the image you’d like to include as a soft edge.
Once you’ve finished using the range and softness sampling controls to refine the key you’re using to isolate the subject, nearly every key you pull will benefit from some further “post-key” refinement. What this means is that, once you’ve created the best key you can procedurally through sampling the image, you can now adjust the resulting key itself, which is just a grayscale image, to improve the isolated result. This is what the Matte Finesse controls are for.
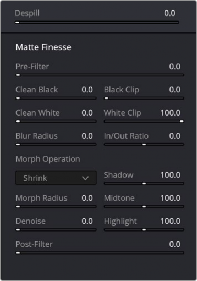
Matte Finesse controls
6 The three most common methods of key refinement using the Matte Finesse controls are to increase Clean Black to fill in “holes” in the parts of the image you’re omitting (the background), increase Clean White to close holes in the part of the image you’re isolating (the foreground), and then use Blur Radius and In/Out Ratio controls to blur the edge of the key and push it in and out. Using these controls, you can vastly improve nearly any key without the need to endlessly readjust the Qualifier controls.
More information about using the Matte Finesse controls appears later in this chapter.
7 When you’re finished, click the Highlight control to turn the highlight off, and make whatever adjustment you need. In this example, the saturation has been raised and the color balance changed to make the adjustment obvious.
![]()
Altered color balance of the ocean and sky