< Previous | Contents | Next >
![]()
![]()
greatest strength, the speed with which you can sample areas of the picture to include (or exclude) from the final key, is also occasionally a weakness with images where your initial samples aren’t giving you satisfactory results, because there aren’t many ways to fine tune the key as it’s being generated (although you can manipulate the result). On the other hand, for most images you would want to qualify, two or three samples is all you need, in conjunction with using the Matte Finesse controls to adjust the resulting key. If you need to do some compositing in the Color page, the 3D keyer also does an excellent job doing blue and green screen keying to create transparency, and has a built-in Despill control as well.
The following two sections provide an overview of how to use the 3D and HSL keyer modes in DaVinci Resolve.
![]()
Basic Qualification Using the 3D Qualifier
The 3D Qualifier mode offers a fast, simple way of pulling a key to isolate a range of color in the image, by drawing lines over the parts of the image you want to key. Each line you draw over the image adds to or subtracts from the cloud of values you’re carving out of a three-dimensional representation of all available colors; you don’t see this representation, but this “under the hood” functionality is what gives the 3D keyer its name.
The 3D keyer is a general-purpose keyer, letting you isolate any color you like. However, the 3D keyer is not good at pulling luma-only keys. If you’re looking to isolate a range of luma values in the image, you should use the LUM mode.
1 Open the Qualifier palette, choose the 3D icon in the upper right and click the eyedropper.
2 Click and drag across the part of the image you want to isolate to draw a line. Lines that add to the key are colored blue.
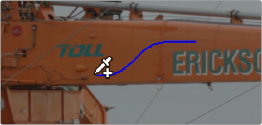
Drawing a line to create a key using the 3D qualifier
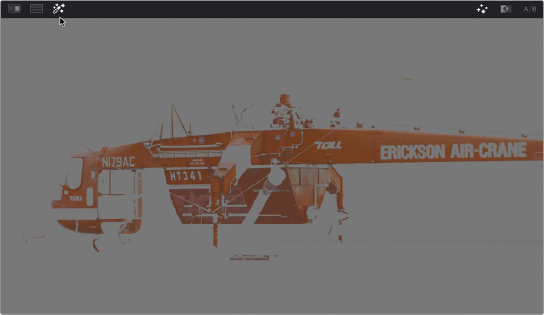
3 To see the key you’re creating as you work, click the Highlight button in the Viewer Options toolbar at the top of the Viewer. As you draw the line, the viewer will update to show your current key in real time.
![]()
Viewing the key using the Highlight button
4 If necessary, draw additional lines to add more of the image to the key you’re creating. Ordinarily, it’s a good idea to not to draw more then two or three lines to sample the part of the image you’re trying to isolate. A few long strokes are better than several short ones. Ideally, you want the key you’re pulling to have a somewhat soft edge, which makes it easier to use the Matte Finesse controls to fine-tune your result later on. If you draw too many lines to sample the image, the result can be a key with hard, jagged edges that can sometimes be more difficult to adjust later on.


A hard-edged key created with three samples
5 Alternately, if there are parts of the image that are included in the key that you want to omit, hold the Option key down and draw a line over these areas. You can see that Option-drawn lines are red, and these subtract areas from the key you’re creating. Again, try not to overdo drawing subtractive red lines, as you can end up with an overly hard-edged key that’s difficult to adjust using other controls in the next few steps. 7Additionally, you can still use power windows in conjunction with the 3D qualifier to exclude specific parts of the image.

Blue lines add to the key and a red line subtracts the grass from the key, as seen with the highlight turned off
![]()
6 If you find yourself wondering whether a particular sample in the list at left is doing any good, you can click the color patch at the left of any entry in the list to toggle that sample off and on. If you decide you don’t need a particular sample, click the trash can button at the right to delete it.
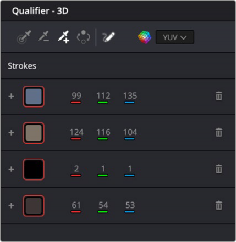
Controls for toggling samples off and on, and deleting them from the list
7 When you’re satisfied that the key is good enough to start fine-tuning, stop drawing lines. It’s all right if there’s a bit of noise, speckling, or if there are small holes in the key you’re creating, because you can take care of these using the Matte Finesse controls.

A sampled key that’s ready for further refinement
![]()
Nearly every key you pull will benefit from some further “post-key” refinement. What this means is that, once you’ve created the best key you can procedurally through sampling the image, you can now adjust the resulting key itself, which is just a gray-scale image, to improve the isolated result. This is what the Matte Finesse controls are for.
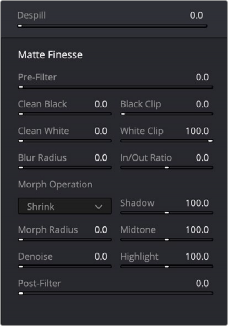
Matte Finesse controls