< Previous | Contents | Next >
— Blue Low Soft/High Soft: Two parameters let you define the upper and lower softness falling off outside the current range of blue.
— Green Low/High: Two parameters let you define the upper and lower range of the Green channel being isolated.
— Green Low Soft/High Soft: Two parameters let you define the upper and lower softness falling off outside the current range of green.
Luma Qualification Controls
The Luma Qualifier mode simply pulls a key from the Luma channel all by itself. It’s identical to the HSL qualifier with H and S turned off. This single-component keyer is more useful than you might think; it’s a common technique to isolate a range of highlights, midtones, or shadows throughout the image to alter the color temperature selectively.
The Luma Keyer mode automatically disables the Hue and Saturation controls
Also, keep in mind that the luma component is the sharpest keyable component when you’re working with heavily compressed video. Keys that are noisy or chunky with HSL qualification may be sharper if you just use the Luma Qualifier, although you won’t be able to be chromatically specific.
The Luma Qualifier has four parameters:

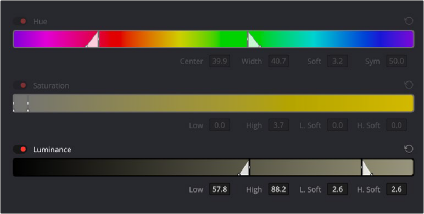
— Lum Low/High: Two parameters let you define the upper and lower range of the luma component being isolated.
— Lum Low Soft/High Soft: Two parameters let you define the upper and lower softness falling off outside the current range of luma.
3D Qualifier Controls
As discussed earlier in this chapter, the 3D Qualifier works much differently than the other qualifiers in DaVinci Resolve. In this mode, drawing lines over parts of the image you want to isolate adds samples to the Sample list, some of which add to the key (when you drag with the pointer) and some of which subtract from the key (when you Option-drag with the pointer). While this functionality is very simple to use, there are other controls that are available.

The 3D Qualifier mode
The 3D Stroke Pickers:

Picker: Chooses the initial color to qualify. Longer strokes will tend to give you a better key.

Picker -: Removes a color region from the qualifier; also available by holding down the Option key.

Picker +: Choses an additional color region to add to the initial qualifier.

Invert: Inverts the current key; qualified areas are then unqualified and vice versa.

Show Paths: A checkbox that lets you turn the visibility of the lines you’re drawing to sample the image on and off. Turning lines off does not affect the key in any way.

Auto-B/W Highlight: With this checkbox enabled, the viewer automatically switches to Highlight B/W mode while drawing a line, to better show you the resulting key in real time. When the button is released the viewer will switch back to its original viewing mode.


Colorspace: A drop-down menu that lets you choose whether you’re sampling colors in YUV colorspace, or HSL, HSP, or LAB colorspaces. YUV is the default, but if you find you’re not getting satisfactory results, you can reset the Qualifier palette and switch to different ones to see if that works any better.

Strokes list: A list shows each line you drew as a sampled entry. A color patch at the left shows you the average color you sampled; clicking the color patch lets you temporarily turn any color sample off to evaluate its contribution to the overall key. A plus or minus icon shows you whether that patch is adding to or subtracting from the key. The average red, green, and blue color values are shown next, and a trash can icon at the right lets you delete any sample from the list.
The 3D Qualifier Modes:

Soft: Provides a softer edge to the key that is more forgiving of Chroma and Luma adjustments. The more gentle drop-off is suitable for situations like subtle light changes across a face. Use the Shadow / Midtone / Highlight Matte Finesse Controls in conjunction with this mode to fine tune the result.

Flat: The default mode. Each color selected is 100% keyed, and adjustments are made for small color variations. This is the ideal mode for chroma keying a green or blue screen.
Additionally, turning up the Pre-Filter setting in the Matte Finesse controls can make for a smoother, flatter key.

Tight: Only keys the exact color picked, and does not apply any softening based on color ranges. You chose that exact color, and only that exact color. Single pixel sharpness levels are expected. This can be used for difficult keying jobs, requiring adjusting the filter and softness manually in the Matte Finesse Controls.

Luma: Functions similar to the Tight setting but ignores all chroma data. This mode is used for black and white footage.

Despill: If you’re using the 3D qualifier to pull a blue or green screen key to create transparency, this slider lets you adjust an automatic color correction that eliminates blue or green spill from the image, while retaining the image’s original color.
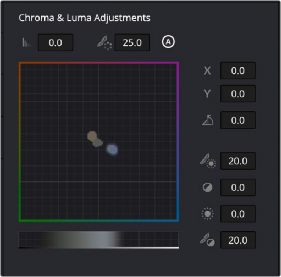

The 3D Qualifier Chroma and Luma Adjustments showing the colors selected in the Strokes List.
The Chroma and Luma adjustment section is dominated by the Color Space box and the Brightness Range. The Color Space box is laid out roughly in the same manner as the Color Wheels, with primary colors laid out around its edge. The exact colors and layout is determined by the Color Space that you choose in the 3D Qualifier. The Brightness Range is represented as a bar underneath the Color
Space, with left being black and right being white. Inside the Color Space and Brightness Range lie the individual colors that you chose with the pickers in the Strokes List. The tools around the periphery adjust the colors within the box in various ways, allowing you to visualize changes to the key.
The 3D Qualifier Chroma & Luma Adjustments:

Chroma Tolerance: Click and drag left and right to expand or contract the range of colors selected by the key.

Chroma Softness: Click and drag left and right to change the sensitivity to similar colors selected by the key. This determines whether the key is a hard cutoff or a soft selection of similar colors.

Adaptive Chroma Softness: Activating this icon allows the keyer to operate consistently in both highly saturated and desaturated regions of the image at the same time. The majority of the time you will want to leave this on. The exception is If you are having difficulty in manually adjusting chroma softness in Soft or Flat mode, then turning Adaptive Chroma Softness off will give you more range to work with. Adaptive Chroma Softness is automatically disabled in Tight and Luma modes, as it is contrary to the functionality of these modes.

X: Moves your selected color region within the color space, changing its chroma based on its horizontal position.

Y: Moves your selected color region within the color space, changing its chroma based on its vertical position.

Angle: Moves your selected color region within the color space, changing its chroma based on its rotation around the central origin point.
 Low: Expands or contracts the dark areas of the key in the brightness range.
 High: Expands or contracts the bright areas of the key in the brightness range.

Low Soft: Controls how well defined the low end of the brightness range is. This determines whether the key is a hard cutoff or a soft selection of similar brightness levels.


High Soft: Controls how well defined the high end of the brightness range is. This determines whether the key is a hard cutoff or a soft selection of similar brightness levels.
< Previous | Contents | Next >