< Previous | Contents | Next >
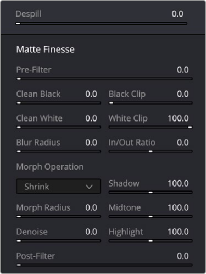
After you’ve used the sample controls and qualifier parameters to create the most useful key for your purposes, you may find that it has problems that cannot be overcome easily by the available adjustments. Issues such as chattery edges, holes, or noisy bits can sometimes be easily fixed using the Matte Finesse controls. These controls filter the output of the Qualifier controls and are
adjustments that are made to the matte itself, so they may work well in some instances, and poorly in others, depending on what you’re trying to do.
The Matte Finesse controls
Pre-FIlter
This slider attempts to clean up the image before colors are sampled. This adjustment can be useful when you have footage containing MPEG blocking artifacts.
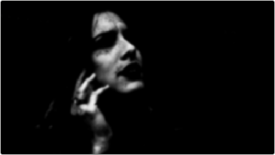
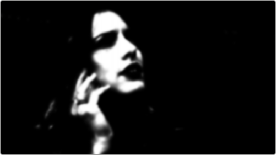
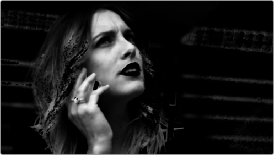
Clean Black
Clean Black is a specialized operation that eliminates noise (seen as white speckling when viewing a high-contrast highlight) in the black area of a key that omits the regions of the image you don’t
![]()
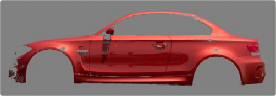
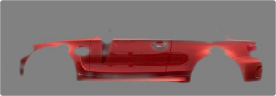
want to isolate, and shrinks the key by making the dark parts of a key darker the higher you raise this parameter, pushing dark gray areas of the key toward black. The practical result is that raising Clean Black lets you “fill holes” in the background portion of a key and erode translucent edges.


Before/after raising Clean Black, viewing the high contrast matte
Black Clip
Raising Black Clip applies a “lift” adjustment such that translucent areas of the matte (gray areas when viewing a high-contrast highlight) are pushed towards black. The range is 0 to 100, with 0 being the default setting.


Before/after raising Black Clip
Clean White
Clean White is another specialized operation that eliminates noise (seen as black speckling when viewing a high-contrast highlight) in the white portion of a key that include areas of the image you’re isolating, and expands the key by making light parts of a key lighter the higher you raise this parameter, pushing light gray areas of the key toward white. The practical result is that raising Clean White lets you “fill holes” in the foreground portion of a key and grow translucent edges.
Before/after raising Clean White, viewing the high contrast matte
White Clip
![]()
Lowering White Clip applies a “gain” adjustment such that translucent areas of the matte (gray areas when viewing a high-contrast highlight) are pushed towards white. The range is 0 to 100, with 100 being the default setting.

Before/after lowering White Clip
Blur Radius

TIP: If haloing is a problem, you can try adjusting the In/Out Ratio parameter, or you may want to consider using the Qualifier Softness parameters to feather the edges of the key, instead.
TIP: If haloing is a problem, you can try adjusting the In/Out Ratio parameter, or you may want to consider using the Qualifier Softness parameters to feather the edges of the key, instead.
TIP: If haloing is a problem, you can try adjusting the In/Out Ratio parameter, or you may want to consider using the Qualifier Softness parameters to feather the edges of the key, instead.
In small amounts, blurring a key does well to take the edge off problem edges. However, blurring a key can also feather the edges of a key past the border of the subject you’re keying, with the result being a visible “halo” around your subject depending on the adjustment you’re making. The range is 0 to 2000, with 0 being the default. With such a large maximum blur radius, combined with the capabilities that the In/Out Ratio provides in customizing the direction of spread, you can turn some pretty precarious mattes into surprisingly smooth and useful results.

Using the Blur parameters to soften the edges of a key
In/Out Ratio
Controls whether the “Blur Radius” is applied equally to the inside and outside of the edge of the matte (zero), applied only within the matte (negative values), or applied only outside the matte (positive values). Using In/Out Ratio can help eliminate fringing when using the Blur Radius parameter.

![]()
(Left) In/Out Ratio lowered so blurring ends at the edge of the matte and feathers inward, (Right) In/Out Ratio raised so that blurring starts at the edge of the matte and feathers outward
However, you can also use In/Out Ratio even in situations where no Blur Radius is applied at all. Raising In/Out Ratio will fill in small black holes in the matte, while lowering In/Out Ratio below 0 will eliminate speckling by pushing small white bits of the matte toward black.

(Left) In/Out Ratio controls lowered to expand holes in the matte, (Right) In/Out Ratio controls raised to fill in small black holes in the matte
Morph Operation
Lets you choose how you want to modify the alpha channel/key. You can choose Shrink or Grow to dilate or erode the edges of the matte with great accuracy. Or, you can choose Opening or Closing to plug or expand holes to clean up a ragged matte.
(Left) A matte with small holes in the face, (Right) Mode set to Shrink, Morph Radius set to 3; used to close holes in a matte
Morph Radius
Combined with Morph Operation, this slider adjusts how much to shrink, grow, open, or close the edge’s key.
Denoise
Denoise provides a distinct way to post-process extracted keys to selectively reduce the noise in a key, getting rid of stray areas of qualification and softly filling holes in a matte.


![]()
Before/after raising Denoise, viewing the high contrast matte
Shadow
Adjusts key strength based on the darker parts of the original image.
Midtone
Adjusts key strength based on the midtones of the original image.
Highlight
Adjusts key strength based on the brighter parts of the original image.
Post-Filter
Performs a final clean-up of the key, using the original image for reference, useful for bringing back some fine detail in sharp edges or hair.