< Previous | Contents | Next >
In Frame mode, you can keyframe window transformations to more faithfully conform to troublesome motion as you’re moving one frame at a time through the track; manual changes to a window’s position will be keyframed to create frame-specific transformations, rather than used to offset the entire tracked motion path as in Clip mode. When you add multiple keyframes in the Tracker graph, animation will be automatically interpolated from keyframe to keyframe.
Copying and Pasting Tracking
There will be plenty of times you’ll apply multiple windows to a single moving subject, such as a car, when you can use a single motion track for all the windows. Commands in the Option menu let you copy and paste track data from one window to another within the same node, saving time when you want several windows tracking together as one.
1 Open the Window palette, then select a window that has tracking applied to it (indicated by a tracking badge in the corner of the shape icon), and choose Copy Track Data from the Option pop-up.
2 Select another window, and choose Paste Track Data from the Option pop-up. Once you’ve copied track data from one window, you can paste it to as many other windows as you like.
You can also copy tracking from the FX mode of the Tracker palette and paste it to a window, in case you want to use the same tracking data for both an effect and a window.
1 Open the Tracker palette, choose the FX mode that contains the tracking data you want to copy, and choose Copy Track Data from the Option pop-up.
2 Open the Window palette, select a window, and choose Paste Track Data from the Option pop-up.
Once you’ve copied track data from one window, you can paste it to as many other windows as you like.
![]()
Tracker Palette Controls in More Detail
You can easily combine object tracking and keyframing to animate windows. For example, you’ll typically use object tracking to make a window follow the position and orientation of a moving feature, but you can add dynamic marks to the window track of the correction in the Color page with which to alter its size and shape to better conform to a feature’s changing form.
Controls in the Window Tracker Palette
Occasionally, you’ll run into a shot that doesn’t quite track well enough using the Tracker menu’s simple controls. In these cases, the Viewer page provides the complete set of object tracking controls that can be used to modify tracking operations in different situations.
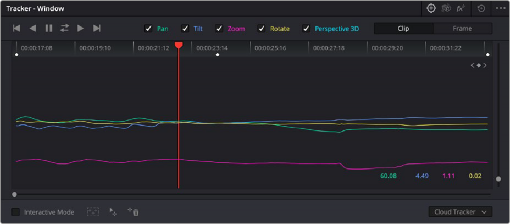
The Tracker palette
The object tracking controls are divided into seven groups.
Tracker Palette Modes
The Tracker palette’s Option drop-down menu lets you choose between Window mode (for matching a window to the motion of a feature in the frame), Stabilizer mode (for subduing unwanted camera motion; for more information on Stabilizer mode, see Chapter 150, “Sizing and Image Stabilization.” ), and FX mode (for tracking position to be used with Resolve FX or Open FX plugins).
Types of Tracking
A pop-up menu below the Tracker graph lets you choose whether to use the Cloud Tracker or the Point Tracker. There are two options:
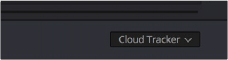
The tracker type pop-up
![]()
— The Cloud Tracker: Automatically analyzes all parts of the image for trackable points, and uses these to automatically figure out the motion in the shot that you want to use to move a Power Window or stabilize a shot. This tracker type is great for quickly tracking a window to match the movement of almost any feature, with a minimum of work.
— The Point Tracker: Lets you create one or more tracker crosshairs that you can manually position in order to track specific features in the shot. The more crosshairs you create and position, the more accurate the track can be. The Point Tracker is incredibly useful in situations where you need to follow the motion of a very specific feature in the frame. It can also be useful in cases where you want to stabilize a shot that has many subjects moving in different directions, and it’s difficult to obtain a good result with the Cloud Tracker.
Object Tracking
The object tracking controls provide the most basic tracking functions, some of which are mirrored within the Color > Tracker menu.
![]()
Choose which type of transform you want to track before tracking
A series of five checkboxes let you turn on and off which transforms you’d like motion tracking to apply automatically to the window. These checkboxes must be selected before you perform a track in order to restrict the transforms that are used.
— Pan and Tilt: Enables tracking of horizontal and vertical position, when you want to transform a window to follow the location of a tracked subject.
— Zoom: Enables tracking of size, when you want to transform a window to resize to follow a tracked subject.
— Rotate: Enables tracking of orientation, when you want to transform a window to rotate with a tracked subject.

NOTE: Once tracking or stabilization has been done, disabling these checkboxes does nothing to alter the result. To make changes, you need to enable or disable the necessary checkboxes first, and then reanalyze the clip.
NOTE: Once tracking or stabilization has been done, disabling these checkboxes does nothing to alter the result. To make changes, you need to enable or disable the necessary checkboxes first, and then reanalyze the clip.
NOTE: Once tracking or stabilization has been done, disabling these checkboxes does nothing to alter the result. To make changes, you need to enable or disable the necessary checkboxes first, and then reanalyze the clip.
— Perspective 3D: Enables tracking of pitch and yaw in 3D space, when you want a window to skew to follow the orientation of a tracked subject within the scene. Good when you want the window to “stick” to a surface.
After you’ve defined the transforms you want to use for the track, the analyze controls let you proceed with the analysis of the subject being tracked.
— Track One Frame Reverse button: Motion tracks a single frame in reverse. Useful for slow tracking of difficult subjects that may require frequent correction.
![]()
— Track Reverse button: Initiates tracking from the current frame backward, ending at the first frame of the clip. Good for tracking backward when your best starting point is somewhere within the middle of the shot.
— Pause button: Stops tracking (if you’re fast enough to click this button before tracking is finished).
— Track Forward button: Initiates tracking from the current frame forward, ending at the last frame of the clip.
— Track Forward and Back button: Initiates tracking from the current frame forward, then when finished, tracks backward from the original selected frame. This allows you a one button process when tracking from the middle of a shot.
— Track One Frame Forward button: Motion tracks a single frame forward. Useful for slow tracking of difficult subjects that may require frequent correction.
Clip/Frame Controls
Two buttons let you set how manual adjustments to the position of tracked windows affect the overall track.
![]()
Selecting clip or frame to apply adjustments
— Clip: The default mode, in which changes you make to the position of a window are globally applied to the entire track. For example, if you track a feature, and then move the window, the window moves along a motion path that’s consistently offset from the original track for the duration of the clip. Use this mode if you’re happy with the track, but you want to modify the window’s overall shape and position relative to the motion path it’s following.
— Frame: In this mode, changes you make to the position or shape of a window create a keyframe at the frame at the position of the playhead. Multiple keyframes are interpolated to create animation with which you can manually transform a window to solve a variety of problems. This mode is useful for rotoscoping the shape and position of windows to match a subject that’s tough to automatically track. Frame mode is also useful for making corrections to individual frames that were badly tracked, for animating windows to go all the way out of frame along with a subject, or for making manual, frame-by-frame adjustments to window position to cover untrackablesections.
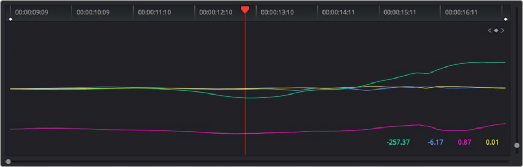
The Tracker Graph
The Tracker graph provides a visual display of the tracking data that’s being analyzed. Each of the transform controls that can be tracked has an individual curve, which lets you evaluate each tracked parameter on its own, and each curve is color-coded to match the corresponding label of the tracking transforms listed above.
![]()
The Tracker graph showing a curve for each transform control
A vertical slider to the right of the Tracker graph lets you scale the height of the curve data within to make it easier to see it all within the graph. A horizontal slider at the bottom of the graph allows you to zoom in and out of the tracker curves, allowing you to see finer detail of the tracking paths. Above the Tracker graph, a Timeline ruler contains a playhead that’s locked to the playheads in the Viewer and Keyframe Editor.
You can draw a bounding box in the Tracker graph with which to select a portion of one or more curves to delete sections of low-quality tracking data using the Clear Selected Keyframes command found in the Tracker Options menu. To eliminate the current bounding box from the Tracker graph, click once anywhere within the graph.
Interactive Mode Controls
The Interactive controls, at the bottom-left of the Tracker palette, let you make manual changes to the automatically generated tracking point cloud that DaVinci Resolve creates when you’re
tracking with the Cloud Tracker, so you can try different ways of obtaining better tracking results in challenging situations.
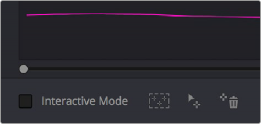
Interactive mode controls
— Interactive Mode checkbox: Turns the Interactive tracking mode on and off. When you enter Interactive mode, you can manually alter the point cloud that DaVinci Resolve uses to track the feature within the current window. You’ll then make your track while in Interactive mode.
— Insert: Lets you add tracking points to whatever trackable features exist within a bounding box that you’ve drawn in the Viewer. Inserted tracking points are automatically placed based on trackable pixels in the image.
— Set Point: Lets you use the cursor (using the DaVinci Resolve Advanced control panel), to manually place individual tracking points, one by one, with which to track a feature. If there is no trackable pixel group at the coordinates where you placed the cursor, a tracking point will be placed at the nearest trackable pixel group.
You must place at least two tracking points at different pixel groups to track rotation, and at least three to track zoom.
— Delete: Eliminates all tracking points within a bounding box that you’ve drawn in the Viewer.
Point Tracker Controls
![]()
If you’re using the Point Tracker, then the Interactive Mode controls disappear, replaced by the two controls of the Point Tracker.
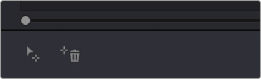
Point Tracker controls
— Add Tracker: Click to create a new tracker that’s automatically positioned in the center of the frame. Once created, you can drag it using the pointer to line up with the feature you want to track. You can create as many trackers as you like. Multiple trackers are all tracked at once.
— Delete Tracker: Select any tracker (selected trackers are red, deselected trackers are blue), and click this button to remove it.