< Previous | Contents | Next >
The Insert button of Interactive mode automatically adds tracking points within the current bounding box.
New tracking points are automatically added to whichever features are appropriate for tracking within the box you’ve drawn.

NOTE: If no appropriate tracking features can be found, no points will be added.
NOTE: If no appropriate tracking features can be found, no points will be added.
NOTE: If no appropriate tracking features can be found, no points will be added.
Tracking with the remaining tracking points
Dealing With Occlusions When Tracking
Sometimes you’ll find that you need to deal with a gap in the useful tracking data. For example, objects in the frame that pass in front of the feature you’re trying to track cause gaps in the tracking information for a clip.
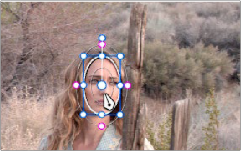
In situations where a subject being tracked becomes totally occluded by another object in the frame, there’s an easy method of interpolating to cover holes in the available tracking data. In the
![]()
following example, the woman walks behind another fence post, this time one that’s taller than she is. The window tracking her face will become completely lost at this point, but interpolation will help to salvage this shot.
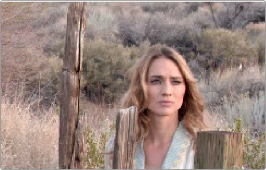
Original clip
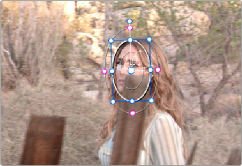
1 Move the playhead to the first trackable frame of the moving feature you’re correcting, and create a Power Window that surrounds it.
Adding the Power Window
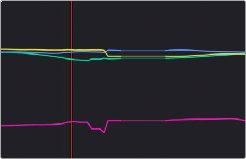
2 Use Track Forward to track the feature as far as you can before it becomes obscured behind something else in the frame.
3 When the Power Window stops tracking the feature reliably, stop the track.
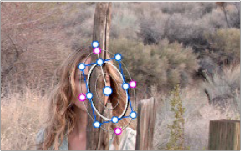
The Power Window is obscured by the post
4 Open the Tracker palette.
5 Click the Frame button to put the Tracker controls into frame-by-frame adjustment mode. This is an important step.
![]()
Selecting Frame mode
![]()
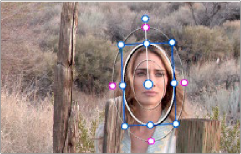
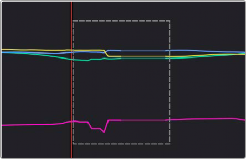
6 Move the playhead to the frame where the feature you’re tracking reappears from behind the occlusion, then drag the window so that it again overlaps the feature.
Moving the playhead and position the window
7 Use Track Forward to continue tracking the feature until the end of the clip. Alternately, you could have started from the end of the clip and used Track Reverse to track the feature as far as possible, if that’s easier.
Now that you’ve identified the gap in reliable tracking data for this clip, it’s time to set up the interpolation.
Notice the gap in the tracking data where the window was behind the post
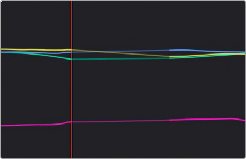
8 Drag a bounding box over the portion of the curves in the Tracker graph that fall between the good tracking data at the beginning and end of the shot.
9 Click the Tracker palette option pop-up menu, and choose Clear Selected Track Data.
![]()
The portions of curves that you selected are deleted, and have linear interpolation automatically applied to them so that there’s no hole in the track data or the motion of the window, which now moves smoothly from the last outgoing frame of reliable tracking data to the first incoming frame of new reliable tracking data.