< Previous | Contents | Next >
As advanced as the Cloud Tracking that is the default in DaVinci Resolve is, there are times when it may be simpler to track using good old-fashioned crosshairs. The Point Tracker makes it easy to track very specific features of a subject with motion you need to follow. Unlike the Cloud Tracker, which automatically looks for all trackable points within a region of the image that you identify using a window, the Point Tracker lets you create one or more crosshairs that you must manually position to overlap with whatever high-contrast features you want to track. This section covers the three main workflows you need to know to use the Point Tracker.
Tracking a Window Using the Point Tracker
The following procedure describes, in a general way, how to use the Point Tracker to track a moving subject and apply that motion to a Power Window.
1 Move the playhead to the frame of the current shot where you want to begin (you don’t have to start tracking at the first frame of a shot, since you can always track backward).
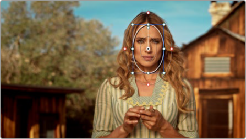
2 Turn on any window, and adjust it to surround the feature you want to track. Typically, you’ll have done this anyway, for example, framing someone’s moving face with a Circular window to lighten their highlights. You want to make sure that the window you want to apply the tracked motion to is selected before you begin tracking. In this example, we’ll be tracking a Circular window to follow the woman’s face.
Setting up to track a window over a woman’s face
![]()
3 Open the Tracker palette, and choose Point Tracker from the bottom right pop-up.
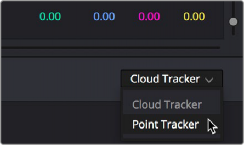
Choosing the Point Tracker
4 Before you start tracking, choose what types of motion you want to track and apply to the window you’re working on. You can choose from among Pan, Tilt, Zoom, Rotate or Perspective 3D. Which methods of transformation can be applied depend on how many points you add to track.
![]()
Choosing what type of motion to analyze
5 Click the Add Tracker Point icon. A new tracker crosshairs appears in the Viewer in the center of the frame.
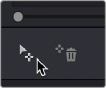
Clicking the Add Tracker Point icon
6 Move the pointer directly over the tracker crosshairs, and when it turns into the move cursor, click and drag to move the crosshairs to line up on top of the feature you want to track. For the best results, this should be a high-contrast detail such as a corner, the end of a line, a small shape like a pebble, or a jagged detail. Unlike other point trackers, there is no inside or outside region to separately adjust, there’s only the one crosshairs that you need to align. In this example, this first crosshairs is placed at the inside of her stage left eyebrow (the corner of her eye would introduce too much jitter as the tracker will pick up her blinks).
Lining up the tracker crosshairs with the feature you need to track
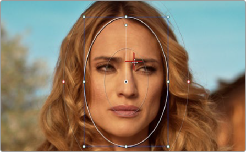
7 If you want to improve the accuracy of your track, you can create more tracker crosshairs and position them on top of other details within the subject you’re tracking. For the best results, make sure that all crosshairs are placed onto details that are in the same plane of motion. In other words, don’t put some crosshairs on a person’s face in the foreground, and other crosshairs on
a tree that’s far in the background, since both these features will have very different vectors of motion. In this example, trackers are placed at her inside eyebrows and at the corner of her lips.
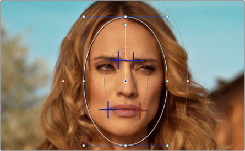
![]()
Setting up four trackers to follow the corners of her eyebrows and mouth
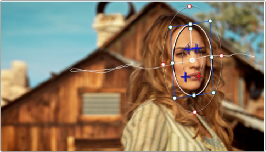
The final track, accomplished with four point trackers, with the track path turned on
8 When you’re done placing crosshairs, click the Track Forward or Track Backward buttons to initiate tracking. The clip will be analyzed, and the Tracker graph will update with the tracking data, and the window you had selected automatically moves to match the motion of the feature you’re tracking.