< Previous | Contents | Next >
The following procedure demonstrates how to use a window to rotoscope an onscreen feature that you want to isolate. In the process, it shows how to set up a window for rotoscoping using the Tracker palette, and discusses some best practices for rotoscoping efficiently.
1 Create a window to isolate the feature you’re wanting to adjust, and use the tracker to make it follow the motion of the subject. If the window doesn’t follow the contours of the subject as
precisely as you require, then you can begin manually keyframing its shape on top of the tracking you’ve done to rotoscope the subject.
2 With the Tracker palette open, click Frame to change the tracking mode.
![]()
Clicking the Frame button to begin keyframing your shape
The best way to use Frame mode for tracking is to either start at the last successfully tracked frame and work your way forward, or start at the first successfully tracked frame and work your way backward. This takes the best advantage of the automatic keyframing and interpolation between keyframes to animate the window you’re transforming smoothly.
3 With the playhead at either the first or last frame where the window fits the subject you’re isolating, you can either click the Add Keyframe button at the upper right-hand corner of the Tracker graph, or wiggle any control point by a pixel or two, to add a keyframe at that frame.
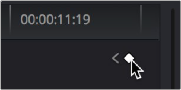
Clicking the Add Keyframe icon in the Tracker graph
![]()
Adding a keyframe at the last frame where the window follows the subject’s motion well means that any future animated changes you make interpolate from this frame forward, rather than from previous frames where there’s no need for alterations.
Adjusting the window in Frame mode adds a keyframe
While you’re in Frame mode, the changes you make to the window automatically generate a keyframe in the Tracker palette, which appears at the bottom of the Tracker graph’s timeline.
Keyframes appear in the Tracker graph ruler
It’s frequently essential to add a keyframe at the last frame where a window conforms well to the subject you’re trying to isolate, in order to limit window animation from that frame to the next keyframed transformation, rather than accidentally animating from the beginning of the clip, or from the next or previous keyframe in the Tracker graph.
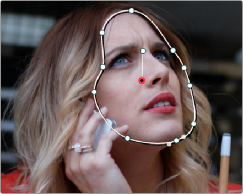
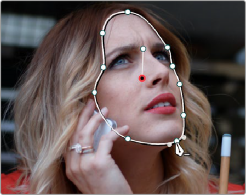
4 Next, move the playhead to the next frame where the window requires adjustment to better fit the moving subject, and adjust the position of the window, the control points of the window, or both to isolate the subject as necessary.
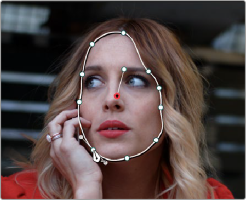
Readjusting the window in Frame mode to follow the subject’s motion
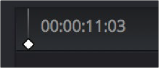
This results in a second keyframe being placed in the ruler of the Tracker graph.

![]()
Two keyframes creating rotoscoped animation in addition to any motion tracking that’s applied
5 With your first two keyframes placed, scrub the playhead back and forth between them to evaluate how well the window’s animation is automatically interpolating to fit the motion of the subject you’re isolating. If the window doesn’t follow the motion of your subject well enough, move the playhead to the frame where the window divergence is the most pronounced and make another adjustment to correct the shape.
This creates another keyframe.