
< Previous | Contents | Next >
1 Add a node with which to apply the sharpening you want to the current clip.
2 Right-click the new node, and choose YUV from the Color Space submenu of the contextual menu.
3 Apply sharpening by doing one of the following:
— Using that node’s contextual menu, uncheck Enable Channel 2 and Enable Channel 3, which correspond to the U (Cb) and V (Cr) channels, leaving only Channel 1 (Y) enabled. Then, open the Blur palette, and drag the ganged Radius sliders down to sharpen the Y channel.
— You can also just open the Blur palette, ungang the Radius sliders, and drag the red slider down to sharpen the Y channel, since any control with three gangable sliders will automatically assign those sliders to whichever channels are used by the currently selected Color Space.
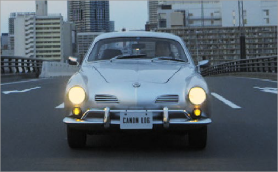
(Before) The original image, (After) Sharpening applied to only the Y’ channel of the image
As you can see, while the Blur palette ordinarily provides separate R, G, and B controls that can be unganged from one another, the Color Space submenu lets you apply sharpening to the channel definitions of other colorspaces, providing many other corrective and creative possibilities with the same controls.
Splitting Channels with the Splitter/Combiner Nodes
![]()
Another method of applying corrections to individual color channels is using the Splitter/Combiner nodes, which break the Red, Green, and Blue channels apart into separate node tree branches, each capable of accepting multiple serial and parallel nodes of image adjustment. There are two ways you can create a Splitter/Combiner node structure.
— To add a premade Splitter/Combiner node structure: Choose Color > Nodes > Add Splitter/ Combiner Nodes (Option-Y). A Splitter and Combiner node appear already connected to three Corrector nodes, one for each color channel.
— To manually construct a Splitter/Combiner node structure: Right-click in any empty area of the Node Editor, and choose from the Add Node submenu to create a Splitter node, a Combiner node, and three Corrector nodes, wiring them together as necessary to create the desired effect.
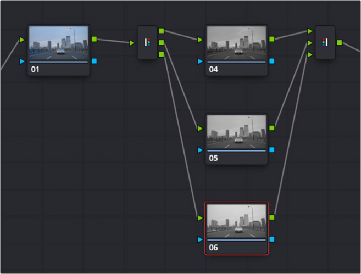
The Splitter Combiner node structure
The Splitter node takes an incoming image and provides individual outputs for each color channel (top/red, middle/green, bottom/blue). When you connect each of these outputs to a Corrector node, that color channel automatically connects to all three internal channels of that node, so that the default three nodes in a Splitter/Combiner structure are internally processing red/red/red, green/green/green, blue/blue/blue. The Combiner then pulls the Red, Green, and Blue channels out of each node connected to its three inputs, and reassembles them into a single RGB image again. Of course, what happens in between the Splitter and Combiner is entirely up to you.
One of the simplest ways of showing the possibilities of this node structure is to combine it with Node Sizing in the Sizing palette. Using Node Sizing, you can correct for misaligned channels in older archived video, or create channel misalignments for creative looks. In the following example, a simple Node Sizing adjustment to a split Blue channel will create an interesting “prism vignette” effect.
1 Choose Nodes > Add Splitter/Combiner Node (or press Option-Y) to add a premade Splitter/ Combiner node structure to the Node Editor.
2 Select the middle of the three Corrector nodes appearing in between the Splitter and Combiner nodes (Node 5 in the following screenshot).
![]()
3 Open the Sizing palette, choose Node Sizing from the Mode drop-down, and then raise the zoom parameter by a small amount; this example uses 1.014.

Zooming just one color channel using the Splitter/Combiner nodes