< Previous | Contents | Next >
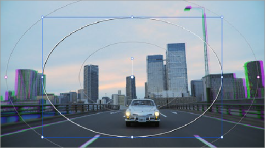
As you can see in the screenshot, just the Green channel has been zoomed in on across the entire image. This is only possible using Node Sizing. This is cool, but not quite what you need.
4 Open the Window palette, add a Circular window, turn on its Invert control, and transform it to be a very soft, horizontally aligned vignette. This limits the individual scaling done to the Green channel to just the outer edge of the image, similar to a lens with excessive chromatic aberration.
The resulting channel split effect
You could easily keep going, applying varying amounts of zoom with different window shapes to each of the other color channels, and perhaps adding some blur to enhance the effect, but this example should show the creative potential available when using this technique.
Multi-Channel RED HDRx Support
The RED EPIC, SCARLET, DRAGON, and WEAPON cameras are all capable of shooting in an HDR mode that effectively “brackets” two different exposures of each frame. The resulting image data stores two channels of image data: the regular exposure, and a “highlight exposure” that’s underexposed by a user-selectable margin (+3, +4, +5, or +6 ƒ-stops difference).
By default, the Input bar in the node graph feeds the regular exposure to your grade’s node tree.

NOTE: You can also take advantage of the highlight exposure of RED HDRx media by enabling and adjusting the Magic Motion controls in the Camera Raw palette.
NOTE: You can also take advantage of the highlight exposure of RED HDRx media by enabling and adjusting the Magic Motion controls in the Camera Raw palette.
NOTE: You can also take advantage of the highlight exposure of RED HDRx media by enabling and adjusting the Magic Motion controls in the Camera Raw palette.
To take advantage of the additional “highlight” exposure, you can add an additional Source input to the node graph that feeds a second stream of image data that you can mix with the regular exposure in different ways.
![]()
1 Using the first default node (Node 1), grade the image to see if you even need to use the alternate exposure that’s available. We’ll assume for this example that you do. In this example, the sky of the default exposure is pretty blown out, but there may be detail that can be retrieved using the highlight exposure.
Using HDRx images with the Layer Mixer
2 Create a Layer Mixer node by choosing Nodes > Add Layer (Option-L).
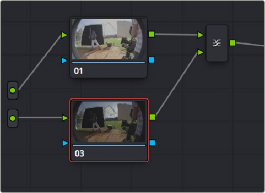
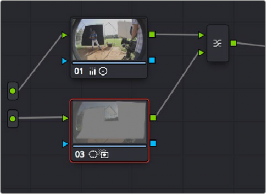
Two nodes are created, a Layer Mixer node that’s added after Node 1, and a third node (Node 3) that’s connected to a second RGB input of the Layer Mixer node in parallel to Node 1.
The Source currently supplies two input, but you can add a second source, which is the short exposure in the HDR image
3 Right-click anywhere within the node graph (except on a node) and choose Add Source from the contextual menu.
A second Source input appears underneath the first, which outputs the highlight exposure of the image as a separate image stream.
![]()
A node tree that uses a Layer Mixer node to mix two Corrector
nodes, each connected to separate outputs for the regular and highlight exposures
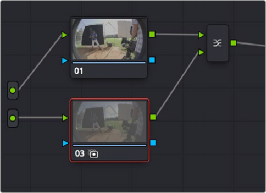
4 Delete the connection between the top Source input and Node 3, and then connect the bottom Source input to the RGB input of Node 3.
Immediately, the image in the node thumbnail and Viewer updates to show the darker, underexposed version of the HDR image. This is because, by default, the Layer Mixer is mixing 100% of Node 3 over Node 1.
5 Select Node 3 and use one of the following two procedures to create a useful combination of the two exposures:
To create a mix of the two exposures, open the Key tab, and drag the Key Output Gain slider to lower the contribution of Node 3 to the overall image. Using dynamics (keyframing), this is a good way to animate a dissolve from the regular exposure to the highlight exposure if you’re going from a dark environment to a bright environment in the same take and you want to create a smooth transition between both exposures.

TIP: You can also use the Blend Type and Blend Bias parameters in the Camera Raw palette to blend the two exposures without building a dedicated node tree.
TIP: You can also use the Blend Type and Blend Bias parameters in the Camera Raw palette to blend the two exposures without building a dedicated node tree.
TIP: You can also use the Blend Type and Blend Bias parameters in the Camera Raw palette to blend the two exposures without building a dedicated node tree.
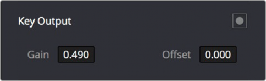
Dissolving between the regular and highlight exposures of RED HDRx media using the Key Output Gain slider of a Corrector node connected to a Layer Mixer node
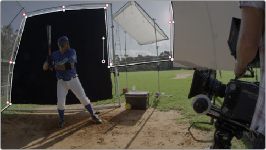
To use the highlight exposure to selectively put detail back into the image (for example, to retrieve blown-out windows), use a Power Window, HSL Qualification, or a combination of the two to isolate the region you want to retrieve in Node 3. (Be careful if you’re using HSL Qualification to combine both exposures, as keyed edges can be tricky to blend.)
![]()
Isolating a region of the image to replace using the highlight exposure image of a RED HDRx clip
Final node display with isolations

A Note About RED HDRx Media and Performance
Since RED HDRx media records two complete streams of image data, DaVinci Resolve must simultaneously decode two separate tracks whenever you add a second Source input.
(If you don’t add the second Source input, only the first stream is decoded.)
Because of this, whether you’re relying on your computer’s CPU or GPU to decode RED media, you’ll get half the performance when using the highlight stream of an HDR clip.
To improve performance, you can enable the Smart Cache by choosing Playback > Render Cache > Smart. This automatically caches all raw source clips to the current codec set in the Render Cache Format parameter of the Master Settings panel of the Project Settings. Alternatively, you can enable the User Cache, and cache all HDRx clips manually by right- clicking them and choosing Render Cache Fusion Output > On. DaVinci Resolve renders all cached clips while you’re paused, so the next time you play a cached clip, it will play at full speed.
If you regularly use RED HDRx media, multiple high-end GPU cards are recommended for optimal decoding performance.