< Previous | Contents | Next >
1 Make whatever adjustments you need to the currently selected node, and click its disclosure triangle to reveal its keyframing tracks.
2 Move the playhead in the Keyframe Editor to where you want to add the first keyframe, then right- click within the keyframing track you want to animate, and choose Add Static Keyframe or Add Dynamic Keyframe (this example shows a Dynamic keyframe).
A keyframe appears at the position of the playhead in that keyframing track.
3 Move the playhead in the Keyframe Editor to where you want to add the next keyframe, then right-click within the keyframing track and again choose either Add Static Keyframe or Add Dynamic Keyframe (this example shows a Dynamic keyframe).
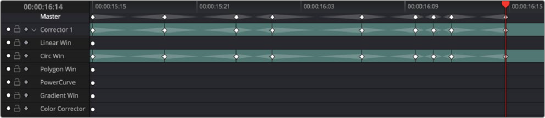
Keyframing just the Circular Power Window using its individual keyframe track

TIP: You can also animate individual keyframing tracks using automatic keyframing, explained in more detail later in this chapter.
TIP: You can also animate individual keyframing tracks using automatic keyframing, explained in more detail later in this chapter.
TIP: You can also animate individual keyframing tracks using automatic keyframing, explained in more detail later in this chapter.
Now, you can make whatever changes you need to the controls governed by the keyframing track you keyframed, in order to create the necessary animated effect.
Corrector Keyframing Tracks
All of the parameters governing the adjustment of color and contrast controls, as well as various effects, Power Windows, and other adjustments are sorted into various sub-tracks within the Corrector track.
— Linear Win: Controls parameters corresponding to the Linear window.
![]()
— Circ Win: Controls parameters corresponding to the Circular window.
— Polygon Win: Controls parameters corresponding to the Polygon window.
— PowerCurve: Controls parameters corresponding to the PowerCurve window.
— Gradient Win: Controls parameters corresponding to the Gradient window.
— Color Corrector: Controls all parameters found in the Camera Raw, Color Wheels, Primary Controls, RGB Mixer, and Curves palettes.
— Qualifier: Controls all parameters in the Qualifier palette.
— Defocus: Controls all parameters in the Blur and Key palettes.
— NR: Controls the Spatial and Temporal Noise Reduction and Motion Blur parameters found in the Motion Effects palette.
— Open FX: Controls all parameters of whichever OFX plugin is applied to the current node.
— Node Format: Controls all parameters of the node sizing mode of the Sizing palette for the current node.