< Previous | Contents | Next >
3 (Optional) If you’re using ColorTrace with a project that has numerous VFX clips in a workflow where all VFX clips have specific reel names that identify them, you can enter these names (with asterisks (*) used as wildcards that indicate text in each reel name that can vary) in the “Effects Shot Definitions” field.
This speeds automatic ColorTrace operations by enabling DaVinci Resolve to use fuzzy string matching when a clip’s reel number qualifies it as a VFX shot so that the best match is
displayed first on the list. You can enter multiple VFX reel names with wildcards, one per line, for simultaneous string matching. You can use whatever reel name text makes sense for your workflow, some examples of VFX reel names are as follows:
*_COMP_* VFX* EFFECTS*
4 Click Continue.
The ColorTrace window appears with two tabs that let you choose how to work.
5 Choose which mode to work in by clicking the Automatic or Manual tab:
— In Automatic mode, ColorTrace automatically searches for matching clips between the selected Timeline and the current Timeline. Each clip is color coded depending on the correspondence that’s been identified.
— In Manual mode, you copy grades yourself, using the Copy and Paste procedures, or by dragging and dropping using your mouse.
The ColorTrace window is complex; details about the operation of each mode are covered separately in the following sections.
6 When you’re finished using ColorTrace, click Close.
Using ColorTrace in Automatic Mode
![]()
In Automatic mode, ColorTrace automatically finds the correspondences between clips in the selected Timeline that you want to copy grades from (the Source timeline), and those in the current Timeline that you want to copy grades to (the Target timeline).
![]()
Selecting the Automatic or Manual ColorTrace
Each clip in the Target Timeline Thumbnail timeline is outlined with a color that indicates its status.
— Red: No match was found at all. Generally true for clips in the current Timeline that weren’t used in the Timeline you’re ColorTrace matching to.
— Blue: Due to overlapping timecode and reel names, multiple correspondences have been found (similar to a reel conflict), and you must select the correct one for each clip. This often happens with VFX and motion graphics clips that you’ve imported with timecode starting at 00:00:00:00.
— Green: A match has been found.
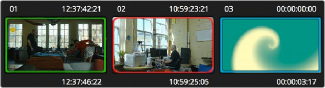
ColorTrace Thumbnail outlines indicate matching, overlapping, and non matching clips.
In Automatic mode the correspondence between each clip in the Source timeline and each clip in the Target timeline should be automatically made. However, overlapping timecode and reel names can cause problems. The other controls in the ColorTrace window help you deal with the subset of clips that can’t be automatically matched, or are matched in error. These controls are:
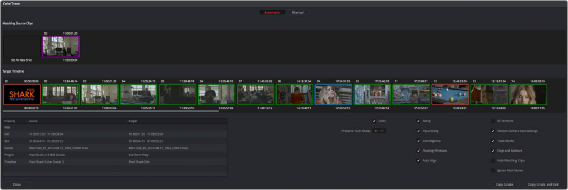
The ColorTrace window shown in Automatic mode
— Matching Source Clips list: Shows a scrollable collection of thumbnails that might correspond to the selected clip in the Target timeline.
— Target Timeline: Shows each clip in the Timeline you want to copy grades to, color coded according to how good a match it is.
— Clip Info pane: Displays two columns of properties for the source clip and the target clips that you’ve selected. These properties include the reel, source timecode, record timecode, clip name, project names, and timeline names of each clip, for easy comparison.
![]()
— Attributes and options checkboxes: A series of checkboxes lets you specify which clip attributes are copied as part of the ColorTrace operation.
— Color: Enables the copying of grades.
— Preserve Num Nodes: When copying grades, lets you prevent the first X nodes of the target clip grades from being overwritten by the first X nodes of the source clip grades.
— Input Sizing: Enables the copying of Input Sizing attributes.
— Convergence: Enables the copying of Convergence for Stereo 3D projects.
— Floating Windows: Enables the copying of Floating Windows for Stereo 3D projects.
— Auto Align: Enables the copying of Auto Align settings for Stereo 3D projects.
— All Versions: Copies all versions, rather than just the current version, from the source to the target clips. The currently selected version of each source clip is always correctly copied.
— Version Camera Raw Settings: Enables the copying of versioned Raw settings, rather than just the current Raw setting.
— Track Marks: Enables the copying of keyframes.
— Flags and Markers: Enables copying of all flags and markers.
— Hide Matching Clips: Hides all clips which have been successfully matched, and only show the clips with multiple or no matches. This lets you focus on the subset of problem clips within a potentially long timeline.
— Ignore Reel Names: If you believe the reel names are in error, you can turn this checkbox on to ignore them, matching all source and target clips by timecode alone.
— Copy Grades: Copies the matched source grades to each green and purple target clip.
— Copy Grades & Exit: Once you’ve finished making all the grade matches you can, click this button to copy the matched source grades to each green and purple target clip, and close the ColorTrace window.
Here’s how to use these controls to sort out which source clips to copy from for each blue and red target clip in the Target timeline.
1 Click any blue clip thumbnail in the Target timeline.
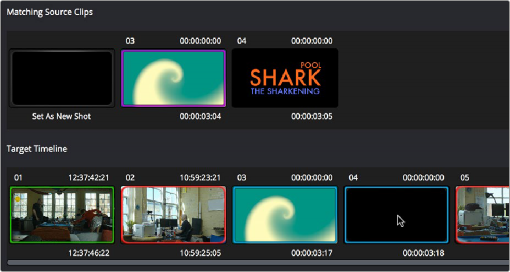
Revealing a number of different possible correspondences in the Matching Source Clips Timeline
![]()
A collection of clips with overlapping timecode and reel names appears. If you want to ignore the reel names because you believe they might be in error, turn on the Ignore Reel Names checkbox.
2 If a comparison of the Source and Target thumbnails doesn’t make the choice obvious, then click any of the clips in the Matching Source Clips timeline to view its metadata for comparison in the source/target columns below.
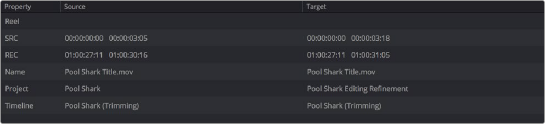
Source and Target clip metadata for comparison