< Previous | Contents | Next >
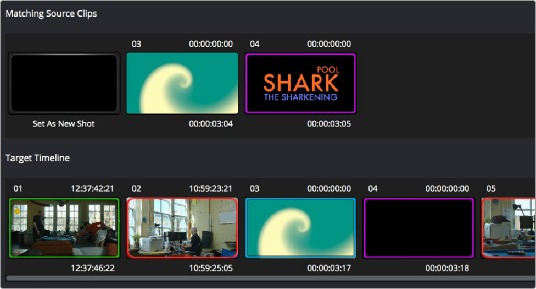
3 Once you’ve decided on a clip correspondence, double-click the Matching Source Clip thumbnail you want to copy from. If no clip in the Matching Source Clip pane is a good match, double-click the “Set As New Shot” box.
The Source and Target thumbnails both turn purple, to show that you’ve created a correspondence.
The matching Source and Target clips now both marked with purple outline
Continue working your way through every thumbnail with Blue and Red Xs until you’ve found matches for every clip in the Timeline for which it’s possible.
4 When you’re finished, click Copy Grades & Exit.
Using ColorTrace in Manual Mode
![]()
Manual mode is ideal for situations where you want to copy grades between programs with clips that have no timecode or reel name correspondence at all. The Manual ColorTrace interface is designed to let you move through two different timelines, either a clip at a time, or in matching multiples of clips, copying grades from the Source timeline to the Target timeline.
For example, if you’re trying to copy grades from a timeline that was conformed from individual media files, to another timeline that was conformed from a flattened master media file, you can use the ColorTrace Manual mode to accomplish this.
The manual interface consists of two sets of controls that correspond to the Source timeline (labeled “Timeline to copy from”), and the Target timeline (labeled “Timeline to paste to”). The general idea is that you move through both sets of timelines one clip at a time, or in matching multiples of clips at a time, and copy grades from the “Copy from” timeline to the “Paste to” timeline.
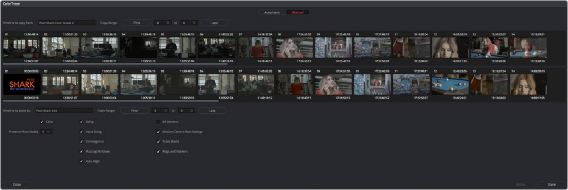
ColorTrace Manual window
Manual mode has the following controls:
— Source timeline: Shows all clips in the Source timeline you selected; the clips you’re copying grades from. Click any one clip thumbnail to select it, or click a thumbnail, and then Shift-click another thumbnail to select a contiguous range of clips. You cannot select a noncontiguous range of clips.
— Copy Range controls: Two fields show the range of clips in the current selection that you’ll be copying from, referred to by their numeric position in the Source timeline. You can change the range numerically by either entering new numbers in the fields, or by using the up/down arrow buttons to alter the value by one. The First button automatically adds all clips from the first one in the Timeline into the current selection. The Last button automatically adds every clip going to the last one in the Timeline to the current selection.
— Target timeline: Shows all clips in the Target timeline you selected; the clips you’re pasting grades to. Selecting clips works identically as with the Source timeline.
— Paste Range controls: Two fields show the range of clips in the current selection that you’ll be pasting to, referred to by their numeric position in the Source timeline. All controls work identically to the Copy Range controls.
— Attributes and options checkboxes: Turn off the checkboxes of any clip characteristics that you don’t want to copy as part of the ColorTrace operation. A more complete description of these options appears in the section on the Automatic ColorTrace mode.
![]()
— Paste button: Once you’ve selected one or more source clips and a matching number of target clips, clicking Paste copies the grades, PTZR settings, and marks (depending on the corresponding checkboxes).
— Undo Last: Lets you undo the most recent paste action.
— Undo All: Lets you undo all paste actions in Manual mode.
— Done: Finishes the operation and closes the ColorTrace window.
If you’re cherry picking individual grades from one timeline to paste into shots in another, you can copy grades one at a time.
— Click a thumbnail in the Source timeline (on top) to copy from, then click a thumbnail in the Target timeline (on the bottom), and click Paste.
You can also simultaneously copy the grades of entire scenes of clips from one timeline to another. For example, if you’re copying grades from an originally graded timeline to a re-edited version of the same program, you can copy every grade from a 10-clip scene in the Source timeline to the same 10 clips in the Target timeline which have been pushed back later in the Timeline.
1 Choose a continuous range of source clips by doing one of the following:
— Click the first clip in the range, and then Shift-click the last clip in the range.
— Enter the clip number of the first clip in the left “Copy Range” field, and then enter the clip number of the last clip in the right field.
— Click a clip, and then click First to select every clip from that one to the first clip in the Timeline.
— Click a clip, and then click Last to select every clip from that one to the last clip in the Timeline.

IMPORTANT: You must select the same number of target clips as you did source clips for the Paste button to become enabled.
IMPORTANT: You must select the same number of target clips as you did source clips for the Paste button to become enabled.
IMPORTANT: You must select the same number of target clips as you did source clips for the Paste button to become enabled.
2 Choose a continuous range of Target clips by using the same procedures as in the previous step, but using the “Paste Range” controls.
![]()
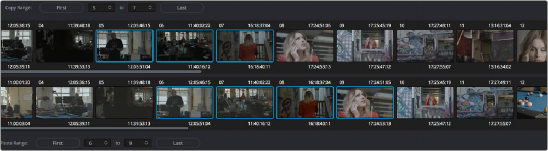
Group copy and paste of grades
3 When you’ve made your selections, click Paste.
The grade settings from the source clips are pasted to the destination clips, in order. In other words, if you copy from clips 5 through 9 to clips 11 through 15, then grade 5 is copied to shot 11, grade 6 is copied to shot 12, grade 7 is copied to shot 13, and so on.