< Previous | Contents | Next >
Favorite LUTs Submenu in Node Editor
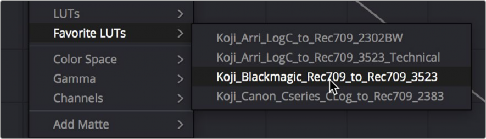
When you “star” a LUT as a favorite in the LUT Browser, those favorite LUTs appear in a submenu of the contextual menu that appears when you right-click on a node in the Node Editor. This makes it easy to create a short list of your go-to LUTs for various situations, for rapid application right in the Node Editor.
A Favorite LUTs submenu in the Node Editor contextual menu gives you a short list
Missing LUTs
Clips with missing LUTs show an overlay at the bottom right of the screen indicating the name of the LUT if a single LUT is missing, or an indicator that multiple LUTs are missing. This allows for quick previews of missing LUTs without interruption. Multiple missing LUTs can be seen and managed from the Missing LUTs tab in the LUT Browser, which only appears if you have one or more LUTs missing.
Exporting LUTs
![]()
If you find it necessary to exchange image adjustments with other grading applications, compositing applications, or NLEs, often the easiest inter-application solution is to export a LUT. This can be done whether your grade consists of one node or several nodes, so long as they contain only Primaries palette adjustments, Custom Curves palette adjustments, and compatible ResolveFX plugins that include Color Space Transform, ACES Transform, and Gamut Mapping. All nodes with compatible functions will be mathematically combined and translated into a LUT.
Keep in mind that any nodes that use Qualifiers, Windows, incompatible filtering operations (such as sharpening or blurring), or incompatible Resolve FX or Open FX will be completely ignored, as will all other correction operations made within these nodes.
1 Right-click a clip thumbnail in the Timeline of the Color page, and choose an option from the Generate LUT submenu:
— Generate 3D LUT (17 Point Cube): A DaVinci-developed LUT format
— Generate 3D LUT (33 Point Cube): A DaVinci-developed LUT format
— Generate 3D LUT (65 Point Cube): A DaVinci-developed LUT format
— Generate 3D LUT (Panasonic VLUT): A LUT format associated with Panasonic VariCam cameras
2 Choose a location for the resulting LUT file in the file dialog. The default file path depends on your operating system; saving it here will make it available to DaVinci Resolve for future use.
— On OS X: Library/Application Support/Blackmagic Design/DaVinci Resolve/LUT/
— On Windows: C:\ProgramData\Blackmagic Design\DaVinci Resolve\Support\LUT
— On Linux: /home/resolve/LUT
If you like, you can create a new folder in which to save your custom LUTs.
3 Enter a name into the Save As field, and click Save. A LUT file is saved.
Once created, you can use an exported LUT from within DaVinci Resolve, applying it to a clip or node directly, or applying it to the entire project using the settings found in the Color
![]()
Management panel of the Project Settings. You can also copy the LUT to a memory stick to give to someone for monitoring or previewing in an onset workflow, or to someone using another grading application that can read this LUT format.