< Previous | Contents | Next >
— Contrast: This one parameter lets you increase or reduce the distance between the darkest and lightest values of an image, raising or lowering image contrast. The effect is similar to using the Lift and Gain master controls to make simultaneous opposing adjustments.
— Contrast Pivot: Changes the center of tonality about which dark and bright parts of the image are stretched or narrowed during a contrast adjustment.
— Midtone Detail: When this parameter is raised, the contrast of regions of the image with high edge detail is raised to increase the perception of image sharpness, sometimes referred to as definition. When lowered to a negative value, regions of the image with low amounts of detail are softened while areas of high detail are left alone.
— Color Boost: Lets you naturalistically raise the saturation of regions of low saturation, sometimes referred to as a vibrance operation. Can be used also to lower the saturation of regions of low saturation.
— Shadow: Lets you selectively lighten or darken shadow detail. Raising this value retrieves shadow detail recorded below 0 percent, while leaving the midtones alone. 0 is unity.
— Highlight: Makes it easy to selectively retrieve blown-out highlight detail in high dynamic range media by lowering this parameter, and achieves a smooth blend between the retrieved highlights and the unadjusted midtones for a naturalistic result.
— Saturation: Increases or decreases overall image saturation. At higher values, colors appear more intense, while at lower values, color intensity diminishes until, at 0, all color is gone, leaving you with a grayscale image.
— Hue Rotation: Rotates all hues of the image around the full perimeter of the color wheel. The default setting of 50 shows the original distribution of hues.
— Luminance Mix: Lets you control the balance between YRGB contrast adjustments you’ve made using the Master Wheels or ganged Custom curves, and Y-only adjustments to contrast made using the Y channel Lift/Gamma/Gain controls of the Primaries palette or the unganged Luma curve.
Additional detail can be found in the Color page basics chapter, and each of these operations can be seen on the Primary palette of the user interface.
Control Buttons
![]()
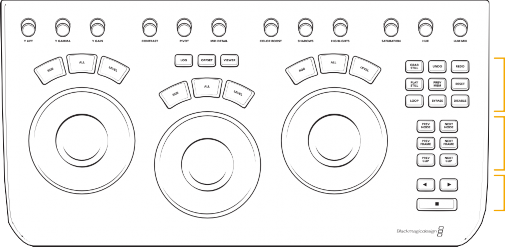
On the right-hand side of the trackballs there are three groups of control buttons.
Top group
Middle group
Bottom group
Control buttons
— Grab Still: At any time when you are grading, selecting the Grab Still key automatically grabs a full resolution frame from the Timeline and attaches the node graph metadata for later display and use.
— Undo: Undo is one of the favorite keys of colorists. Try any grade, and if you don’t like it, simply undo. There are multiple steps of undo available within the page.
— Redo: Sometimes you hit undo once too many times. Redo will put back into effect the last item you undid. As with undo, there are multiple levels of redo.
— Play Still: Using Play Still, DaVinci Resolve will automatically display a wipe on the Viewer between the current scene and the current still. You can use your mouse on the Viewer to move the wipe position. Selecting Play Still a second time will toggle this mode off.
— Prev Mem: Each clip, by default, has a memory of its grade, sizing, and so on, which is saved in reference to the source timecode. If you are grading a clip and move from it to another clip, the grade is saved automatically in a memory for that clip. If you come back to the clip and make a change to the grade, then decide you don’t like the change, select Prev Mem to return to the previous grade status you found when selecting the clip.
— Reset: This key resets the grade of the current node. Holding down this key deletes all nodes in the clip except for the first node, resets the grades to default, and clears the keyframes.
— Loop: You may wish to repeat a review of a grade of a clip, or a selection of clips on the Timeline; this Loop toggle key selects or deselects the Loop operation.
— Bypass: This toggle selects the Node Graph Bypass mode.
— Disable: This toggle enables or disables the current node.
— Prev Node: Within the Node Editor on the Color page, you are likely to have a number of nodes. These are numbered based on the order that you added them. DaVinci Resolve node graphs are completely user configurable, so you can add nodes anywhere and in any order you like. Thus, the Previous Node key selects the node one lower in numerical order.
— Next Node: Similar to the Previous Node key, this selects the node adjacent to the current node, in this case the next higher numerical position.
![]()
— Prev Frame: To step the Viewer one frame in reverse along the Timeline. Press and hold the Prev Frame button to go to the first frame of the clip.
— Next Frame: A single frame step forward for each key press. Press and hold the Next Frame button to go to the last frame of the clip.
— Prev Clip: Selects the first frame of the previous clip.
— Next Clip: Selects the first frame of the next clip.
— Left Arrow: Select this key to play the clip/Timeline in reverse. Press the Left Arrow key multiple times to play in reverse at a faster speed.
— Stop: You guessed it. This stops the playback.
— Right Arrow: The forward key plays the clip/Timeline forward. Press the Right Arrow key multiple times to play forward at a faster speed.