< Previous | Contents | Next >
Using the DaVinci Resolve Mini Panel
The Mini Panel has an identical feature set and controls as the Micro Panel for the lower trackball deck. In addition, the panel has an upper sloped desk with dual high resolution LCD displays with eight soft knobs and keys that are menu driven. There are also two banks of control buttons, on the left-hand side for palette selection and on the right-hand side for commonly used operations.
Please refer to the Micro Panel details above for the lower deck features.
Data and Power Connections
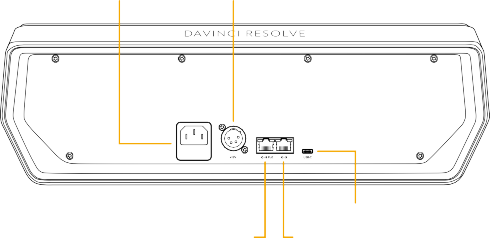
The DaVinci Resolve Mini Panel has multiple ways to connect data and power in order for easy install in a wide variety of post-production environments. There is no power switch, and the panel is always on when connected to a power source. When DaVinci Resolve is closed, the LCD will display “No connection to DaVinci Resolve” and will turn off the LEDs and go dormant after approximately 10 minutes.
— USB-C: The Mini Panel can be connected directly to the computer via a USB type C connection. It can not be powered by USB-C, however. If connected directly via USB C, DaVinci Resolve should see the panel automatically.
— Ethernet: The Mini Panel can be connected to computer via an Ethernet network. This requires setting the up the panel to be on the same subnet as the host computer in the Network Settings. You will also need to connect to the panel using the DaVinci Resolve Mini Panel (Ethernet) option in the Color Grading section of the Control Panels pane of the System Preferences.
— AC Power: The Mini Panel can be powered directly from a wall socket.
— DC Power: The Mini Panel can be powered using a 12V battery and 4-pin XLR power connector
— PoE: The Mini Panel can be connected and powered with a single cable via Power over Ethernet (PoE) if your router supports this function.
USB-C
USB-C
USB-C
PoE Ethernet
PoE Ethernet
PoE Ethernet
Ethernet
Ethernet
Ethernet
![]()
Mains 100-240V AC Power DC Power Input
The power and connection ports of the Mini Panel