< Previous | Contents | Next >
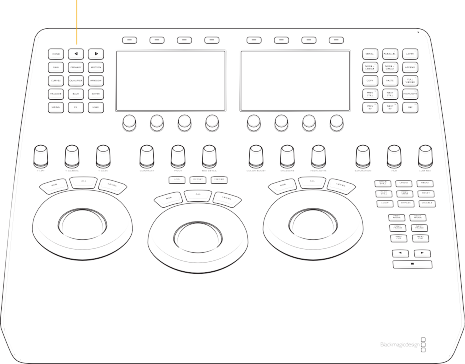
On the left-hand side of the top deck you will find 15 palette selection buttons. To quickly select the main palette toolsets in DaVinci Resolve, simply select the appropriate button and the menus on the LCD screens will update to the correct display.
Palette selection buttons
— Home: This key is used for the initial setup of the panel and also selects the top-most menu.
— Network: Exposes the Network Settings controls to set up the Mini Panel over Ethernet.
— About: Displays the currently installed firmware version.
— Left Arrow: A number of menus have multiple pages as indicated by the small dots in the center of the LCD displays. The Left Arrow moves the menu display left.
— Right Arrow: The Right Arrow moves the menu display right.
![]()
— Raw: This palette contains groups of parameters that correspond to every camera raw media format that’s supported by DaVinci Resolve.
— Primary: The first grade for every clip will be likely be a primary. This is where you balance the clip and correct for offsets in the black and white balance. Selecting Primary switches DaVinci Resolve from other grading modes and automatically selects the Primary menus for the LCD displays.
For more information on using these controls, see Chapter 129, “Primaries Palette.”
— Primary: Exposes the Primary grading controls and opens the Primaries Wheels palette in the DaVinci Resolve interface.
— Log: Exposes the Log grading controls and opens the Primaries Log palette in the DaVinci Resolve interface.
— Offset: Exposes the Offset adjustment controls.
— RGB Mixer: Exposes the RGB Mixer controls and opens the RGB Mixer palette in the DaVinci Resolve interface.
— Motion: The Motion Effects palette (only available in the Studio version) contains two sets of controls for applying optical-flow-calculated effects to clips in your program. These include enhanced Temporal and Spatial noise reduction, and motion-estimated artificial motion blur.
— Curves: The Curves palette has modes that provide different curve-based methods of manipulating the color and contrast of an image. Each curve lets you adjust a customizable region of the image based either on image tonality (zones of lightness or darkness), hue (specific colors), or saturation (intensity of color). For more information on the specifics of curves, see Chapter 132, “Curves.”
— Custom: Exposes the Custom curve controls and opens the Custom curve palette in
DaVinci Resolve. In Custom mode, the first 6 knobs represent control points along the curve in 20% increments. Rotating the knobs increases or decreases the position of the control point, and pressing in on the knob resets the control point to its default value. Using the arrow keys, you can also navigate to the Intensity and Soft Clip controls.
— Tools: Allows you to gang or split the YRGB components of the curves, as well as provides access to the YSFX controls.
— Hue vs Hue: Exposes the Hue vs Hue curve controls and opens the Hue vs Hue curve palette in DaVinci Resolve. In this mode, the first 6 knobs represent specific colors along the curve. The eighth knob (Input Hue) allows you to fine tune the selected color. Rotating the knobs increases or decreases the position of the control point, and pressing in on the knob resets the control point to its default value.
— Hue vs Sat: Exposes the Hue vs Sat curve controls and opens the Hue vs Sat curve palette in DaVinci Resolve. In this mode, the first 6 knobs represent specific colors along the curve. The eighth knob (Input Hue) allows you to fine tune the selected color. Rotating the knobs increases or decreases the position of the control point, and pressing in on the knob resets the control point to its default value.
— Hue vs Lum: Exposes the Hue vs Lum curve controls and opens the Hue vs Lum curve palette in DaVinci Resolve. In this mode, the first 6 knobs represent specific colors along the curve. The eighth knob (Input Hue) allows you to fine tune the selected color. Rotating the knobs increases or decreases the position of the control point, and pressing in on the knob resets the control point to its default value.
![]()
— Lum vs Sat: Exposes the Lum vs Sat curve controls and opens the Lum vs Sat curve palette in DaVinci Resolve. In this mode, the first 4 knobs represent Black, Shadow, Highlights, and White along the curve. The eighth knob (Input Lum) allows you to fine tune the selected level. Rotating the knobs increases or decreases the position of the control point, and pressing in on the knob resets the control point to its default value.
— Sat vs Sat: Exposes the Sat vs Sat curve controls and opens the Sat vs Sat curve palette in DaVinci Resolve. In this mode, the first 4 knobs represent Black, Shadow, Highlights, and White along the curve. The eighth knob (Input Sat) allows you to fine tune the selected level. Rotating the knobs increases or decreases the position of the control point, and pressing in on the knob resets the control point to its default value.
— Sat vs Lum: Exposes the Sat vs Lum curve controls and opens the Sat vs Lum curve palette in DaVinci Resolve. In this mode, the first 4 knobs represent Black, Shadow, Highlights, and White along the curve. The eighth knob (Input Sat) allows you to fine tune the selected level. Rotating the knobs increases or decreases the position of the control point, and pressing in on the knob resets the control point to its default value.
— Qualifier: When you select and isolate a particular color, and change that color, you are making a secondary correction. The qualifier key updates the menus to provide all the Secondary controls, including the 3D, HSL, RGB, or Luma key, with which to isolate the correction you need. For more information on Qualifiers, see Chapter 134, “Secondary Qualifiers.”
— HSL: Exposes the HSL qualifier controls and opens up the HSL Qualifier in DaVinci Resolve. The arrow keys cycle through all available controls of the qualifier including the Matte Finesse tools, and the knobs are used to make adjustments.
— RGB: Exposes the RGB qualifier controls and opens up the RGB Qualifier in DaVinci Resolve. The arrow keys cycle through all available controls of the qualifier including the Matte Finesse tools, and the knobs are used to make adjustments.
— LUM: Exposes the LUM qualifier controls and opens up the LUM Qualifier in DaVinci Resolve. The arrow keys cycle through all available controls of the qualifier including the Matte Finesse tools, and the knobs are used to make adjustments.
— 3D: Exposes the 3D qualifier controls and opens up the 3D Qualifier in DaVinci Resolve. The panel controls give you access to the full parameters of the 3D qualifier. However, the unique nature of the 3D qualifier requires pointer input to select the color paths to key. The
arrow keys will expose the Matte Finesse tools, and the knobs are used to make adjustments.
— Tools: Exposes additional tools for all qualifiers, including Picker, Picker Subtract/Add, Feather Subtract/Add, and Invert.
— Window: Power Windows are another way of making secondary correction, being essentially shapes you can use to isolate regions of the image. Different controls let you use oval, rectangular, polygonal, or custom curved shapes. Because you can isolate regions of the image by drawing, Power Windows produce exceptionally clean results, with edges that can be precisely positioned and feathered to achieve a variety of effects. For more information on Windows, see Chapter 135, “Secondary Windows.”
— Linear: Exposes the Linear Window adjustment controls. It is possible to shape the window to your specifications using the eight control knobs. Pressing the knob resets the parameter.
— Circle: Exposes the Circle Window adjustment controls. It is possible to shape the window to your specifications using the eight control knobs. Pressing the knob resets the parameter.
— Polygon: Exposes the Polygon Window adjustment controls. The Polygon Window must first be created using the pointer in the Viewer; it is then possible to move the window to your specifications using the eight control knobs. Pressing the knob resets the parameter.
![]()
— Curve: Exposes the Curve Window adjustment controls. The Curve Window must first be created using the pointer in the Viewer; it is then possible to move the window to your specifications using the eight control knobs. Pressing the knob resets the parameter.
— Gradient: Exposes the Gradient Window adjustment controls. It is possible to shape the window to your specifications using the five control knobs. Pressing the knob resets the parameter.
— Add Window: If you need to add another window of the same type (linear, circle, etc.) in the same node, you can press this button to add another one. Each specific window’s parameters can then be accessed by using the Left/Right Arrow keys on the Mini Panel.
— Window On: Toggles the selected window on or off. The correct order to create a window using the Mini Panel is to select the window type first, and then press the Window On button to activate it.
— Tools: Exposes a common set of Window-related tools, including Invert, Mask Control, Window Copy/Paste, Convert to Curve, and a Delete button to remove a specific window from a set of window types created by the Add Window function.
— Tracker: The Tracker palette operates in Window mode, where the tracking controls let you match the motion of a window to that of a moving feature in the frame. The tracking controls are all accessed by the soft keys on top of the LCD panels; the knobs have no functionality in the tracker. You can track forward, reverse, and forward/reverse. You can access the Clip and Frame
modes, as well as add and delete keyframes, copy and paste tracks, and select the included spatial parameters of the track. Toggling between the Tracker in frame mode and the Window panels allow you to manually track a window solely on the Mini Panel if necessary.
— Blur: With the Blur palette controls you can apply an exceptionally high-quality Gaussian blur, or another equally high-quality sharpening operation to your image. For more information on how to use the Blur controls, see Chapter 151, “The Motion Effects and Blur Palettes.”
— Blur: Exposes the Blur controls and opens the Blur palette in the DaVinci Resolve interface. The Radius and H/V Ratio amounts can be adjusted either simultaneously or on a per color basis by using the control knobs.
— Sharpen: Exposes the Sharpen controls and opens the Blur palette in the DaVinci Resolve interface. The Radius and H/V Ratio, and Scaling amounts can be adjusted either simultaneously or on a per color basis by using the control knobs. Coring controls are accessible via the Left/Right arrows.
— Mist: Exposes the Mist controls and opens the Blur palette in the DaVinci Resolve interface.
The Radius and H/V Ratio, and Scaling amounts can be adjusted either simultaneously or on a per color basis by using the control knobs. Mix controls are accessible via the Left/Right arrows.
— Keyer: Each color correction node’s key input and key output makes it possible to route key channel data from one node to another, so you can apply isolated corrections. These key levels are controlled in the Keyer palette and include the Key Input, Key Output, and Qualifier tools.
— Sizing: DaVinci Resolve has a powerful toolset for making geometric transforms, using advanced algorithms for optical-quality sizing operations, and they are found in this palette.
— Edit: Exposes the sizing controls to affect a specific clip on the Edit or Cut page and are linked to the transform values set in the Video Inspector.
— Input: Exposes the sizing controls to affect a specific clip on the Color page only. The changes made here will be seen in the Timeline but will not be linked to the clip’s Video Inspector.
— Output: Exposes the sizing controls to affect the entire timeline.
— Node: Exposes the sizing controls to affect a specific node.
![]()
— Reference: Exposes the sizing controls to affect the Gallery Still that is being used in a reference wipe.
— Fx: This palette allows the control of Resolve FX plugins. Resolve FX plugins span the gamut from blurs and complex color adjustments to stylized image treatments and lighting effects to sharpen and repair operations that are too complex to accomplish using the palette controls of the Color page. Several of the most commonly used Resolve FX plugins are mapped to the soft buttons above the LCD panels. Pressing one of these buttons applies the plugin to the selected node.
If the specific plugin you want is not assigned to the soft buttons, you can manually drag the Resolve FX to your node from the Open FX Library. Once placed, the parameters of that plugin will be available in the panel interface. see Chapter 149, “Using Open FX and Resolve FX.”
— User: Additional palettes introduced in newer versions of DaVinci Resolve without their own direct access buttons will appear here.
— Stereoscopic: Exposes DaVinci Resolve’s extensive set of stereoscopic controls to use with 3D images, including convergence, stereo alignment, and floating windows. If no clips have been marked as Stereo, this palette is inactive. For more information on the Stereoscopic tools, see Chapter 15, “Stereoscopic Workflows.”
— HDR: Exposes the High Dynamic Range toolset and opens the High Dynamic Range palette in DaVinci Resolve. The HDR toolset provides a more nuanced, zone-based primary grading
that is especially suited for HDR deliverables. The six default zones being Black, Dark, Shadow, Light, Highlight, and Specular. However, using the HDR palette with the Mini Panel creates some unique interface conventions to keep in mind:
Each zone is mapped to an LCD panel, and a trackball and its ring.
— The LCD Panel shows the Zone Name, and the four knobs control saturation, exposure, zone pivot, and zone falloff.
— The Trackball controls the zone’s color balance showing angle and strength or XY coordinates.
— The Ring controls the zone’s exposure.
There are six default zones (and the user can add more), but only three sets of trackballs, and two LCD panels, so the trackballs now shift zones up or down depending on the selected active zones, instead of being dedicated to a single zone like with lift, gamma, and gain.
Zones are shifted using the Prev Zone and Next Zone soft keys above the LCD panels. The current active zones are shown in the High Dynamic Range palette in DaVinci Resolve, and they are also indicated by the colored Zone bank controls on the top of the palette.
— The left trackball is mapped to the left LCD panel.
— The center trackball is mapped to the right LCD panel.
— The right trackball is still active, but has no corresponding LCD, so the saturation, exposure, zone pivot, and zone falloff controls are not adjustable until you shift the zones down using the Previous Zone soft button. Then the zone that was on the right trackball is now remapped to the center trackball and the right LCD screen.
— To access the highest zone’s LCD panel, you must navigate to the furthest zone bank to the right by using the Next Zone button until it reaches the end. Then you must press the Right Arrow key on the Mini Panel. The highest zone controls (by default specular) are now available in the Left LCD panel but are still linked to the right trackball.
![]()
— Global is accessed via the Right arrows, the LCD is changed to allow the knobs control of the Black/Offset, Color Balance, Exposure, Temperature, and Tint, but the trackballs are still actively controlling the zones set in the zone bank.

TIP: The trackballs and rings are always active in their selected zones in the HDR palette, regardless of what is on the LCD screens at the time.
TIP: The trackballs and rings are always active in their selected zones in the HDR palette, regardless of what is on the LCD screens at the time.
TIP: The trackballs and rings are always active in their selected zones in the HDR palette, regardless of what is on the LCD screens at the time.
For more information on using the HDR toolset, see Chapter 130, “HDR Palette.”