< Previous | Contents | Next >
Before describing the hard key operation, it is important to understand two keys on the left and right panels. These keys, Shift Up and Shift Down, provide access to potentially two more functions on each of the next key selected.
For example, on the T-bar panel, next to the Shift Up key is the Base Mem key. The term “Base Mem” is a legacy DaVinci colorist description to revert to the default memory, so there is no grade or sizing on that node. (There is an exception discussed later in this chapter.)
If you select Shift Up and then Base Mem, the All operation is to Base Mem All or reset the current color correction of every node in the node graph for the current clip, leaving the nodes in place. To “Reset” the selected node graph or “Reset Grades and Nodes,” first select Shift Down, then Base Mem.
To permit a fast and single-handed operation, this function does not require you to hold the Shift Up or Shift Down key while selecting the second key; just select them sequentially, first the Shift key, then the function.
Trackball Panel
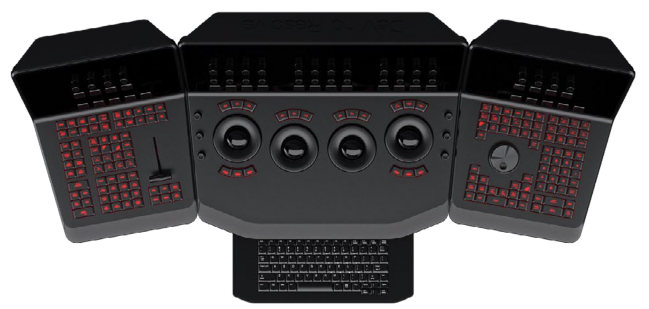
The Center panel has the traditional four trackballs, each with a surrounding control ring and no end stop in either direction. Three variable knob controls are on each side of the panel, three keys above the trackballs, three below the leftmost and rightmost trackballs. On the LCD panel, there are three LCD displays, each with eight knob controls and four keys. The LCD screens are menu driven and thus the knobs, soft keys, and the display itself depends on the application’s current operation. The Center panel also offers a slide-out keyboard for naming files, stills, and nodes, as well as for a number of other operations.
![]()
The Trackball panel includes a slide-out keyboard
The three trackballs, from left to right, are in the traditional DaVinci format of Lift, Gamma, and Gain when DaVinci Resolve is set for Primary grading; when in Log grading they are Lowlights, Midtones, and Highlights.
By rotating the trackballl the colorist can alter the balance between the red, green, and blue levels of the image. Using the vectorscope as a rough guide, moving the trackball towards the three-thirty clock position adds more blue while reducing the red and green.
The control ring surrounding these trackballs provides a master amplitude control of the associated trackball.
— RGB: This key only resets the RGB balance to default detent.
— All: Select All to reset both RGB and level.
— Level: Select the Level key to reset the level while maintaining RGB differential.
The rightmost (fourth) trackball has a number of modes. It operates similar to a mouse for moving the onscreen cursors, Color curve control point position, and Power Windows position, and can also act as a primary grade Offset control.
Under the leftmost and rightmost trackballs there are three unmarked buttons.
On the left hand side of the panel, the right-most of the three unlabelled buttons below the trackball toggles the right hand side (fourth) trackball in and out of offset adjust mode.
The keys under the right-hand side trackball provide left, center, and right mouse buttons. Above the rightmost trackball, the three keys have two modes.
When used in conjunction with the Shift Down button, the three buttons above the trackball function as resets, as per the buttons above the other trackballs.
— Shift Down Adjust Window: Only resets the RGB balance to default detent.
— Shift Down Modes: To reset both RGB and level.
— Shift Down Cursor: To reset the level while maintaining RGB differential.
— Adjust Window: Selection turns on the Viewer Shape cursors for the current node and allows the trackball to position the current window.
— Modes: This key allows access to a number of menus and acts as an on/off toggle.
![]()
— Display (Shift Up Cursor): This shift function changes the cursor views on the main monitor. The user can select the cursor display, including: Windows, Off, On the UI but not the main SDI monitor, or displayed on both.
— Cursor: The Cursor is used for the color picker when in Curves and Vector/Secondary modes. This key also controls the Window display.
On the left side of the panel are three luminance knobs. From top to bottom they are Luminance Gain, Gamma, and Lift.
On the right side there are three more controls, from top to bottom: Saturation, Hue (has the effect of hue rotation), and Luminance Mix.