< Previous | Contents | Next >
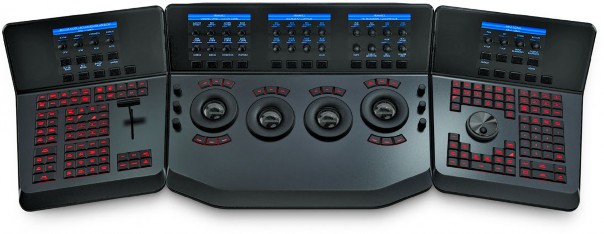
The T-bar panel, typically located on the left for a right-handed colorist, has an LCD display with four variable controls and nine soft keys. The lower section of the panel houses the T-bar and six groups of hard keys. Each group and their keys are described below.
Mode Control Group
The Mode Control group provides navigation to a number of the GUI pages and a few commonly used functions.
— Config: This key opens the Project Setting window where you will set up DaVinci Resolve for each project. Select again to close the window without saving.
— Browse: Select Browse to call the Media page where you can review files on attached storage and review the Media Pool.
— VSR (Shift Down Browse): This selection is reserved for future use.
— Conform: Selects the Lightbox display on the Color page.
— Shift Up Conform: Toggles the display of the Lightbox on the SDI output.
— Deck (Shift Up Revival): The Deck key selects the Capture mode for importing a batch list from an EDL.
— Revival: This key opens the Revival Dirt and Dust-busting window.
— Scene (Shift Down Revival): To select the Scene Cut Detection window, select the Shift Down key followed by the Revival key.
— Current ~ Viewer: This key toggles between the Color page and the Enhanced Viewer page.
— Object Track Mode: This key selects the Tracking menus.
— Clip/Track/Unmix: This is a toggle key between the Clip/Timeline modes of the node graph and the Unmix mode.
— User (Shift Up Cache Mode): This marks a clip for render cache of the clip output.
— Cache: This key is a toggle function to turn the render cache on or off.
— Editor: Selects the Edit page where you can edit the Timeline, import AAF, EDL or XMLs and apply speed changes, Composite and Dissolve/Wipe effects, and so on.
— Proxy On/Off: This key toggles the proxy mode on and off.
![]()
— Auto Color: This is a popular key. Using this key, DaVinci Resolve will automatically make a basic primary color correction to balance the blacks and whites of your image.
— Page Up (Shift Up Gallery): In larger projects you may have a number of gallery albums holding stills. This key changes the Gallery page to the next higher album on the list.
— Gallery: Used to select the Gallery UI page where you can manage, import, and export your stills.
— Page Down (Shift Down Gallery): The inverse of the Shift Up Gallery function, this selects the Gallery album one lower than the current.
— A/C Mode: This toggle key displays the clips in the Timeline in the order of the EDL (the record order, often referred to as C Mode), or the ascending order of the source clip timecode,
called A Mode.
— Handles Mode: This selection exposes the handles of the selected clip to allow tracking and grading outside the I/O selections of the current edit.
Timeline Management Group
When grading clips, colorists often try different looks. This group of keys offers a quick way to navigate through these versions and to split and join clips on the Timeline.
— Split (Shift Up Undo): This key splits the clip at the position of the cursor on the Timeline.
— Undo: Undo is one of the favorite keys of colorists. Try any grade, and if you don’t like it, simply undo. There are multiple steps of undo available within the page.
— Join (Shift Up Redo): The reverse of split. Place the Timeline cursor at the junction of two clips that have sequential timecode and select Join to make just one clip.
— Redo: Sometimes you hit undo once too many times. Redo will put back into effect the last item you undid. As with undo, there are multiple levels of redo.
— Restore Point: This selection is reserved for future use.
— Save: Remember this key; it’s your friend. Save often, and also consider the auto save options found in the User Preferences.
— Add Version: When you make a grade on any clip, DaVinci Resolve stores the parameters for that clip. If you want to try different grades, don’t lose your good grades, just use the Add Version feature. This key makes a second, third, or higher version of the grade for that clip.
— Default Version: If you have multiple versions of grades for a clip, this key is used to select the Default version, regardless of which version is currently displayed.
— Previous Version: This selects the grade one version lower in order. For example, if you are on version three, select Previous Version to get to version two. Once the Default version is reached, selecting Previous Version again will select the highest version.
— Next Version: Use this key to select the next higher version of the grade. Once the top version is reached, selecting Next Version again will select the lower version.
Keyframing Group
On the bottom right of the Color page is the Keyframe timeline for the current clip. The Keyframing group of keys is used in association with the Keyframe timeline and controls the selection of marks for the start and end of dynamic transitions of the grade.
![]()
— Start Dynamic: Use Start Dynamic to select the first keyframe in a transition. The transition may be a grade change, resizing, the addition of a matte, or any number of 100 variables, all of which are associated with the node graph and the Clip or Track timeline.
— Ripple Value: If you have a grade or effect, or just an adjustment, and you would like to ripple this effect over another effect or over a large number of other clips, use Ripple Value.
— Delete: This key deletes the selected keyframe.
— Lift Mark: If you place a keyframe in the wrong spot, put your cursor on the keyframe and use Lift Mark to remove it.
— Trim: This key is used with the numerical keypad to trim a keyframe’s position.
— Mark: Like the Start Dynamic key, Mark is a major key. It places a Static keyframe on the Keyframe timeline.
— Scene (Shift Down Mark): This selection opens the Scene Cut Detector.
Memory Access Group
DaVinci Resolve has a number of hot keys, called Mems, where you can store a grade for quick reference. In fact, every time you make a grade for a clip, a memory of the grade is kept. While you could save a still for each clip, having thousands of stills to scroll through would take time, so there are 26 quick and easy memory locations to store a grade, called A–Z Mems.
Every clip has its own metadata for the grade that is stored by DaVinci Resolve as a memory. There are a number of keys available to select or revert to these stored metadata memories, or to clear the metadata to revert to a base grade or no grade state.
— All (Shift Up Base Mem): This is used to reset the current color correction of every node in the node graph for the current clip, leaving the nodes in place.
— Base Mem: Used to reset the grade of the current node.
— Reset (Shift Down Base Mem): Used to reset the grades of the current clip.
— Please note that there is an exception to the rule to clear the Base Mem. It is possible, in fact very helpful sometimes, to have a clip preset that is not cleared when you select Base Mem. For example, when a film is over scanned and the frame edges are shown as well as the image.
Instead of making an input resize adjustment for every clip to remove the framing, a preset resize can be made and stored, with a label, and this preset is not deleted when using Base Mem.
— Preview Mem: To preview one of the Memory grades on any clip, select the clip on the Timeline, select Preview Mem and then the Memory letter. This key is a toggle so if you do not like the grade on the memory for that clip, select Preview Mem again and the grade will revert to the original.
— Original Mem: Each clip by default has a memory of its grade and sizing, etc. If you are grading a clip and move from it to another clip, the grade for the first clip is saved automatically in a memory for that clip. If you come back to that clip and make a change to the grade, then decide you don’t like the change, select Original Mem to return to the grade status you found originally.
— Scroll: When you select Scroll you can navigate up and down the Timeline to find and select a clip and its grade to recall to the current clip.
— View (Shift Up Current): The Color page has two display modes. The normal mode includes the viewer, stills, and node graph on the top of the page. Selecting View toggles to the alternate page with a wide Node Graph view and stills but no viewer. Select View again to toggle back to the normal mode.
![]()
— Crnt: Select Current before selecting a Mem key (A, B, C to Z) and the current grade on the active Timeline clip will be stored in the memory selected.
— Shift Up: The Shift Up key permits the operator to select the upper secondary function of keys on the control panel. This operation does not require you to hold the Shift Up key, just select it prior to the second key.
— Shift Down: The Shift Down key permits the operator to select the lower secondary function of keys on the control panel. This operation does not require you to hold the Shift Down key, just select it prior to the second key.
— Macro: This key displays the Split Screen controls on the T-bar panel LCD display.
— Memory Keys: The A, B, C to Z keys, selected directly or with the appropriate Shift Up or Shift Down preselection will recall the grade stored in this memory and will apply it automatically to the clip that is active on the Timeline.
Menu Navigation and Node Control Group
DaVinci Resolve is a nodal-based color enhancement system. Grades are not stored in layers, but in nodes. In operation they can appear to be in layers if you select the Serial nodes, but greater grading flexibility is available by using the Parallel and Layer nodes.
This group also gives you quick access to the main menus to control primaries, secondaries (known here as Vectors), image sizing, and windows. It also offers a quick way to add and manage nodes.
All three panels have LCD panels which display the menus
— Primary: The first grade for every clip will be likely be a primary. This is where you balance the clip and correct for offsets in the black and white balance. Selecting Primary switches DaVinci Resolve from other grading modes and automatically selects the Primary and Custom Curve menus for the LCD displays.
— Vectors: When you select and isolate a particular color, and change that color, you are making a secondary correction. The Vectors key updates the menus to provide all the Secondary controls, including the hue selection and control.
— Sizing: The input and output image resizing engines are controlled using the menus selected by Sizing.
![]()
— Windows: The Windows key opens the menus for Circular, Linear, Polygon, PowerCurve, and Gradient windows that can be used as a matte or mask for primary and secondary grades.
— Outside Node: Selecting the Outside Node key adds another node after the current node and automatically link both image and key paths. If the original node has a grade within the matte shape the new Outside node would control the grade in the inverse (i.e., outside the matte).
— Add Matte: Selecting this key displays the Matte node on the node graph for the selected node and the default matte selected.
— Disable Current: This key is a toggle key and it disables or enables the grade on the current node.
— Delete Current: To delete the current node. Remember to use undo if you had the wrong node selected.
— Bypass (Shift Up Disable Current): This toggle selects the bypass mode.
— Enable/Disable All (Shift Down Disable Current): This toggle enables or disables all nodes.
— Node + CPW: Adding a Serial node is a one button selection, Add Serial, but to also add a window requires a number of extra key selections. The Node + CPW key adds a node after the current node on the node graph and simultaneously adds a Circular Power Window, thus reducing the number of keystrokes.
— Node + LPW: As above, adds a Serial node after the current node with a Linear Power Window.
— Node + PPW: A Polygon Power Window is also selected when adding a Serial node.
— Node + PCW: This key, like the others above, adds a Serial node after the current node, but also sets up the PowerCurve Window to permit the marking of freeform shape points and Bezier spline curves on the viewer to construct a freeform window.
— Add Serial: The most common node to use on the node graph is a Serial node. A Serial node is a full-featured color correction processor offering primaries, secondaries, windows, tracking, image stabilization, sharpening and blur, matte blur, and so on. Serial nodes are added one after the other in a cascade mode, similar to adding one layer of correction on top of the last. All grades in a preceding node(s) will impact the source image and therefore the grades in following nodes.
— Shift Down Add Serial (Add Serial Before): This adds a serial node before the current node.
— Add Parallel: Unlike adding a Serial node, adding a Parallel node first actually adds two nodes. One behaves like a Serial node with full color correction capabilities. The second is a Parallel Mixer node. This mixer accepts the image from the original Serial node and from the new Serial node and the output is a mix of these two. If the current node is one of the Serial nodes immediately preceding the Parallel Mixer node and you select Add Parallel again, another input to the mixer will be created as will another preceding Serial node. In each case, the input to these Serial nodes will be common, effectively making them in parallel to each other. The key advantage is that the source image is available to many nodes, whereas in a straight Serial node graph, each time you restrict a color in a node the following nodes have little ability or limited range to use that color.
— Add Layer: The Layer node is similar to the Parallel node in that it accepts the image inputs from more than one node. The key difference to a Parallel node is that the mixing of the inputs in a Layer node is prioritized towards the latest additions to the input list. For example, select Add Layer and DaVinci Resolve will add a node in parallel to the current node and link the output of the current and the newly made Parallel node to the two inputs of the Layer Mixer node. The previous current node will have the lowest priority in the mix, and the newly made Parallel node the highest priority. Add one more Layer node, and a third input node will be created with a higher mix priority than the first two nodes.
![]()
— Append Node: Often when navigating around the Node Editor and making correction trims, the colorist decides he/she needs an additional node for more correction. Using the Append Node key will always add a Serial node to the very end of the node graph, regardless of which node in the graph is the current node.
Reference Configuration Group
This area of the T-bar panel includes six keys and the fader T-bar. It is primarily used for control of stills display with and without reference wipes. The fader bar controls the mix or wipe position when the appropriate mode is active.
— Key: This key adds and Alpha output on the node graph.
— Circle: This key is not yet implemented.
— Wipe: The Wipe key selects a wipe for reference comparison with the current image.
— H/V: This key toggles the wipe between horizontal and vertical.