< Previous | Contents | Next >
— To remove an Open FX plugin from a node: There are two ways to delete an Open FX plugin from a node.
— Right-click a node showing the FX badge, and choose Remove OFX Plugin from the contextual menu.
— Click on the trashcan icon to the right of the name of the effect in the Effects Inspector.
— To edit the parameters of an Open FX plugin: Select any node with an FX badge, and open the Open FX Panel to show the Settings list. You can switch to the Library by clicking the Library button.
— To sample a color parameter within an Open FX plugin: Some OFX plugins have a color swatch parameter, which exposes an eyedropper button in the Settings. Clicking the eyedropper turns the pointer into an eyedropper you can use to sample the contents of the Viewer.
— To use Open FX onscreen controls in the Viewer: Select any node with an FX badge, and the onscreen controls, if there are any, should appear in the Viewer. If not, make sure the Viewer mode drop-down is set to FX.
Applying Resolve FX and Open FX Plugins
Once you’ve found an Open FX plugin you want to use in the Library, there are two ways of applying it within the Node Editor of the Color page. Which method you use depends on how you want to use that plugin.
Adding a Plugin to an Existing Corrector Node
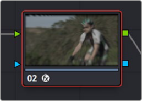
If you want to combine an Open FX plugin with a grade within a single node, simply drag and drop it onto a new corrector node to apply that plugin’s effect to that node. Nodes with an Open FX plugin applied have an FX badge in the bottom left-hand corner.
![]()
A node with an Open FX plugin applied
You can only apply one Open FX plugin to a node at a time, but by using multiple nodes you can add as many Open FX plugins to your grade as you need.
When added to a corrector node, Open FX are applied after Motion Blur and Noise Reduction, but before anything else. This means you can use Motion Blur and Noise Reduction to pre-process the image before it’s handed off to the Open FX plugin. This also means that all other adjustments you make within that node are applied to the Open FX plugin’s output.
However, the principal advantage of adding plugins to corrector nodes is that you can use secondary operations such as a window, a qualifier, or a key to limit that plugin’s effect, much as you would limit any other kind of adjustment you’d make with a corrector node.