< Previous | Contents | Next >
— Input Sizing Adjustments: The Input Sizing controls are displayed on the right screen of the Center panel. These are similar to the mappings on the Transport panel, but the Center panel’s second row of knobs also exposes PITCH, YAW, H SIZE, and V SIZE controls, and there’s an additional MODIFY PAR button that lets you change the pixel aspect ratio of a clip.
— Output Sizing Adjustments: If you press the OUTPUT soft key on the Center panel, the knobs and soft keys change to show the Output Sizing controls. Press BLANKING to expose all the preset aspect ratios on the Transport panel, along with the USER which allows you to expose user definable presets.
1 Press SIZING on the T-bar panel.
2 Press the OUTPUT soft key on the Center panel.
3 Press the OUTPUT BLANKING soft key on the Transport panel, and then enter the blanking aspect ratio as a number (e.g., 2.4) using the number pad on the Transport panel to set your customized blanking.
4 Press the BLANKING soft key on the Center panel.
TIP: With the Input Sizing Adjustments controls exposed on the Center panel, you can set the Transport panel to display the Output Sizing controls, for simultaneous presentation of every sizing control that’s available.
TIP: With the Input Sizing Adjustments controls exposed on the Center panel, you can set the Transport panel to display the Output Sizing controls, for simultaneous presentation of every sizing control that’s available.
TIP: With the Input Sizing Adjustments controls exposed on the Center panel, you can set the Transport panel to display the Output Sizing controls, for simultaneous presentation of every sizing control that’s available.
5 To apply the new ratio, press the BLANKING soft key on the Center panel, then press USER on the Transport panel, and press one of the USER 1–5 soft keys.
Using Node Sizing for Channel and Paint Effects
![]()
Using Node Sizing, you can apply individual sizing adjustments on a per-node basis. All Node Sizing adjustments within a grade are cumulative, and any keyframing done to Node Sizing parameters is stored in that node’s Node Format keyframe track in the Keyframe Editor. Two good examples of Node Sizing include realigning color channels individually in conjunction with the Splitter/Combiner nodes, or duplicating windowed regions of an image by moving them around the frame.
Example 1
1 Choose Color > Nodes > Add Splitter/Combiner Node to add this node structure to the current grade.
2 Select one of the three Corrector nodes connected between the Splitter and Combiner nodes that corresponds to the color channel you want to transform.
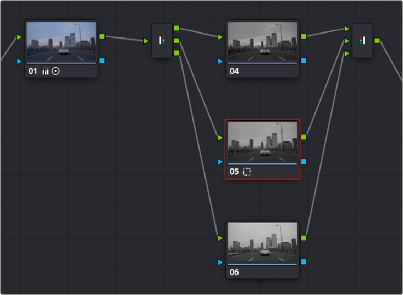
Adding the Splitter/Combiner nodes to use Node Sizing on individual color channels
3 Open the Sizing palette, choose Node Sizing from the mode drop-down, and use the Sizing parameters to transform that channel as necessary. For example, if you have an old video clip with misaligned color components, you could pan a misaligned channel to the left or right to try and improve its alignment.
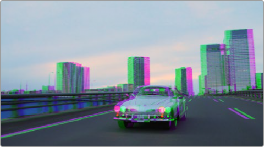
Before and after panning the green channel
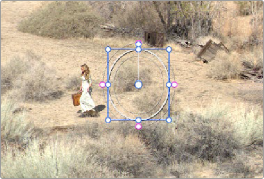
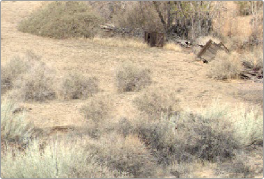
Example 2
![]()
1 Create a new node.
2 Open the Window palette, create a Circular window, and then shrink and reposition it to surround a feature you want to remove.
3 Open the Tracking palette, and track the window to follow the feature to be removed.
4 After the track is complete, now move the window to an adjacent area of clean detail that’s right next to the feature you want to remove. This is the area of the image you’re going to duplicate and cover the unwanted feature with.
5 Now, open the Sizing palette, choose Node Sizing from the mode drop-down, check Key Lock, and use the Sizing parameters to move a duplicate of the windowed area to cover up the unwanted feature.