< Previous | Contents | Next >
Before/after using Node Sizing to clone an area of the image to cover up the actor with a plant to create a clean background
When you’re done, playing through the clip should show that the duplicated area of the image is still tracking the feature you want to remove.
Image Stabilization in the Tracker Palette
The Image Stabilization mode of the Tracker palette lets you smooth out or even steady unwanted camera motion within a clip. The analysis is performed in such a way as to preserve the motion of individual subjects within the frame, as well as the overall direction of desirable camera motion, while correcting for unsteadiness.
Using the Stabilizer
DaVinci Resolve uses an advanced stabilizer that’s capable of both warping and translation to minimize unwanted shaking in a clip replaces the classic stabilization tools that were available previously (these tools are still available should you need specific capabilities of the older toolset, and are covered in
![]()
a later section). With a single click of the Stabilize button, the currently selected clip is analyzed and automatically stabilized using a combination of warping and image translations.

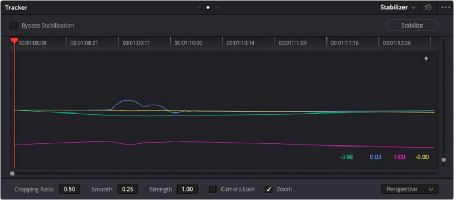
The default Stabilizer controls
Stabilizer Parameters and Controls
The default settings yield good results for most situations, but there are ways you can customize stabilization in situations where unique issues arise.
A drop-down menu provides three different options that determine how the selected clip is analyzed and transformed during stabilization. You must choose an option first, before clicking the Stabilize button, because the option you choose changes how the image analysis is performed. If you choose another option, you must click the Stabilize button again to reanalyze the clip.
— Perspective: Enables perspective, pan, tilt, zoom, and rotation analysis and stabilization.
— Similarity: Enables pan, tilt, zoom, and rotation analysis and stabilization, for instances where perspective analysis results in unwanted motion artifacts.
— Translation: Enables pan and tilt analysis and stabilization only, for instances where only X and Y stabilization gives you acceptable results.
— Camera Gyro: If your footage is from a Blackmagic Cinema Camera that has a gyroscope, this option will appear in the drop-down menu. You can stabilize the footage based on the movement recorded by the internal gyro that is embedded in the clip.
The other controls let you customize how aggressively the selected clip is stabilized.
— Bypass Stabilization: This checkbox lets you turn stabilization off and on to be able to compare the stabilized and unstabilized image.
— Cropping Ratio: This value limits how hard the stabilizer tries to stabilize, by dictating how much blanking or zooming you’re willing to accept in exchange for eliminating unwanted motion.
A value of 1.0 results in no stabilization being applied. Progressively lower values enable more aggressive stabilization. Changing this value requires you to click the Stabilize button again to re- analyze the clip.
— Smooth: Lets you apply mathematical smoothing to the analyzed data used to stabilize the clip, allowing camera motion in the shot while eliminating unwanted jittering. Lower values perform less smoothing, allowing more of the character of the original camera motion to show through, while higher values smooth the shot more aggressively. Changing this value requires you to click the Stabilize button again to reanalyze the clip.
![]()
— Strength: This value is a multiplier that lets you choose how tightly you want to use the stabilization track to eliminate motion from a shot using the current analysis. With a value of 1.00, stabilization is maximized. Since some clips might look more natural with looser stabilization, choosing a number lower than 100 lets a percentage of the original camera motion show through. Zero (0) disables stabilization altogether. As an additional tip, you can invert the stabilization by choosing –1.00 when pasting a stabilization analysis from another clip to perform a match move based on the overall motion of the scene, and you can use a negative value either lower or higher than –1.00 to under or overcompensate when inverting the stabilization, simulating the effects of parallax where foreground and background planes move together but at different speeds.
— Camera Lock: Turning on this checkbox disables Cropping Ratio and Smooth, and enables the stabilizer to focus on eliminating all camera motion from the shot in an effort to create a locked shot.
— Zoom: When this checkbox is turned on, the image is resized by a large enough percentage to eliminate the blanking (black edges) that is the result of warping and transforming the image to eliminate unwanted camera motion. The lower a value Cropping Ratio is set to, the more DaVinci Resolve will need to zoom into an image to eliminate these blanked edges. If you turn
this off, the image is not zoomed at all, and whatever blanking intrudes into the image is output