< Previous | Contents | Next >
along with the image, on the assumption that you’ll have dedicated compositing artists deal with eliminating this blanking by filling in the missing image data in a more sophisticated manner.
You may also leave this checkbox turned off if you’re planning on animating the Input Sizing Zoom parameter to dynamically zoom into and out of a shot being stabilized to eliminate blanking only where it occurs, using only as much zooming as is necessary for each region of the shot.
Using the Classic Stabilizer
The “classic” image stabilizer controls available in DaVinci Resolve version 12.5 and earlier are still available, simply select “Classic Stabilizer” from the option menu of the Tracker palette. Classic image stabilization in DaVinci Resolve consists of three steps. First, you analyze the clip. Second, you choose the Stabilization settings you want to use. Third, you click Stabilize to calculate the result.
When analyzing the clip, you can choose to use either the default Cloud Tracker, which automatically finds as many trackable points as possible throughout the image and calculates stabilization based on all of them, or you can use the Point Tracker, which lets you manually place one or more individual crosshairs on image features that you select. For more information on using the Point Tracker for window tracking, see Chapter 137, “Motion Tracking Windows.”
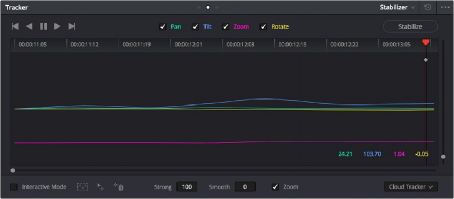
The Classic Stabilizer mode of the Tracker palette
As with object tracking, you can choose which aspects of motion to stabilize, but this must be done before you do the initial image analysis.
![]()
Analyze Controls
The Analyze controls automatically scan through the entire clip, identifying trackable features that can be used to stabilize the shot.
A series of four checkboxes let you turn on and off which axes you’d like to stabilize. These checkboxes must be selected before you perform an analysis in order to restrict the data that’s generated.
— Pan: Enables horizontal stabilization.
— Tilt: Enables vertical stabilization.
— Zoom: Enables stabilization of size.
— Rotate: Enables stabilization of orientation.

NOTE: Once stabilization has been done, disabling these checkboxes does nothing to alter the result. To make changes, you need to enable or disable the necessary checkboxes first, and then reanalyze the clip.
NOTE: Once stabilization has been done, disabling these checkboxes does nothing to alter the result. To make changes, you need to enable or disable the necessary checkboxes first, and then reanalyze the clip.
NOTE: Once stabilization has been done, disabling these checkboxes does nothing to alter the result. To make changes, you need to enable or disable the necessary checkboxes first, and then reanalyze the clip.
The five direction buttons let you perform the stabilization analysis.
— Track One Frame Reverse: Initiates tracking from the current frame backward by a duration of one frame.
— Track Reverse: Initiates tracking from the current frame backward, ending at the first frame of the clip.
— Pause: Stops tracking (if you’re fast enough to click this button before tracking is finished).
— Track Forward: Initiates tracking from the current frame forward, ending at the last frame of the clip.
— Track One Frame Forward: Initiates tracking from the current frame forward by a duration of one frame.
Interactive Mode Controls
The Interactive controls let you make manual changes to the automatically generated tracking point cloud that DaVinci Resolve creates, so you can try different ways of obtaining better stabilization results in challenging situations.
— Interactive Mode checkbox: Turns the Interactive stabilization mode on and off. When you enter Interactive mode, you can manually alter the point cloud that DaVinci Resolve uses to stabilize
the image. You’ll then make your analysis while in Interactive mode. When you exit Interactive mode, your manual changes to the point cloud are eliminated, and DaVinci Resolve again uses automatically placed point clouds to do all stabilization.
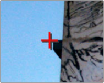
— Insert: Lets you add tracking points to whatever analyzable features exist within a bounding box that you’ve drawn in the Viewer. Inserted stabilization points are automatically placed.
![]()
— Set Point: Lets you use the cursor (using the DaVinci Resolve control panel), to manually place individual tracking points, one by one, with which to track a feature. If there is no trackable pixel group at the coordinates where you placed the cursor, a tracking point will be placed at the nearest trackable pixel group. You must place at least two tracking points at different pixel groups to track rotation, and at least three to track zoom.
— Delete: Eliminates all stabilization points within a bounding box that you’ve drawn in the Viewer.
The procedures for using Interactive mode for stabilization are the same as for tracking. For more information, see Chapter 137, “Motion Tracking Windows.”
Stabilization Parameters and Controls
There are five controls in the Stabilization group:

Stabilization selections
— Strong: Lets you choose how tightly you want to use the stabilization track to eliminate motion from a shot. With a value of 100, stabilization is maximized in an effort to “lock” the shot in place and eliminate all camera motion. This value is a multiplier. Since some clips might look more natural with looser stabilization, choosing a number lower than 100 lets a percentage of the original camera motion show through. Zero (0) disables stabilization altogether. Additionally, you can invert the stabilization by choosing –100, as described in the section on performing a match move below, and you can use a negative value either lower or higher than –100 to under or overcompensate when inverting the stabilization, simulating the effects of parallax where foreground and background planes move together but at different speeds.
— Smooth: Lets you apply mathematical smoothing to the analyzed data used to stabilize the clip, and is meant to be used when the Strong parameter is less than 100, allowing camera motion in the shot while eliminating unwanted wiggling. Lower values perform less smoothing, allowing more of the character of the original camera motion to show through, while higher values smooth the shot more aggressively.
— Zoom: When this checkbox is turned on, the image is resized by a large enough percentage to eliminate the blanking (black edges) that is the result of repositioning the image to eliminate unwanted camera motion. The higher a value Smooth Frames is set to, the more DaVinci Resolve will need to zoom into an image to eliminate these blanked edges. If you turn this off, the image is not zoomed at all, and whatever blanking intrudes into the image is output along with the image, on the assumption that you’ll have dedicated compositing artists deal with eliminating this blanking by filling in the missing image data in a more sophisticated manner. You may also leave this checkbox turned off if you’re planning on animating the Input Sizing Zoom parameter to dynamically zoom into and out of a shot being stabilized to eliminate blanking only where it occurs, using only as much zooming as is necessary for each region of the shot.
![]()
— Tracker Type: A drop-down menu below the Tracker graph lets you choose whether to use the Cloud Tracker or the Point Tracker. The default Cloud Tracker automatically finds as many trackable points as possible throughout the image and calculates stabilization based on all of them. This is fast, but can result in problems if there are too many prominent subjects in the
frame with different vectors of motion. The Point Tracker, by contrast, lets you manually place one or more individual crosshairs on image features that you select. This involves more steps, but has the advantage of letting you choose exactly which features exhibit the motion you’re trying to stabilize. For more information on using the Point Tracker for window tracking, see Chapter 137, “Motion Tracking Windows.”
— Stabilize: After you’ve tracked the clip and adjusted the previous two controls, you need to click Stabilize to calculate the resulting effect of the Strong, Smooth, and Zoom controls on your clip. Whenever you make changes to the Strong, Smooth, or Zoom parameters, you need to click Stabilize to recalculate the resulting effect on your clip.
Classic Stabilization With the Cloud Tracker
Classic Image stabilization in DaVinci Resolve is easy, but you need to follow a specific series of steps for it to be successful.
1 Open the Tracker palette, and choose Stabilizer from the Palette mode drop-down menu. Select Classic Stabilizer in the option menu. Make sure the Tracker Type drop-down menu at the bottom right of the Tracker palette is set to Cloud Tracker.
2 Turn off any of the Analyze checkboxes (Pan, Tilt, Zoom, Rotate, Perspective 3D) that correspond to transform axes you don’t want to smooth.
3 Click the Track Forward button to track the clip forward (or Track Reverse if you’d rather start from the end of the clip and work backward).

Multiple tracking points are automatically placed to analyze the motion of the image for stabilization
This analyzes the clip, but no stabilization is yet applied.
![]()
4 Adjust the Strong parameter to reflect what kind of stabilization you want. If you want to eliminate all possible motion from the shot, leave Strong set to 100. If you want to use stabilization to smooth out the shot but leave some motion in the frame, reduce the strong parameter to be less than 100 but greater than 0. This parameter is a multiplier, so higher numbers reflect a higher percentage of smoothing being applied to the clip’s range of motion, and lower numbers reflect a lower percentage of smoothing being applied to the original range of motion.
5 If you’ve set the Strong parameter to a value less than 100 to calm the motion in the shot, rather than lock the shot completely, you can also adjust the Smooth parameter to mathematically smooth what motion remains in the shot. This lets you even out any “wobbling” that you don’t want, while retaining the camera motion that you do want. The Strong and Smooth parameters work together, so experiment with different values in each parameter to get the result you need.
6 Choose how you want the edges of the stabilized clip to be handled using the Zoom checkbox:
— If you want DaVinci Resolve to zoom into the image as much as is necessary to prevent blanking (black edges) from intruding into the frame (the result of repositioning the image to steady camera motion), then turn on the Viewer Zoom checkbox.
— If you want to leave the scale of the image alone, allowing blanking (black edges) to intrude into the frame so that you either (a) have an effects artist deal with filling in these holes later, or (b) manually animate the Input Sizing Zoom parameter to eliminate blanking in a dynamic way, then turn off the Viewer Zoom checkbox.
7 With all of these controls adjusted, click Stabilize. The clip is immediately transformed to apply the amount of stabilization you selected via the Smooth Frames slider.
8 Play the clip and examine the stabilization effect. If you need to make any changes, choose new Strong and Smooth Frames values, then click Stabilize. Any time you change any of the Stabilization parameters, you need to click Stabilize to recalculate the resulting transform to your clip.
Classic Stabilizing Using the Point Tracker
For clips in which there are too many moving subjects for the Cloud Tracker to get a solid lock, you need to track a very specific feature in order to successfully stabilize the image. In these cases, it’s often faster to use the Point Tracker for stabilization.
1 Open the Tracker palette, and choose Stabilizer from the Palette mode drop-down menu. Select Classic Stabilizer from the option menu.
2 Choose Point Tracker from the Tracker Type drop-down menu at the bottom right of the Tracker palette. This changes the available controls under the tracker graph.
3 Click the Add Tracker Point button to add a crosshairs to the Viewer, and drag it to a high-contrast, angular feature you want to track that’s indicative of the overall motion of the clip.
TIP: You can optionally add more than one Tracker crosshairs to track multiple features, and DaVinci Resolve will attempt to stabilize as many dimensions as are made possible by the additional trackers. One point lets you stabilize Pan and Tilt. Two points lets you try to stabilize Pan, Tilt, and Rotation. Four points lets you try to stabilize Pan, Tilt, Rotation, and Zoom.
TIP: You can optionally add more than one Tracker crosshairs to track multiple features, and DaVinci Resolve will attempt to stabilize as many dimensions as are made possible by the additional trackers. One point lets you stabilize Pan and Tilt. Two points lets you try to stabilize Pan, Tilt, and Rotation. Four points lets you try to stabilize Pan, Tilt, Rotation, and Zoom.
TIP: You can optionally add more than one Tracker crosshairs to track multiple features, and DaVinci Resolve will attempt to stabilize as many dimensions as are made possible by the additional trackers. One point lets you stabilize Pan and Tilt. Two points lets you try to stabilize Pan, Tilt, and Rotation. Four points lets you try to stabilize Pan, Tilt, Rotation, and Zoom.
![]()
Using the Point Tracker to stabilize an image
4 Click the Track Forward button to track the clip forward (or Track Reverse if you’d rather start from the end of the clip and work backward).
This analyzes the feature you chose to track with the crosshairs, but no stabilization is yet applied.