< Previous | Contents | Next >
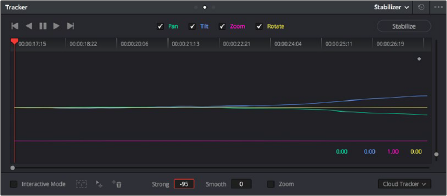
5 Adjust the Strong parameter to reflect what kind of stabilization you want. If you want to eliminate all possible motion from the shot, leave Strong set to 100. If you want to use stabilization to smooth out the shot but leave some motion in the frame, reduce the strong parameter to be less than 100 but greater than 0. This parameter is a multiplier, so higher numbers reflect a higher percentage of smoothing being applied to the clip’s range of motion, and lower numbers reflect a lower percentage of smoothing being applied to the original range of motion.
6 If you’ve set the Strong parameter to a value less than 100 to calm the motion in the shot, rather than lock the shot completely, you can also adjust the Smooth parameter to mathematically smooth what motion remains in the shot. This lets you even out any “wobbling” that you don’t want, while retaining the camera motion that you do want. The Strong and Smooth parameters work together, so experiment with different values in each parameter to get the result you need.
7 Choose how you want the edges of the stabilized clip to be handled using the Zoom checkbox:
— If you want DaVinci Resolve to zoom into the image as much as is necessary to prevent blanking (black edges) from intruding into the frame (the result of repositioning the image to steady camera motion), then turn on the Viewer Zoom checkbox.
— If you want to leave the scale of the image alone, allowing blanking (black edges) to intrude into the frame so that you either (a) have an effects artist deal with filling in these holes later, or (b) manually animate the Input Sizing Zoom parameter to eliminate blanking in a dynamic way, then turn off the Viewer Zoom checkbox.
8 With all of these controls adjusted, click Stabilize. The clip is immediately transformed to apply the amount of stabilization you selected via the Smooth Frames slider.
9 Play the clip and examine the stabilization effect. If you need to make any changes, choose new Strong and Smooth Frames values, then click Stabilize. Any time you change any of the Stabilization parameters, you need to click Stabilize to recalculate the resulting transform to your clip.
Using Stabilization to Create a Match Move
![]()
In some circumstances, such as when you’re using the HSL Qualifier to create transparency for a composite (using the Alpha Output described later in this chapter), you may find you need to apply the motion from a foreground clip to the background clip so that the two clips appear to be moving as one. This is referred to as doing a “match move,” and is a necessary step when creating a composite for purposes of doing a sky replacement, for example. This can be done in a simple way using the Stabilizer mode of the Tracker palette.
1 First, in the Edit page, edit a foreground clip onto track V2, and a background clip with a more interesting sky onto track V1.
2 With that done, open the Color page and follow the instructions in the section titled “Using a Qualifier Key to Create Transparency” in Chapter 143, “Channel Splitting and Image Compositing,” to key the sky, and use that key to create a region of transparency in the foreground clip that lets the background sky clip in track V1 show through.
Creating transparency to replace the sky in a superimposed clip with a sky image edited into a lower video track
In this example, the plain blue sky is being keyed so that it can be replaced with a more interesting photo of a dramatically cloudy sky.
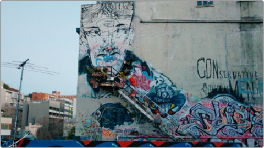
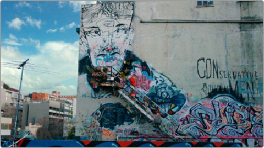
Before and after setting up a sky replacement by connecting an HSL qualifier of the blue in the sky to the Alpha Output to create transparency
This procedure works equally well with still images or movie clips. Also, depending on the range of motion you’re going to be matching, you’ll probably need to use a background image that’s somewhat larger than the region you’re keying, to make sure you have full coverage as the layer moves to match the foreground motion. If necessary, you can zoom into the image using the Zoom parameter in the Transform section of the Edit page Inspector.
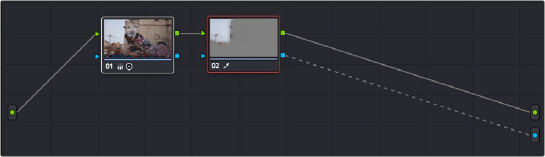
3 In this example, the foreground clip happens to have a camera pan, which gives the composite away as the sky doesn’t move along with it. To move the compound clip of the sky image to match this pan, open the Tracker pallet.
![]()
4 Choose its Stabilizer mode, and then click the Analyze Forward button to analyze the motion of the entire clip. Then, click the Tracker palette’s Option menu, and choose Copy Track Data.
5 Select the clip that you want to match (in this case the sky image), then open the Tracker Palette’s Option menu and choose Paste Track Data.
6 Now, for this to work correctly, you need to set the Strong parameter to –100, and click the Stabilize button. Setting a negative value inverts the tracking data you copied in step 3, which enables it to become a match move. If you’re feeling extra tricky, you can set the Strong parameter to a little less than –100, say –94, which introduces a disparity of foreground and background motion that simulates parallax.