
< Previous | Contents | Next >
A set of inner handles lets you choose how much of the image you want to stretch out. These default to the current title safe boundary. If you customize these, choosing too narrow an edge results in a more extreme warping and stretching effect, while choosing a wider edge to stretch looks more natural, but affects more of the frame.
— Expand: (Only appears when Zoom Mode is set to Manual) Zooms the image.
— Aspect: (Only appears when Zoom Mode is set to Manual) Stretches the image.


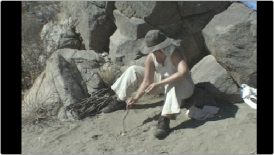
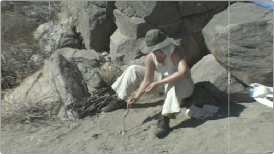
(Left) The original 4:3 image edited into a 16:9 timeline with black pillar boxing to the left and right as a result, (Right) The image with Blanking Fill set to Warp Top Layer, stretching the left and right edges to fill the blanking area
Fill Appearance
These controls let you change the look of the image being used to fill the blanking area.
— Blend Edges: Lets you feather the edges where the original image meets the blanking fill area.
— Blur Background: Lets you choose how much or how little to blur the image that fills the blanking fill area.
— Fade Amount: Lets you fade or tint the blanking fill area. At 0, there’s no fade applied. At 1.000, the blanking area is filled with a solid color defined by the Fade Color control.
— Fade Color: A color picker/eyedropper combination that lets you choose a color with which to fade, tint, or fill the blanking fill area.
![]()
Drop Shadow
These controls let you add a drop shadow to “lift” the foreground image against the blanking fill image.
— Shadow Strength: Lets you choose how solid the drop shadow appears.
— Drop Angle: Lets you choose the angle the drop shadow appears at. At 0 the drop shadow is centered.
— Drop Distance: Offsets the drop shadow farther in the direction of the Drop Angle
— Blur: Softens the drop shadow.
— Color: Tints the drop shadow.