< Previous | Contents | Next >
If you’ve accidentally placed a tracker control somewhere you don’t want one, you can either drag anywhere within the inner box to move it to another location, or you can Option-click it to delete that tracker.
Once placed, you can choose how much image detail is considered for analysis by resizing that
tracker control. To resize a tracker, move the pointer over the edge of the inner box, and drag to shrink or enlarge it.
This plugin will automatically derive as much motion data as the number of trackers you’ve placed allows:
— One tracker tracks horizontal and vertical position (pan and tilt).
— Two or more trackers also track rotation.
— Four or more trackers also track perspective.
— If you place six or more trackers, then the Match Move filter is capable of automatically choosing the best tracker data from the overall collection to give you the most accurate track that’s possible.
A Match Move Workflow
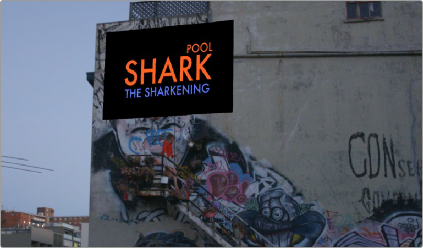
The following example shows the simplest complete workflow for importing a foreground clip to composite with a match move to follow a background clip that’s already in the timeline. This workflow is suitable for such operations as placing a graphic as a sign on a side of a building, or into the display of a phone.
1 Open the Media Pool in the Edit page, right-click a clip you want to match move to a clip in the Timeline, and choose “Add as Matte For Color Page Clip” to add it to the Color page Node Editor of the currently selected clip as a Timeline Matte. This is currently the only way you can match move and composite a foreground clip against a background clip in the Color page.
![]()
2 Open the Color page, make sure the background clip you want to match move to is selected, then open the OpenFX library and drag the Match Move plugin directly onto the connection from the last node in the tree to the Output, to add it as a stand-alone FX node.
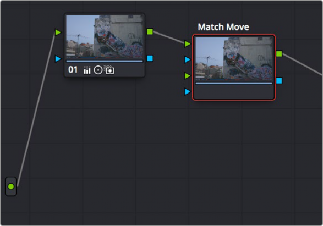
Adding the Match Move filter as a stand-alone FX node
3 Right-click any corrector node in the node tree (Node 01 in this example) and choose the clip you added in step 1 in the Add Matte > Timeline Mattes submenu of the contextual menu to expose that clip as an Ext. Matte node. Delete the connection between the new Ext. Matte node and the node it’s connected to, and then reconnect its RGB output to the second input of the FX node.
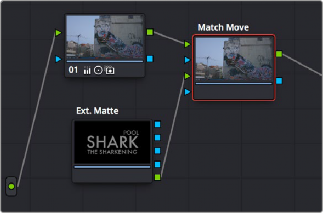
Connecting the foreground image to the second input of the FX node
4 Select the FX node, make sure the OpenFX onscreen controls are enabled, choose whether you want to start at the first or last frames of the clip to begin the tracking process, and then click within the Viewer to place tracker controls on the surface of the image you’re going to attach the foreground image to. If you want to do a perspective track, place at least four tracker patches in areas you know won’t be occluded by other things in the frame. Choose features that are high contrast and angular for the best results, and try to make sure the features you track won’t go offscreen or be occluded by other features within the frame. As you place tracking controls, their patch window will be tinted the color of the channel that DaVinci Resolve automatically determines will provide the best tracking result.
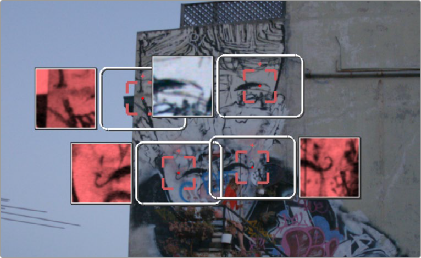
![]()
Adding tracker controls to the feature you need to Match Move to
5 (Optional) If necessary, you can delete trackers you don’t want by Option-clicking them.
6 Now that your tracker controls are all set up, you’re ready to begin the tracking analysis. If the playhead is at the beginning of the clip, click Track Forward, otherwise click Track Backward. DaVinci Resolve will automatically analyze all tracker controls within the clip until the last frame of the clip is reached.
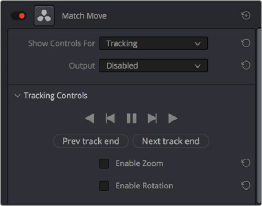
Using the Tracking controls
7 (Optional) If anything occludes a patch that’s being tracked, or if the tracked feature starts going off the edge of the frame, that tracker control may veer off course and will eventually turn off. If this happens, there’s a way to continue the track that’s surprisingly easy:
a) Click the Track Forward or Track Backward button again to stop the analysis.
b) Move the playhead back to the last good frame of tracking data, then click the inner box of each tracker control that went wrong to make sure they’re turned on (you know it’s on if the patch window is displayed), and then click “Clear tracking forward” or “Clear tracking backward” as necessary to delete the incorrect tracking data. When you’re done, click the inner box of each tracker that went wrong to turn it back off again, so it doesn’t continue trying to track incorrectly (you know it’s off if the patch window is hidden).
c) Now, place additional trackers on different features of the same surface to replace the trackers that you had to turn off.
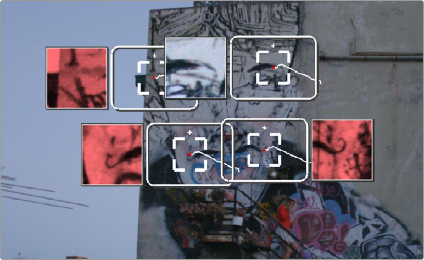
![]()
Placing more tracking controls to cover for tracking controls that turn themselves off when going offscreen or being occluded by other moving features in the image
d) Click “Track forward” again to continue the track, and DaVinci Resolve will automatically use those additional features to continue the analysis.
e) When the analysis is complete, turn the trackers you disabled back on again. All trackers that are turned on contribute data to the match move, for whichever ranges of frames they contain valid tracking data.
8 When DaVinci Resolve finishes its analysis, move the playhead back to the first frame of the track, and choose Positioning from the “Show controls for” pop-up menu. This takes you to the next stage in the Match Moving process.
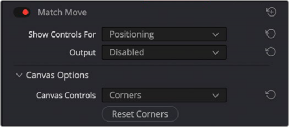
Choosing the Positioning controls
9 A grid appears, covering the Viewer. This is the positioning canvas, and it lets you corner-pin the area in which the foreground image you connected in step 3 will be composited and tracked. You can corner-pin and resize it by dragging it by the corners, and you can move it by dragging the center.

Resizing the canvas to fit the foreground image into the background
![]()
10 Once you’ve positioned the grid, scrub back and forth to verify that it tracks correctly and looks right once it’s in motion.
11 Choose Compositing from the “Show controls for” pop-up menu to expose the compositing controls.
12 Set the Output pop-up menu to “Composite” to output the final match-moved composite. If necessary, you can use the Composite Type and Plate Cropping controls to choose how the foreground image is blended with the background and whether you need to crop unwanted parts of the image from the edges.