< Previous | Contents | Next >
Additionally, you can use the FX mode of the Tracker palette to motion track the feature you’re warping. Then, by setting the Tracking pop-up menu to FXTracker, every warp and limiter point you’ve placed will move along with the feature you’re tracking, meaning you can create warp effects that move along with someone’s face, with a car driving on the road, or with something in a shot with camera motion.
Additionally, starting in version 16, warp and limiter points can be keyframed via the Warp Scale and Warp Point Positions parameters.
Effect Options
These controls affect how warp points that you add will affect the image.
— Warp Limits: A pop-up menu lets you choose how to treat the edges of the image when you’re warping it. There are three modes:
— Corners (the default) lock the four corners of the image in place, but allow the sides to bulge in or out as you warp and allowing blanking to creep in.
— Edges locks the full width and height of all four edges in place as you warp, preventing blanking.
— Distance locks parts of the image that are n pixels away, but the default setting is very permissive.
— Manual allows the entire image to be warped without locking any part of it, allowing for extreme warps all along an entire edge of the image, but requiring you to place at least one limiter point prior to adding a warp point.
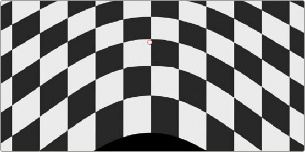
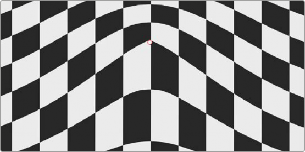
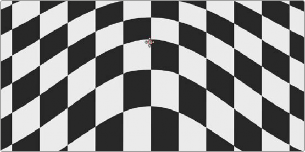
— Warp Sharpness: A pop-up menu lets you choose one of three methods of interpolating how the image bends around a Warp point: Sharp, Rubber-Sheet (the default), and Rounded. Sharp produces the “most pointy” warps, while Rounded produces the most gently curved warps. Rubber-Sheet strikes a balance between the two extremes.
![]()
Sharp
Rubber-Sheet