< Previous | Contents | Next >
— Edge Behavior: A pop-up menu eliminates any blanking caused by warping that affects the edge of the image by filling black areas in one of several user-defined ways; options include Black (do nothing and leave the blanking), Reflect, Wrap-Around, and Replicate.
— Quality: A pop-up menu lets you choose from among three methods of calculating the warping effect you’re creating: Faster, Default, and Better. Each choice is an obvious trade-off between image smoothness and performance.
— Warp Scale: This slider lets you scale the overall warp effect you’re creating. Setting this to 0.000 reduces the warp effect to nothing, while raising it to the maximum value of 2.000 doubles the warp effect. Warp Scale can be keyframed to animate the warping effect.
Point Locations
This set of controls lets you adjust how the points will operate.
— Effect Follows: Allows you to choose whether the points stick to the scaled content (Input and Edit Sizing), or the original frame in the timeline (Timeline Frame).
— Manual Keyframing: Click on the diamond to manually position the points on the frame over time.
Onscreen Controls
This set of controls lets you customize which of the Warper’s onscreen controls appear, with different options that make it easier to see certain things in various situations.
— Render a reference grid: This checkbox superimposes a reference grid over the image to make it easier to see what kind of warping you’re applying.
![]()
— Show Warp Boundaries: This pop-up menu has three choices for letting you see which areas of the image will be locked off by limiter points you place in the image.
— None hides this information and is the default setting.
— As Border shows a red line at the boundary where warping becomes locked off.
— As Mask dims the area that’s protected from warping by limiter points.
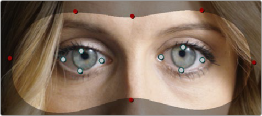
Show Warp Boundaries set to As Mask