< Previous | Contents | Next >
Additionally, both the filmstrip and waveform viewers scroll continuously during playback, giving you a preview of what visual actions and audio cues are coming a few moments forward in time that you can refer to while performing automation or recording foley.
Repositioning the Scroller Playhead
While the scrollers are visible, the Scroller playhead can be dragged to the left or right in the Timeline to give you more or less preview room to the right.
Zooming the Video Scroller
Right clicking on the Video scroller lets you choose a Low, Medium, or High zoom level. At Low, you get a frame-by-frame view of the program that feels like scrolling a strip of film on a Steenbeck flatbed editor. At Medium and High, you get a progressively abbreviated film strip that scrolls more quickly.
Scrolling the Fairlight Timeline Using the Scroller Tracks
Dragging the scroller tracks to the left or right smoothly scrubs through the Timeline in greater detail, regardless of the zoom level of the Timeline tracks above.
Mixer
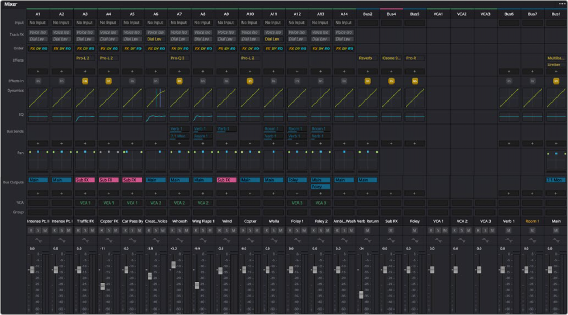
The Audio Mixer provides a set of graphical controls you can use to assign track channels to output channels, adjust EQ and Dynamics, add filters and Fairlight FX, set levels and record automation, pan stereo, surround and immersive audio, and mute and solo tracks.
The Audio Mixer exposes two sets of channel strips with controls that correspond to the tracks in the Timeline. By default, the leftmost set of channel strips expose one set of controls for each track in the Timeline, while the rightmost set of channel strips expose another set of controls for each bus you’ve created to manage signal flow from the audio tracks to submixes and desired outputs.
![]()
The Audio Mixer, with channel strips corresponding to the tracks in the Timeline

TIP: You can right-click on a the number at the top of mixer channel strip to copy/paste settings, and also copy/past settings within the mini views of the channel dynamics and EQ as well. Also, effects plugins (Fairlight FX, AUs and VSTs) have local 3 dot Options menus at their top right that allow you to copy/paste settings.
TIP: You can right-click on a the number at the top of mixer channel strip to copy/paste settings, and also copy/past settings within the mini views of the channel dynamics and EQ as well. Also, effects plugins (Fairlight FX, AUs and VSTs) have local 3 dot Options menus at their top right that allow you to copy/paste settings.
TIP: You can right-click on a the number at the top of mixer channel strip to copy/paste settings, and also copy/past settings within the mini views of the channel dynamics and EQ as well. Also, effects plugins (Fairlight FX, AUs and VSTs) have local 3 dot Options menus at their top right that allow you to copy/paste settings.
— Track color: Each track can be differently color-coded using the right-click contextual menu on a track in the Timeline or Tracks Index, to help you keep organized.
— Track number: The number of the Timeline track corresponding to each channel strip appears here.
— Input: A drop-down menu that lets you patch inputs, buses, utility signals, and configure the input settings of audio signals routed through Blackmagic Design or other hardware interfaces.
— Track FX: Track effects are specialized effects that are built-in to each channel, routed directly from disk, then onwards to other effects processing. The two built-in Track FX are Voice Isolation and Dialogue Leveler. They are disabled by default. Voice Isolation is a DaVinci Neural Engine AI effect and is available in DaVinci Resolve Studio only.
— Order: A drop-down menu that lets you choose the order of processing per track of the EQ, Dynamics, and Effects.
— Effects: Fairlight FX, VST, and Audio Unit effects that you apply to tracks from the Effects Library appear here, with controls for enabling/disabling each effect, opening an effect’s floating user interface or Inspector controls, and deleting that effect.
— Effects In: A button to globally mute or enable all insert effects on a track (Fairlight FX, AU or VST). Track FX and the built-in channel dynamics and EQ are not affected by this control.
— Dynamics: Double-clicking exposes a set of dynamics controls with three sets of controls corresponding to an Expander or Gate, a Compressor, and a Limiter that can be used separately or in concert to manage the dynamics of the audio on that track.

![]()
The channel strip Dynamics control window
— EQ: Double-clicking exposes a four-band parametric equalizer, with additional High and Low Pass filters, that has both graphical and numeric controls for boosting or attenuating different ranges of frequencies of audio on each track. You can select from among four types of EQ filtering from the Equalizer Type drop-down menu, with options for Earth (the default), Air, Ice, and Fire. These four equalizer types affect the Curves aspect and Q-factor of the transfer function. Each band has controls for the filter type (Bell, Lo-Shelf, Hi-Shelf, Notch), Frequency, Gain, and Q-factor (sharpness of the band), with the available controls for each band of EQ change depending on the filter type.
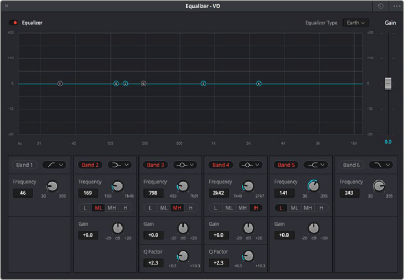
The channel strip EQ window
— Bus Sends: Click the + sign to add bus sends. Bus sends are only available if there are two or more available busses. Creating a bus send requires at least one additional bus other than the main output bus.
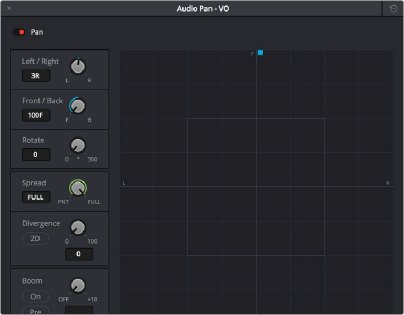
— Pan: A pan control compatible with stereo and surround panning. You can drag within this control to adjust pan, or you can double-click to expose a pan window. What controls are available in the pan window depend on the mapping of the audio track, but both stereo and surround panning controls are available, with corresponding numeric controls.
![]()
The Pan control window
Option-double-clicking on the Pan control of the Mixer opens an alternate 3D Audio Pan window. Whereas the regular Pan window lets you do stereo and conventional 5.1 and 7.1 surround panning, the 3D Audio Pan window lets you do the kind of spatial audio positioning enabled by advanced surround formats, such as Dolby Atmos, Auro 3D, and NHK 22.2.
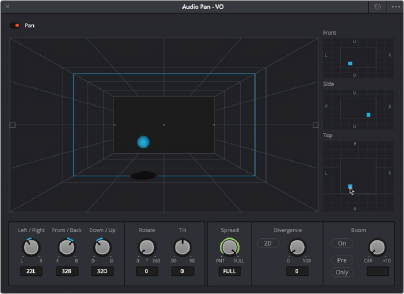
The 3D Pan window
— Bus Outputs: These buttons let you assign a track or bus to one or more of the output busses.
— VCA: These buttons let you assign that track’s channels to VCAs 1-10, or assign from the larger pool of 128 total available VCAs via a secondary dialog box.
— Track name: This mirrors the track name found in the header controls of the Timeline. You can customize a track’s name in the Mixer by double-clicking and typing in the name field.
— Arm, Solo, and Mute buttons: Identical to the controls found in the track header controls of each timeline audio track. Arm enables recording for a track. Solo lets you mute all other tracks in order to play that track in isolation (along with any other Soloed tracks). Mute disables audio playback from that track. These controls are also available the Tracks Index.
— dB display: Shows you the volume level, in decibels, that track is currently set to.
— Automation Arm: Arm automation control per track. When enabled, will record automation in Latch mode when the transport runs. The control also shows red when a fader is moved. Automation can also be set to “Safe” or “Off” by right-clicking on this control.
— Level Meter: This is a real time indicator showing a track’s signal level from -60db to 0db. The display and decay characteristics for audio metering can be set in Project Preferences > Fairlight > Audio Metering.

NOTE: Starting with DaVinci Resolve 17.4, the mixer panel has changed from prior versions. Some of the items are in a different order than earlier versions. Also, when using the
Fixed Legacy Busing option, then the bus structure as it applies to the Mixer panel also offers different busing usage. The redesigned Mixer panel makes a more efficient use of the Fairlight page but rest assured that no features have been removed, simply improved.
![]()
— Fader: Each track’s main vertical faders let you adjust the level of that track and perform automation recording. Double-clicking the fader handle will reset it to the default level of 0. Holding the Shift key when adjusting a fader allows fine control of level with .1 dB resolution.