< Previous | Contents | Next >
6 Click the Audition button in the Sound Library. That clip now appears, temporarily, in the Timeline, and you can play through that section of the Timeline to see how you like the sound effect in context with the rest of the mix.
7 If you like the sound effect, click Confirm to keep it in the Timeline. If you don’t, click Cancel, and it will disappear from the Timeline.

NOTE: In order Use the Audition function, a track has to be selected first.
Additionally, if you select another sound effect after auditioning, without first confirming the prior sound, the Audition process is cancelled, and the prior sound is removed
from the timeline.
NOTE: In order Use the Audition function, a track has to be selected first.
Additionally, if you select another sound effect after auditioning, without first confirming the prior sound, the Audition process is cancelled, and the prior sound is removed
from the timeline.
NOTE: In order Use the Audition function, a track has to be selected first.
Additionally, if you select another sound effect after auditioning, without first confirming the prior sound, the Audition process is cancelled, and the prior sound is removed
from the timeline.
Sound Effect List
All sound effect clips that match the current search criteria appear in this scrollable list. Double- clicking anywhere on an item of this list plays that sound effect in its entirety.
— Clip Name: The name of that sound effect file in the storage system.
— Description: Any metadata that’s embedded within the files of professionally created sound effect libraries appears here.
— Duration: The duration of that sound effect file.
— Audio Channel: The number of channels in that sound effect file.
— Star rating: A clickable control you can use to rate sound effects within DaVinci Resolve. Star rating information is not saved outside of DaVinci Resolve.
— Waveform: The overall waveform of the entire sound effect library is stretched or compressed within the available width of the Sound Library, regardless of the actual duration of each clip.
Index
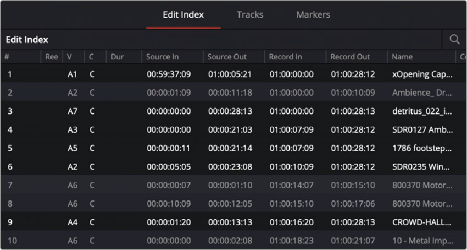
The Index provides a handy interface for listing all of the clips in the current edit, all the tracks in the current Timeline, and all the markers in the current Timeline. Using these lists, multiple items can be selected, tracks can be managed, and marker notes can be consulted with ease. Each of these three categories of information is displayed in separate panels: the Edit Index, Tracks, and Markers.
Edit Index
Displays the Edit Index as seen in the Edit page. Each audio clip in the currently open Timeline corresponds to a row in the Edit Index, with columns for video track, Source In and Out, Record In and Out, Name, and other descriptive metadata. All selected clips (including clips that are automatically selected because they intersect the playhead) are selected in the Edit Index. The Option menu lets you filter the Edit Index by various criteria, for example showing only clips with a particular color of flag, marker, or color, only clips with speed effects, only clips with audio filters, or compound audio clips.
