< Previous | Contents | Next >
Using a Channel Strip’s Input Menu
The Input drop-down menu at the top of each track’s channel strip in the mixer provides some shortcuts for patching different inputs and busses to the tracks of your mix. Each option in this menu makes the Patch Input/Output window appear with various Source and Destination selections automatically set up.
Input
The Patch Input/Output window appears set up to let you patch different inputs (such as the system audio input) to the tracks of the timeline. This makes it fast for setting up audio inputs in preparation for recording.
Bus
A shortcut to open the Patch Input/Output window (discussed previously in this chapter) that lets you patch Bus Out or Bus Sends to Timeline track channels.
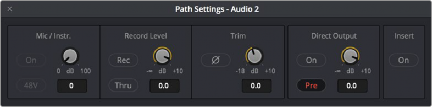
Path Settings
Choosing Path Settings opens the Path Settings window for that track. This window contains controls for adjusting the input level of audio signals being input via an input/output device.
The Path Settings window showing audio inputs and track inputs
These parameters are as follows:
Mic/Inst
Controls will only appear on this panel if you have connected channels 1 or 2 of a Fairlight SX36 audio interface to your system. If connected, you can remotely control all of the options (including level) for the mic/instrument inputs of the SX36 if they are assigned to the channel. If there is no connection to an SX36, the area is empty.
Record Level
— Record: Linked and identical to the Record Enable button on the channel strip; here for convenience. If you hit one, it will enable the other.
![]()
— Thru: Allows the input signal to pass into the mixer without enabling a record path. This is ideal when you want a source signal to always be available and just want to monitor it.
— Record Level: Allows you to apply a digital gain adjustment to the record path to disk, post the output of your audio interface’s analog-to-digital converter.
Normally, this control should be left at 0.0 (no change, unity gain), as it affects the level you are recording to disk. It is best practice to use the level controls on your audio interface to control the input level into DaVinci Resolve in order to maximize audio fidelity. However, there might be a time where you need a bit more level, or may not have access to an audio interface’s controls, and in those cases you can adjust the input.