< Previous | Contents | Next >
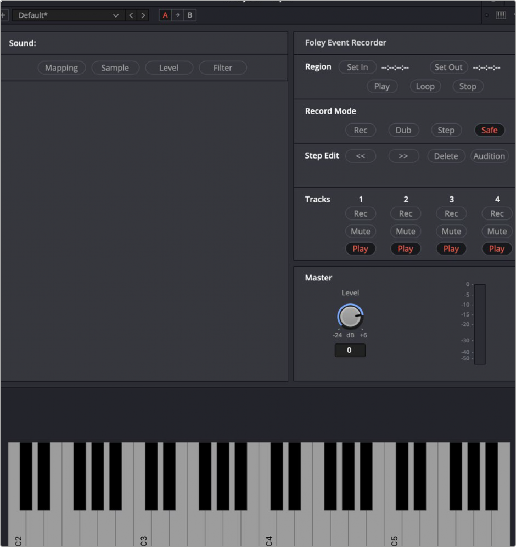
DaVinci Resolve supports VSTi instruments working with connected MIDI controllers to trigger instrument sounds that can be recorded live on audio tracks of the Timeline. Davinci Resolve Studio includes the Fairlight FX Foley Sampler. This can be loaded with foley sounds such as footsteps or human movements, so you can perform these sounds in real time and record the result to another track as you watch performers walking or punching in the edit, even if you lack a recording booth with foley pits and props.
The Foley Sampler ready to be filled with sounds
For more information about the Foley Sampler, see Chapter 177, “Fairlight FX.”
On the other hand, if you’re a musician, there’s nothing stopping you from loading VSTi musical instruments of different kinds for playback, and using the Fairlight page as a multi-track recorder. DaVinci Resolve doesn’t have MIDI sequencing functionality, but you can record live playback straight to the Timeline, using layered audio to manage multiple takes for later re-editing. Bet you never thought you’d be recording music in DaVinci Resolve.

A VST Instrument (in this case Serato Sample) loaded into a track of the Timeline
1 If DaVinci Resolve is running, quit before connecting your MIDI controller and setting it up.
2 On macOS you’ll use the Audio Midi Setup utility to choose output hardware and select a speaker configuration to be made available on your system. In the Finder, use Spotlight and search for Audio MIDI Setup to open it.
3 In Audio MIDI Setup, choose Window > Show MIDI Studio. A window showing icons for all connected MIDI controllers appears. Your controller should be showing an icon. If it’s not, you may need to install drivers for it.
4 Select the icon for your controller and turn on the “Enter test MIDI setup mode” button (it looks like a little keyboard) to test if your keyboard is connecting with the computer. If it is, then turn this off.
For more information on setting up MIDI on different systems, see the DaVinci Resolve Configuration Guide, available on the web from the Blackmagic Design support page at https://www.blackmagicdesign.com/support/family/davinci-resolve-and-fusion.
1 Open DaVinci Resolve.
![]()
2 Make sure you have at least two available audio tracks in the Timeline, one for the instrument you’ll be playing, and one to record into. This example will use tracks A4 and A5 for this.
3 Open the Effects Library, find a VSTi sampler you have installed on your system, and drag it to the track header of the track you want to use for playing, for example track A4.
Massively-featured sampler/synth combinations such as Native Instruments Kontakt and Steinberg Halion are ubiquitous and useful when you want to specifically map a collection of sound effects to specific keys or pads to create re-usable multi-purpose instruments.
However, more streamlined samplers that emphasize automatic audio clip slicing such as Serato Sample (Windows and macOS) or Image Line Slicex (Windows only) can make short work of the more specialized task of loading library sound effects recordings (or custom recordings you create) with multiple footsteps, punches, keyboard presses, cloth rustles, or other foley activities, and quickly splitting them up into individually playable samples you can trigger with pads or a keyboard.
4 When the VSTi interface window appears, open the MIDI menu at the upper right-hand corner of the VSTi window and choose the correct MIDI channel from your MIDI controller’s submenu. If you’ve selected the correct MIDI channel, the instrument should start responding to the keys or pads on your controller.
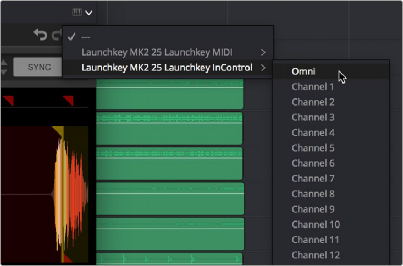
Enabling MIDI control
5 Next, configure the VSTi instrument you’re using to play the sound effects you want to use for foley. In this example, the Serato Sample VSTi plugin is being used to automatically slice up a recording of footsteps from one of Sound Ideas’ many sound effects libraries.
Because the VSTi you added is patched to that track’s Insert (if you look at the Mixer you should see that the I button is enabled on the channel strip the instrument is patched to), the Send is PRE the Instrument. This means you need to patch that track’s Track Direct output to the input of another track to record the instrument.
6 Choose Fairlight > Patch Input/Output to open the Patch Input/Output window, then set the Source drop-down menu to Track Direct and the Destination drop-down menu to Track Input. Click Audio 4 to the left, and Audio 5 to the right, and click the Patch button; this sets you up to play the VSTi plugin on track A4, and record its output on track A5.
![]()
Be aware that after patching Track Direct from the track with the instrument to the track you’re recording onto, you also need to turn “Direct Output” on for that track in the Path Settings of that track’s channel strip in the Mixer.
7 Open the Mixer (if necessary), click the Input drop-down menu at the top of the channel strip that shows the VSTi instrument you’re using, and choose Path Settings. When the Path Settings window appears, click the ON button for Direct Output, then close the Path Settings window.
At this point, you’re ready to begin recording.
1 Click the Record Arming button of the track you’re recording to (in this example A5), move the playhead to where you want to begin recording, and then click the Record button
to begin recording.
2 As the video of your program plays, use your MIDI controller to trigger sound effects as necessary. When you’re finished, click the Stop button.
If necessary, you can record multiple takes using track layering until you get the timing right. When you’re finished, you can remove the instrument from the track it’s on since the recorded audio is all you need.