< Previous | Contents | Next >
ADR (Automated Dialog Replacement)
Clicking the ADR button on the Interface toolbar opens up the celebrated Fairlight ADR panel, which provides a thoroughly professional workflow for doing automated dialog replacement. Dialog replacement, for those who don’t know, is the process whereby audio professionals bring in actors to re-record unsalvageably bad dialog recordings from the comfort of their recording studios, line by line and with a great deal of patience.
![]()
The ADR panel on the Fairlight page
It’s an old joke that ADR isn’t really automatic, but the Fairlight page aims to give you all the help it can to make this a structured and straightforward process. Simple, but powerful, Cue list management lets you efficiently assemble a re-recording plan. Industry-standard audio beeps and visual cues via your BMD video output device help the actors in the booth nail their timings and their lines. Then, sophisticated take management with star ratings and layered take organization in the Timeline help you manage the resulting recordings to pick and choose the best parts of each take when you edit the results.
The ADR Interface
When open, the ADR interface consists of three panels to the left of the Timeline: a List panel, a Record panel, and a Setup panel. The controls of these panels are described in the order in which they’re used.
The Setup Panel
As its name implies, the Setup panel is where you configure your ADR session.
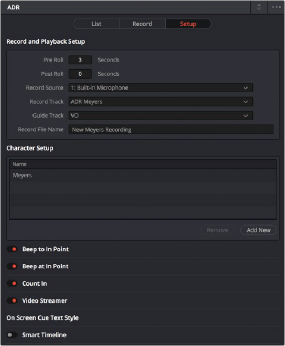
![]()
The Setup panel of the ADR interface
This panel presents the following controls:
— Pre Roll and Post Roll: Specifies how many seconds to play before and after each cue’s specified In and Out points, giving actors a chance to listen to what comes before and after each cue in order to prepare. If you enable the Beep options below, beeps provide a countdown during the specified pre-roll.
— Record Source: (Disabled until you select a Record Track) A drop-down menu lets you choose the input you want to record from, creating a patch to the Record Track.
— Record Track: A drop-down menu lets you choose the track you want to record to. Selecting a track with this menu creates a patch from the Record Source to the Record Track, and automatically toggles Record Enable on.
— Guide Track: A drop-down menu lets you choose which track the original production audio you need to re-record is on. This is used for sending audio playback to the talent to use as a guide for recording their own replacement performance.
— Record File Name: A text entry field that lets you provide a name for the audio files being recorded to be saved with.
— Character Setup: A list for adding the names of all the characters that have dialog cues you’ll be re-recording, to help with cue creation and management. An Add New button lets you add
additional names to this list, while a Remove button lets you delete characters you no longer need.
— Beep to In Point: Enables a three-beep sequence to be heard leading up to the recording. For beeps to be audible, the Beeps channel of the System Generator is a source that must be patched to your audio outputs using the Patch Input/Output window.
— Beep at In Point: Enables one last beep at the In point. For beeps to be audible, the Beeps channel of the System Generator is a source that must be patched to your audio outputs using the Patch Input/Output window.
— Count In: An onscreen counter that counts down to the start of the cue.
— Video Streamer: A visual cue for the talent to watch during pre-roll to ready them for recording. A pair of vertical lines superimposed over the program being output to video move towards one another across your video output screen during the pre-roll to the cue. This gives the talent a visual indication of the time remaining until they should begin talking. When the beeps play, these lines get taller. Both lines come together at the Time In frame, at which point a cross shows that recording is beginning.
— Smart Timeline: When turned on, this option automatically moves the playhead to each cue as it’s selected in the Cue list, and zooms in to frame the duration of that cue in the Timeline.
— Mixing Control: Enables automated switching of audio playback, to independently control what the talent and the audio engineer hear at various stages of the ADR recording process. For example, with this enabled, the Guide track is not routed to the Control room while the engineer is reviewing a take.
The List Panel
This is where you create a list of cues you need to re-record, either from within the Fairlight page, or imported from a .csv file that someone provides you.
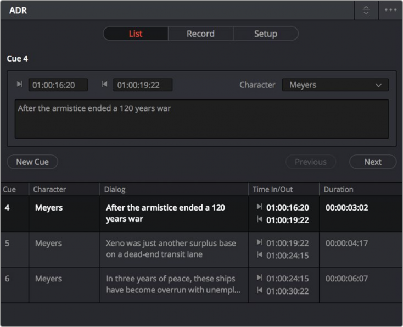
The List panel of the ADR interface
This panel presents the following controls:
— Cue editing controls: Displays the data for the currently selected cue (or a cue that was just created). In and Out timecode fields store the Timeline In and Out points that were set when the cue was created but can be manually edited for fine tuning. A Character drop-down menu lets you choose which character that line of dialog belongs to. A text entry field lets you enter the dialog cue that’s to be re-recorded, so you and the talent can both refer to it.
— New Cue button: Clicking this button adds a new cue to the list using whatever In and Out points have been set in the Timeline, and whatever character was last selected.
— Cue list: The list of all cues that have been entered or imported. The Cue list can be filtered using the Filter drop-down menu at the top-right of the ADR panel (next to the option menu). You can choose to show the cues for all characters, or for any selected combination of characters. You can also choose to hide all cues that are marked as done to experience the joy of this list shrinking more and more the closer you are to being finished.
Additionally, the ADR interface option menu has three commands pertaining to the List panel:
— Import Cue List: Lets you import a properly formatted .csv file to create cues that have been prepared in a spreadsheet. Correct formatting for cue lists you want to import is no headers, one line per cue, with four individual columns for In timecode, Out timecode, Character Name, and Dialog.
— Export Cue List: Lets you export the contents of the Cue list to a .csv file, for exchange or safe-keeping.
— Clear Cue List: Deletes all cues in the Cue list. It’s recommended you export a copy of your Cue list before eliminating it completely, in case you ever need to revisit a cue.
The Record Panel
This is where you actually run the ADR recording session you’ve set up, using the dialog cues you’ve put into the Cue list.
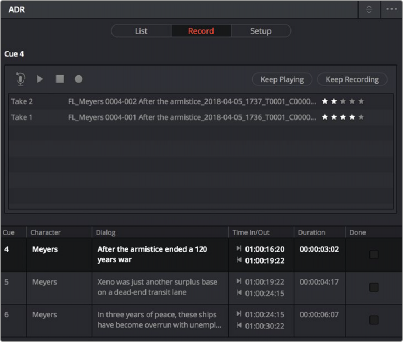
The Record panel of the ADR Interface
This panel presents the following controls:
— Record and rehearse controls: Four transport controls and two buttons let you control recording during ADR sessions. These controls are only clickable when you’ve selected a cue from the Cue list to record.
— Rehearse: Runs the section of the Timeline specified by a cue without actually recording anything, giving the talent an opportunity to run through their dialog and practice their timing and delivery. Beeps and on-screen streamers are not played during a rehearsal.
— Play: Plays the currently selected take from the Take list (described below). If no take is selected, the most recently recorded one on top is played.
— Stop: Immediately stops rehearsal, playback, or recording.
— Record: Initiates recording of the cue to the specified audio track, with cue beeps and video streamer cues.
![]()
— Keep Playing: At the end of a take you may wish to keep playing, so the talent can hear the next section of the track. Pressing the Keep Playing button at any time, even while recording, results in post roll being ignored and normal playback resuming after the cue’s Out time.
— Keep Recording: At the end of a take you may wish to keep recording until you manually stop. Pressing the Keep Recording button at any time, even while recording, results in the Out point of the current cue being ignored and recording continuing until you stop it.
— Take list: The Take list shows every take you’ve recorded for the current cue, with take number, name, and a five-star rating that you can set to keep track of which takes worked and which didn’t. Earlier takes are at the bottom of this list, while recent takes are at the top (the same order in which the corresponding layered audio clips appear in the Timeline track they’ve been recorded to).