
< Previous | Contents | Next >
1 Select the Media Pool clips you want to edit into the Timeline by dragging a bounding box, Command-dragging multiple bounding boxes over different sets of clips, by Shift-clicking a range of clips, or by Command-clicking individual non-contiguous clips.
2 Hold Command-Shift down, and drag the selected clips into the track you want them to appear, to perform an overwrite edit.
A series of audio clips edited into the Timeline by timecode position
Each clip edited into that track appears at the same timecode position as its embedded timecode. This means that if you were recording time-of-day timecode, each clip will appear on the Timeline at the time it was recorded. A series of clips recorded during hour 10 through 13 will appear distributed throughout hours 10-13 on your timeline.
You can also edit two or more audio clips into the Timeline as a stack, in preparation for layering multiple sound effects for doing sound design work.
Dragging multiple clips to edit them into a track as a parallel stack:
1 Select the Media Pool clips you want to edit into the Timeline by dragging a bounding box, Command-dragging multiple bounding boxes over different sets of clips, by Shift-clicking a range of clips, or by Command-clicking individual non-contiguous clips.
2 Command-drag the selected clips into a track of the Timeline. The first of the selected clips appears in the track you’re dragging to, the other clips appear either in audio tracks underneath the first one, or if there are no audio tracks available, in new audio tracks that will be created to hold those clips.
All clips you’ve edited appear as a parallel stack, in separate tracks, one on top of another.
Moving Audio Clips to Embedded Timecode Position
All clips have a timecode embedded into their metadata. There are options to place clips onto the Timeline from either the Media Pool or in the Timeline itself with this metadata.
Right-clicking a clip in the Timeline has the choice to Move to Embedded Start Timecode. When this is clicked the clip will spot onto the Timeline on a selected track with the timecode.
![]()
It’s important to be aware of the embedded audio timecode and the Timeline timecode. The two must have overlapping timecode, or this function will not work. For example, a clip that has an embedded timecode of 00:00:00:00 may be difficult to find on a Timeline that starts at 00:59:58:00. If you have spotted a clip using these tools and still don’t see the clip in question, then check the embedded timecode in the Metadata panel of the Inspector as well as the timecode of the Timeline itself.
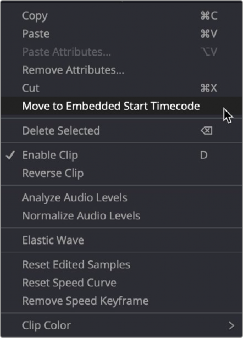

Right-clicking a clip in a Timeline reveals the Move to Embedded Start Timecode option.
Right-clicking a clip in the Media Pool reveals the Insert Selected Clips to Timeline option.

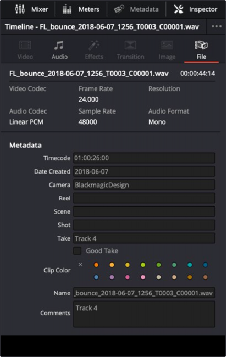
NOTE: You can find the embedded timecode for a clip in the Inspector in the File tab under timecode.
NOTE: You can find the embedded timecode for a clip in the Inspector in the File tab under timecode.
NOTE: You can find the embedded timecode for a clip in the Inspector in the File tab under timecode.
Right-clicking a clip in the Media Pool has the choice to Insert Selected Clips to Timeline Using Timecode. When this is clicked the clip will spot onto the Timeline on a selected track with the embedded timecode.
![]()
Timecode metadata is in the Inspector window under the File tab.
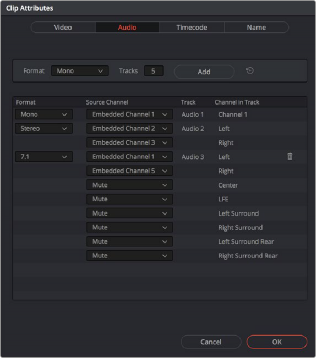
Clip Attributes now lets you assign channels among different tracks with different channel assignments