< Previous | Contents | Next >
![]()
The timeline resolution is one of the most fundamental settings of your project, defining its frame size. It’s found in the Master Settings panel of the Project Settings, where you can choose a predefined resolution from the “Timeline resolution” drop-down menu, or you can type a custom resolution into the X and Y fields below.
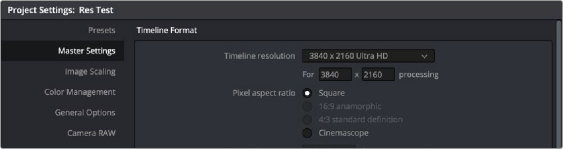
The project-wide Timeline Resolution parameters found in the Master Settings panel of the Project Settings window
Mixing Clip Resolutions
Media used in a project does not have to match the timeline resolution. In fact, it’s extremely common to mix multiple resolutions within the same timeline. Clips that don’t match the current resolution will be automatically resized according to the currently selected Image Scaling setting (described below).
Changing the Timeline Resolution
As mentioned earlier, you can change the timeline resolution whenever you like. When you do so, each Edit page transform, Fusion clip effects output, Color page Power Window, Input and Output Sizing adjustment, tracking path, spatial keyframing value, as well as any other other resolution-dependent Resolve FX effect or transform operation in DaVinci Resolve is automatically and accurately scaled to fit the new resolution.
You Can Use Separate Timelines to Output Different Resolutions
Beginning in DaVinci Resolve 16, you have the option of creating separate timelines with individual Format (including Input Scaling), Monitoring, and Output Sizing settings for situations where
you need to set up multiple timelines to create multiple deliverables with different resolutions,
pixel aspect ratios, frame rates, monitoring options, or output scaling options than the overall project, including “Mismatched Resolution Files” settings. For more information, see Chapter 34, “Creating and Working with Timelines.”