
< Previous | Contents | Next >
Adding and Adjusting Volume Keyframes in the Timeline
Mixing audio by adding and adjusting individual keyframes can be a fast and effective way of balancing clip levels with one another and of fixing clip-specific dynamic level problems. When manually editing any audio parameter curve, you can use the following procedures.
— To adjust any curve segment: Position the pointer over the overall segment for clips with no keyframes, or position it between any two keyframes, directly on top of the curve segment you want to raise or lower. When the move cursor is displayed, click and drag up to raise the Volume, or down to reduce the Volume.
— To adjust a section of level in a clip: Use the Edit Selection tool to highlight the portion to adjust. Then with the Clip Gain line showing, increase or decrease to the desired level and keyframes will automatically be created at the boundary of the gain adjustment.
— To add keyframes to the level curve: Hold the Option key down and click the curve to place a keyframe at that frame. You must add at least two keyframes to create an automated change in Volume. By using the Option and Command key you can remove any keyframe.
— To adjust a keyframe in any direction: Move the pointer over a keyframe so that the four-way cursor appears, and then click and drag up or down to change the Volume, or side to side to change its timing.
— To adjust a keyframe in only one direction: Move the pointer over a keyframe so that the four-way cursor appears, and then click and drag in the intended direction of adjustment, either vertically to change the volume of the clip at that frame, or horizontally to move the keyframe to
a different point in time. Once you start dragging a keyframe into a particular direction, keyframe movement is constrained in that direction until you release that keyframe.
— To select one or more keyframes: Click any keyframe to select it.
— To select multiple discontiguous keyframes: Command-click all keyframes you want to select, whether they’re next to one another or not.
NOTE: When adjusting the gain on clips, the tooltips will show the current gain level and reflect whatever changes you make indicating the amount of change as the keyframe moves.
NOTE: When adjusting the gain on clips, the tooltips will show the current gain level and reflect whatever changes you make indicating the amount of change as the keyframe moves.
NOTE: When adjusting the gain on clips, the tooltips will show the current gain level and reflect whatever changes you make indicating the amount of change as the keyframe moves.
— To select multiple contiguous keyframes: Click the first keyframe you want to select, and then shift-click the last keyframe you want to select, and all keyframes between will also be selected.
Normalize Audio Levels Command
The Normalize Audio Levels command automatically adjusts the level of clips to a specific target level, and you can choose the method used to analyze each audio clip’s levels to determine how to normalize each clip’s volume. Options include a variety of loudness normalization algorithms specific to various international standards, which are useful for balancing the perceived overall loudness of several clips to one another, regardless of transient levels throughout each clip. You can also do Peak normalization, with options for both Sample Peak and True Peak.
The various loudness options are designed to analyze an audio signal based on its perceived loudness to the listener, which results in a more accurate automatic balancing of different clips’ audio levels to one another, regardless of transient peaks occurring throughout different clips.
The target peak meter now uses the BS.1774 standard for measuring maximum “true peak,” which means that this meter is capable of measuring “inter-sample peaks,” rather than only the peaks at each sample of a waveform. However, you still have the option to measure Sample Peak, which is the previous method of measuring the actual peak of the samples in a media file.
The change made by the Normalize Audio Volume command is only a volume adjustment; no dynamics are applied, so the result of using this command is that the loudest parts of each selected clip are going to match one another at the target level. This command is also available in the Fairlight page.
1 Right-click one of the selected clips and choose Normalize Audio Levels. The Normalize Audio Level dialog appears.
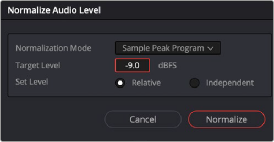
The Normalize Dialog in the Fairlight page
2 Choose the Normalization Mode you want to use. You can choose among a variety of standardized loudness measurement algorithms, or Sample Peak, or True Peak.
3 Choose the reference level that you want to set the peak volume of the selected clips to match, in dBFS.
4 Choose how you want to set the level of multiple selected clips:
— When Set Level is set to Relative, all selected clips are treated as if they’re one clip, so that the highest peak level of all selected clips is used to define the adjustment, and the volume of all selected clips is adjusted by the same amount. This is good if you have a series of clips, such as a dialog recording, where the levels are consistent with one another, and you want to normalize all of them together.
— When Set Level is set to Independent, the peak level of each clip is used to define the adjustment to that clip, so that the volume of every selected clip is adjusted by an amount specific to that clip. The end result may be a set of very different volume adjustments intended to make the peak levels of each audio clip match one another. This is good if, for example, you’re trying to balance a series of different sound effects with one another that have very different starting levels.
For more information about loudness normalization, see Chapter 178, “Audio Meters and Audio Monitoring.”