< Previous | Contents | Next >
Normally, this control should be left at 0.0 (no change, unity gain), as it affects the level you are recording to disk. It is best practice to use the level controls on your audio interface to control the input level into DaVinci Resolve in order to maximize audio fidelity. However, there might be a time where you need a bit more level, or may not have access to an audio interface’s controls, and in those cases you can adjust the input.
Trim
— Polarity: Inverts the polarity of the signal coming into the channel strip (sometimes referred to as “flipping the phase”). For example, you may have an input signal like an explosion where the transient attack of the signal produces with a massively positive-going waveform (where the waveform mostly appears above the zero line). If you invert the polarity, the signal will now be mainly negative-going and the waveform will be concentrated beneath the zero line. Inverting polarity is sometimes used to more closely align signals from multiple microphones and can be used creatively to affect frequency response of such a signal.
— Trim Level: Allows you to trim the level of the signal coming off of disk, post the Track FX (which process directly off of disk) and pre all other effects. Trim Level appears post the recorded signal to disk and doesn’t affect the recording level. Trim is a playback adjustment and allows you to adjust the level of the signal coming into your mix to optimize the level feeding effects and the busses, or to slightly trim an otherwise perfect element in the mix up or down in level.
Direct Output
Each audio channel strip can enable a direct output that can be used to feed any other input destination. You can patch this source using the Track Direct choice in the Patch Input/Output dialog via the Source dropdown. For more information see Chapter 167, “Setting Up Tracks, Busses, and Patching.”
— On/Off: Enables/disables the direct output.
— Pre: Sets the direct output tap-off point to be pre (before) the channel fader. On by default.
— Level Control: Sets the level from full off (minus infinity) to +10 dB. Default is 0.0 (unity gain).
Insert
Linked and identical to the Effects In button on the channel strip; here for convenience. If you hit one, it will enable the other. Switches all Fairlight FX, AU, or VST effects on a channel in or out of the signal path with a single switched control.
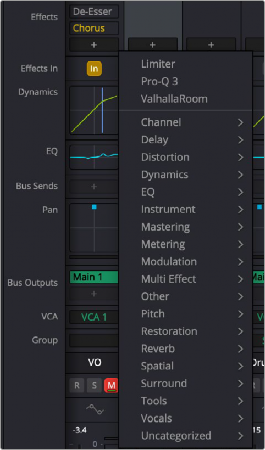
Effects
Fairlight FX, VST, or Audio Unit effects can be applied on the Mixer’s channel strips. Effects are applied on the entire track, not just on one or more clips in the Timeline for that track.
Clicking the plus (“+”) button opens a drop-down menu, allowing you to apply any Fairlight FX, VST, or AU effects installed on your machine to that track. The menu is organized by processing type. Within each type, there is a hierarchical choice for Fairlight FX, AU, and VST (if you’re on a Mac) or Fairlight FX and VST (if you’re on Windows).

NOTE: Depending on what you have installed on your machine, the collection of audio effects available for the Mixer channel strip inserts is often close to (or identical to) those that you can access for clip-based audio processing found in the Effects panel on the left side of Cut, Edit, and Fairlight pages.
NOTE: Depending on what you have installed on your machine, the collection of audio effects available for the Mixer channel strip inserts is often close to (or identical to) those that you can access for clip-based audio processing found in the Effects panel on the left side of Cut, Edit, and Fairlight pages.
NOTE: Depending on what you have installed on your machine, the collection of audio effects available for the Mixer channel strip inserts is often close to (or identical to) those that you can access for clip-based audio processing found in the Effects panel on the left side of Cut, Edit, and Fairlight pages.

TIP: You can store favorite effects for quick access at the top of the list by marking them as favorites in the Effects panel. Mark a favorite by clicking on the star next to the name.
TIP: You can store favorite effects for quick access at the top of the list by marking them as favorites in the Effects panel. Mark a favorite by clicking on the star next to the name.
TIP: You can store favorite effects for quick access at the top of the list by marking them as favorites in the Effects panel. Mark a favorite by clicking on the star next to the name.