< Previous | Contents | Next >
Super Scale options in the Video panel of the Clip Attributes
![]()
The Super Scale drop-down menu provides the options of 2x, 2x Enhanced, 3x, and 4x, as well as Sharpness and Noise Reduction options to tune the quality of the scaled result. Most of the Super Scale parameters are in fixed increments, however the 2x Enhanced mode lets you apply Super Scale in variable amounts. Selecting one of these options enables DaVinci Resolve to use advanced algorithms to improve the appearance of image detail when enlarging clips by a significant amount,
such as when editing SD archival media into a UHD timeline, or when you find it necessary to enlarge a clip past its native resolution in order to create a closeup.

TIP: Super Scale, while incredibly useful, is a processor-intensive operation, so be aware that turning this on will likely prevent real-time playback. One way to get around this is to create Optimized Media for clips in which you’ve enabled Super Scale, since Optimized Media “bakes in” the Super Scale effect. Another way to work is to create a string-out of all of the source media you’ll need to enlarge at high-quality, turn on Super Scale for all of them, and then render that timeline as individual clips, while turning on the “Render at source resolution” and “Filename uses > Source Name” options.
TIP: Super Scale, while incredibly useful, is a processor-intensive operation, so be aware that turning this on will likely prevent real-time playback. One way to get around this is to create Optimized Media for clips in which you’ve enabled Super Scale, since Optimized Media “bakes in” the Super Scale effect. Another way to work is to create a string-out of all of the source media you’ll need to enlarge at high-quality, turn on Super Scale for all of them, and then render that timeline as individual clips, while turning on the “Render at source resolution” and “Filename uses > Source Name” options.
TIP: Super Scale, while incredibly useful, is a processor-intensive operation, so be aware that turning this on will likely prevent real-time playback. One way to get around this is to create Optimized Media for clips in which you’ve enabled Super Scale, since Optimized Media “bakes in” the Super Scale effect. Another way to work is to create a string-out of all of the source media you’ll need to enlarge at high-quality, turn on Super Scale for all of them, and then render that timeline as individual clips, while turning on the “Render at source resolution” and “Filename uses > Source Name” options.
You may find that, depending on the source media you’re working with, setting Sharpness to Medium yields a relatively subtle result that can be hard to notice, but setting Sharpness to high should be immediately more preferable, while also sharpening grain and noise in the image to an undesirable extent at the default settings. However, while raising Noise Reduction will ameliorate this effect, it will also diminish the gains you obtained by raising Sharpness. In these cases, it’s worth experimenting with keeping Sharpness at Low or Medium so that Super Scale sharpens all aspects of a clip, but then using the Noise Reduction tools of the Color page (with their additional ability to be fine-tuned) to diminish the unwanted noise.
Fusion Effects and Resolution
All image processing by the Fusion page takes place before effects that are applied by the Edit page, with the sole exception of the Lens Correction effect. When it comes to sizing and image resolution, whether or not the Fusion page affects resolution depends on how you use it.
Fusion Effects Inherit the Source Resolution of a Clip
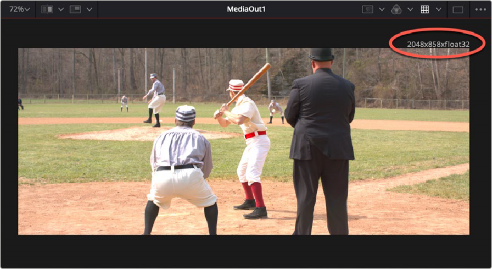
When you open a clip on the Timeline in the Fusion page, the Fusion page is set to the full source resolution of that clip, regardless of the Timeline resolution. This can be seen if you look at the resolution that’s listed above the upper right-hand corner of the Viewer. This means that if you don’t apply any operations that reduces the image resolution (described later), subsequent sizing adjustments in other pages will refer to the same resolution as the source clip.
![]()
The available resolution and bit depth of the currently selected clip is visible above the upper right-hand corner of the Viewer, circled in red
Fusion Clips Inherit the Timeline Resolution
If you combine multiple clips on the Timeline into a Fusion clip, the Fusion page is set to the timeline resolution, regardless of the source resolution of the clip. The image is then output to the Edit page at this timeline resolution, and all subsequent sizing adjustments are performed relative to the timeline resolution, with no reference to the original resolution in the source clip.
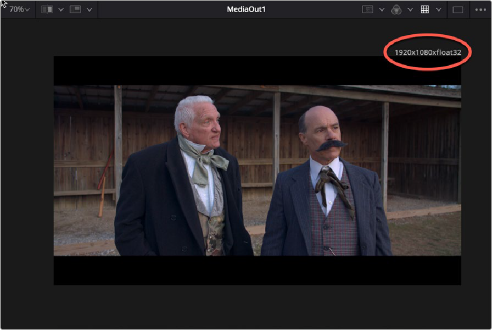
The available resolution and bit depth of a clip that’s been turned into a Fusion Clip, that’s set to the timeline resolution of 1920x1080
Operations in the Fusion Page That Change Resolution
If you don’t do anything to change the size of a clip in the Fusion page, then its resolution stays the same and you’ll effectively output the source resolution of that clip to the Edit page.
However, if you Merge the image with a second clip attached to the background which has a different resolution, or if you use a Crop or Resize node to increase or decrease the resolution of the image, then the new resolution will be passed to the Cut and Edit pages as the effective source resolution of that clip.
In short, the Fusion page passes whatever resolution is output by the last node of your composition back to the Edit page as the effective resolution of that clip in the DaVinci Resolve image
processing pipeline.
Fusion Page Transform Operations Are Resolution Independent
![]()
Within the Fusion page, multiple Transform nodes operate in a resolution independent manner relative to the resolution of the source clip. This means that if you shrink an image to 20% with one Transform node, and then enlarge it back up to 100% using a second Transform node, you end up with an image that has all the resolution and sharpness of the input image.
Fusion Page Resize Operations Are Not
Within Fusion there are two kinds of transform effects, the Transform node and the Resize node. Which of these nodes you use has a dramatic impact on resolution independence.
— The Transform node always refers back to the input resolution of the clip (as defined by the Clip Attributes) to enable resolution-independent sizing, such that multiple Transform nodes
can scale the image down and up repeatedly within the Fusion page with no unnecessary loss of image resolution.
— The Resize node actually decreases image resolution when you shrink an image or increases image resolution (with filtering) when enlarging. This means that the Resize node will break resolution independence, and the resolution of the image will be fixed at whatever you specify from that point in your composite’s node tree forward.
In most situations, you probably want to use the Transform node to maintain resolution independence relative to the source media, unless you specifically want to alter and perhaps reduce image resolution to create a specific special effect which purposefully degrades the image. For example, if you want
a clip to be forced to a standard definition resolution in order to make it look like a low-resolution archival clip, the Resize node will accomplish this. Enlarging the result with a Transform node will then perform a filtered enlargement that will look like a real SD clip being enlarged.
Transforms from the Fusion Page to the Edit Page
All transform operations you apply on the Cut, Edit, and Color pages are resolution independent, referring to the original resolution of the source media, so long as you don’t use the Fusion page. For example, if you shrink an image to 20% in the Edit page (using Edit sizing controls) and then enlarge it in the Color page back to 100% (using Input sizing controls), you end up with an image that has all the resolution and sharpness of the original media, because the final resolution is drawn from the original source media.
However, once you use the Fusion page to do anything to a clip, from adding a small effect to creating a complex composition, the resolution-independent relationship of the Edit and Color pages to the source media is broken, and whatever resolution is output from your Fusion composition is the new effective resolution of the clip that appears in the Timeline. This means if you shrink an image to 20% in the Fusion page (using a Transform node) and then enlarge it in the Color page by 150%, you end up with an image that isn’t as sharp as the original because the downconverted image in the Fusion page is effectively the new source resolution of that clip.