
< Previous | Contents | Next >
configurations to see how it holds up in different situations. For more information on configuring different speaker setups, see Chapter 4, “System and User Preferences.”
Control Room Meters
The monitoring menu lets you choose which bus you want to monitor while working.
The mustard-colored Control Room audio meters show the sum of all audio channels that are routed to the currently selected bus being monitored (as selected in the drop-down menu below). These are peak meters measured in dBFS.
A true peak audio measurement is displayed at the top of the Control Room meter.
Loudness Meters
What Is LUFS?
LUFS measurements evaluate sound levels that are averaged over time referenced to full scale. Full scale is the loudest level a digital audio system can handle before overloading (“clipping”). LUFS allows totally different types of program material to be matched in perceived level by human ears and has become the standard way that mixes are measured for final delivery of your program material. LUFS are shown as negative numbers, such as
-23, -14, etc., because the level is referenced to full scale (digital 0).
The set of meters all the way to the right are the Loudness meters, which consist of a set of two graphical meters and a numerical readout. This lets you keep track of the “integrated loudness” of the overall mix, which is the standard that all contemporary mixing specifications refer to when specifying client deliverables. Unlike the RMS audio meters found in the Timeline or Mixer, which measure audio in dB, Loudness meters do a different kind of analysis, measured in LUFS (loudness units relative to full scale).
Loudness Meter Options
Two options in the General Options of the Project Settings let you customize the Loudness meters.
— Target Loudness level: Lets you set the LUFS value that’s used as a reference level for loudness metering. Defaults to –23 LUFS, which conveniently makes the display of these meters scale similarly to traditional audio meters that you’re already used to.
— Loudness Scale: Lets you choose which scale you want to use with which to measure the meters. Options currently include the default of EBU +9 Scale (–18 to +9), and EBU +18 Scale (–36 to +18).
Support for Multiple Loudness Standards
The Loudness Meter can be switched among a variety of international industry-standard loudness monitoring standards. The standard you choose uses the integrated loudness value (along with a specified tolerance defined by each selected standard) to indicate whether or not the current mix level is of acceptable loudness via color coding of the Integrated Loudness value, and in the Integrated Loudness graph described below. Blue values indicate loudness levels that are below tolerance,
yellow indicates loudness values that are within tolerance, and red indicates loudness values that are above tolerance.
The built-in standards you can switch among include the following:
— BS.1770-1: An older loudness standard used by DaVinci Resolve version 15 and before.
— BS.1770-4: The most up-to-date loudness standard as of DaVinci Resolve 16; the algorithms specified by this standard govern the other standards that are listed below in this drop-down menu.
— ATSC A/85: The American standard for acceptable loudness in broadcast.
— EBU R128: The European standard for acceptable loudness in broadcast.
— OP-59: The New Zealand and Australian standard for acceptable loudness in broadcast.
— TR-B32: The Japanese standard for acceptable loudness in broadcast.
— AGCOM 219: The Italian standard for acceptable loudness in broadcast.
— NETFLIX: The Netflix standard for acceptable loudness in broadcast.

NOTE: The target peak meter now uses the BS.1770-4 standard for measuring maximum “true peak,” which means that this meter is capable of measuring “inter-sample peaks,” rather than only the peaks at each sample of a waveform.
NOTE: The target peak meter now uses the BS.1770-4 standard for measuring maximum “true peak,” which means that this meter is capable of measuring “inter-sample peaks,” rather than only the peaks at each sample of a waveform.
NOTE: The target peak meter now uses the BS.1770-4 standard for measuring maximum “true peak,” which means that this meter is capable of measuring “inter-sample peaks,” rather than only the peaks at each sample of a waveform.
All of these loudness standards are available for off-line readings as well, using the Loudness Analyzer described in the next section.
Graphical Loudness Meters
Two separate meters give you a dynamic graphical measurement of the loudness of the selected bus being monitored according to the loudness standard you’ve selected, which determines how to analyze the subjective loudness of a given audio mix for purposes of compliance with required broadcast quality control (QC) standards.
![]()
— A steel-blue meter labeled M (for momentary) has as many channels as the selected bus you’re monitoring, excluding the LFE channel(s) of surround formats, which aren’t factored into loudness metering. This meter measures LEQ (equivalent sound level), within a 400ms window following the playhead as measured every 100ms. This lets you evaluate the LUFS (Loudness Units Full Scale) level of the mix at the current frame as you play. This discrete-channel analysis is used to calculate all other values of the loudness metering system.
— A second steel-blue mono meter to the right displays the sum of all channels in the M meter, displayed in LU (loudness units). The number value displayed at the top of this meter is the maximum LU value that’s been analyzed during any stretch of timeline playback. This value is held until it’s reset, either by stopping and initiating playback a second time while Link to Playhead is enabled, or when you click the Reset button at the bottom of the loudness meter area.
Numeric Loudness Meters
A set of values to the right of the meters give running reports on the audio level of your mix. While the graphical meters are useful for analyzing your mix as you work, these numeric readouts are particularly valuable for providing the strict information you need to adhere to written QC standards. Their meaning is as follows:
— Short: Measures the average LU level over a 30-second window following the playhead.
— Short Max: Shows the maximum level over the same 30-second window. This analysis is required by EBU R128.
— Range: Measures the dynamic range of the Loudness of your mix (in LU, or loudness units), which is the difference between the average soft and average loud parts of your mix. Analyzes the overall loudness over a played range of the mix, discounts the lowest 10% and highest 5%, and then gives a standardized expression of the difference between the remaining soft and loud
levels that were analyzed. The window of analysis is as long as you’ve been playing. This analysis is required by most QC specifications.
— Integrated: Measures the LUFS value of the portion of the range of the mix you’ve played through. As you play, this integrated value accumulates. This analysis is required by most QC specifications.
Absolute Scales and Dialog
While some users prefer to measure their levels to correspond to a relative scale of “0,” similar to a VU meter where the needle rides above the “0,” others want to see the absolute measure of the amplitude in LUFS and true peak. By default, the Loudness meter is set to relative scale, but you now have the option to choose between relative scale and absolute scale in the Loudness meter.
Relative scale in the Loudness menu is relative to the selected scale, so a loudness unit of 0 corresponds to the target of the chosen measure type. For instance, if EBU R128 is selected, whose target measure is -23dB LUFS, the “0” LU (Loudness Unit) is -23dB. If ATSC A/85 is chosen, whose target is -24dB, then that becomes the corresponding equivalent of the relative LU of 0.
When using the absolute scale, the Loudness meter displays the increments to reflect the the chosen measure type. In absolute scale the EBU R128 meter will display -23 instead of the relative scale’s 0.
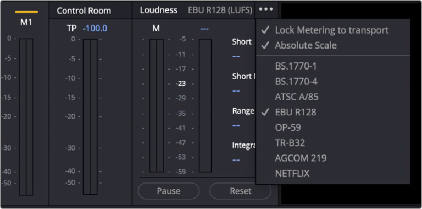
The option in the Loudness panel reveals the various measure types as well as the option for absolute scale.