< Previous | Contents | Next >
About the Fairlight Desktop Console
Fairlight Desktop Consoles offer traditional and enhanced mixing controls for both the Edit page and Fairlight page in DaVinci Resolve. All that you need to connect a Fairlight Desktop Console to your DaVinci Resolve computer is a standard USB-3 or Ethernet cable. Once connected to your workstation, you can use the transport controls and search dial on the Desktop Console for timeline navigation, recording, playback, and more.
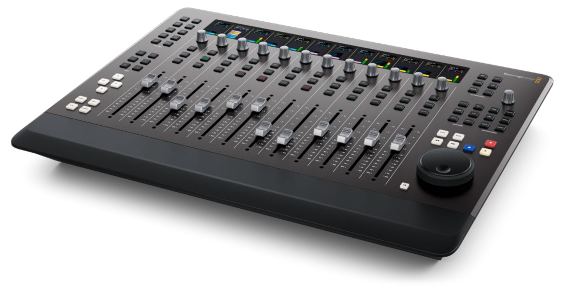
Fairlight Desktop Console Sections in Clockwise Order
On the upper-left of the Desktop Console there is a set of 10 control buttons that are used to map the 12 adjacent encoder knobs and select buttons to focus mode mixing parameters. Moving to the
upper-right of the Desktop Console, you’ll find the Automation section with six buttons used to control the automation system. Below the Automation section are the channel and monitoring controls.
The channel controls include three buttons that work in conjunction with the channel select buttons above the faders and two bank buttons for banking faders in groups of 12 in the relative direction. To the right of the Channel section are the monitoring controls complete with an encoder knob and four buttons to target the Control Room monitoring. Additional TALK and CANS buttons add studio
controls and can be pressed and held for talkback and re-targeting the monitoring controls for studio monitoring. The lower-right of the Desktop Console includes an electronic search dial for full shuttle and scroll transport control, along with a set of transport keys. A handy Zoom Icon button below
the dial lets you use the dial for quick timeline zoom functions including: horizontal, vertical, and waveform zoom.
The center of the Desktop Console includes 12 fader channel strips, each with a belt-driven
![]()
touch-sensitive fader, Mute, Solo, and Select (SEL) buttons, as well as an encoder knob for panning in default mode and controlling additional parameters in Focus modes. At the top of each channel strip you’ll find an LCD screen that displays information for that channel in default mode or alternative parameter information in Focus modes.
Arrow and Modifier keys are located in the lower-left of the Desktop Console and can be used in conjunction with the Transport, Channel, and Automation buttons for expanded functionality. Directly above the Arrow keys is the User section, containing six sequentially numbered buttons that can be used in combination with other keys to change the current operation depending on the mode and task at hand.