< Previous | Contents | Next >
Now that you are familiar with the general layout, types of controls, Editor modes and key-press options in the Fairlight Audio Editor, it’s time to dive deeper into the different areas of operation and how everything works together. Keep in mind that the Fairlight Audio Editor is essentially an over-sized mouse designed specifically to control the DaVinci Resolve Fairlight page. Therefore, the better you understand the Fairlight page, the more proficient you’ll be with your Audio Editor panel.
Please refer to the previous Fairlight chapters for detailed information on the software interface, tools, functions, and audio workflows. However, with the increased functionality and physical controls available on the Fairlight Audio Editor, there are some functions and workflow enhancements that are only available via the Editor panel. This section will give an overview of the entire Fairlight Audio Editor
and focus more in-depth on unique features and functions that go beyond the standard keyboard and mouse options in the Fairlight page.
Monitor Section
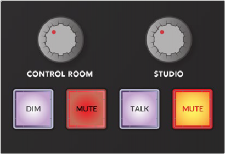
The Monitor section in the upper-right corner of the Fairlight Audio Editor panel is where you control playback levels for the Control Room and Studio speakers. Control Room monitor levels can be changed at any time using the Control Room knob. Adjusting these controls also adjusts the corresponding onscreen monitoring controls in DaVinci Resolve.
— Control Room knob: this can be used to quickly dial the level of the speakers selected in the control room. You can select alternate control room speaker sets in the Monitor mode toolset.
— DIM: This button reduces the Control Room monitor volume by a user-defined amount. Press to toggle Dim on or off. You can set the Dim level on the Editor screen in Monitor mode.
— MUTE: Use this button to mute or unmute the Control Room monitors.
![]()
The Studio controls control the Studio monitoring circuit of a Fairlight Accelerator card installed on your workstation.
— Studio knob: Use this to dial the level of the speakers in the Studio.
— Talk: Latch this button to toggle on or off a talkback microphone. When latched, the talkback mic remains live. Momentary-press the talk button to use talkback without latching, in this case, the talkback mic will remain live only during the momentary-press and shut off when you
release. Press Control with the Talk button to open or close the Talkback Settings window on the computer screen. Engaging Talk also dims the Control Room circuit. You can modify the talkback functionality and general purpose input and output (GPI/GPO) via the Talk Setup menu option keys in the Setup mode picture keys.
— MUTE: Use this button to mute the Studio monitors.
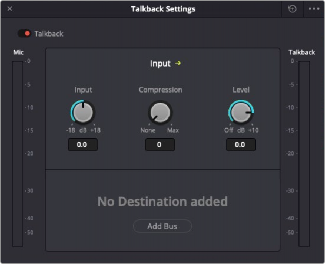
Monitor controls Talkback Settings window, opened or closed by pressing Control with the Talk button
User-defined Fixed Control Room and Dim levels
Sometimes the monitoring environment must be set to a standard level and not changed. This is called Fixed Level monitoring. For example, if your control room has been calibrated with a sound pressure level (SPL) meter, you will probably want to set a Fixed monitoring level. When fixed,
the Control Room knob has no affect on the monitoring levels. You’ll find controls for Fixed Level monitoring on the built-in Editor screen in Monitor mode. Here you can also toggle on and off Fixed level monitoring and adjust the Dim level. When Fixed Level monitoring is toggled on, the listening level meter in the upper-right of the Timeline GUI turns from green to blue.
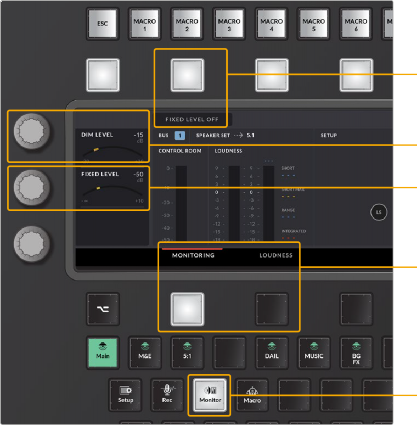
1 Latch or momentary-press the Monitor mode key to enter the Monitor toolset and show the Dim Level and Fixed Level controls on the left side of the Editor screen.
2 Use the top control knob to adjust the adjacent Dim level amount onscreen. As you turn the knob left or right, the Dim level GUI changes accordingly.
3 Use the middle knob to adjust the adjacent Fixed Level control using the GUI display in the Editor as a guide.
![]()
4 To toggle Fixed Level monitoring on or off, press the soft button directly above the Fixed Level On/ Off button on the Editor screen. This can be done anytime during playback, recording, or mixing sessions by simply using a momentary-press on the Monitor mode key then toggling on or off the Fixed Level On/Off soft button.
5 Hold the Control key while touching a touch-sensitive knob to reset it to the default value. In this case, the default Dim level is -15dB and the default Fixed Level is 0.0dB.