
< Previous | Contents | Next >
6 When finished, release the Monitor key If you were performing a momentary-press. Otherwise, simply latch a different Editor mode key to exit Monitor mode.
Fixed Level Toggle soft menu button
DIM Level Control Fixed Level Control
Monitoring and Loudness soft menu buttons
TIP: Setting monitor levels is an example of how different areas of the Fairlight Audio Editor work together to quickly achieve a goal. To further define an example, a user could be in the middle of a session and decide to change the Dim level. Without interrupting the current task, the user could momentarily hold the Monitor mode key with one hand and with the other hand, quickly adjust the Dim Level. When finished, the user only needs to release the Monitor key to resume whatever they were working on. Latching the Dim button on the Monitor controls will now reduce the Control Room monitors to the newly defined Dim level.
TIP: Setting monitor levels is an example of how different areas of the Fairlight Audio Editor work together to quickly achieve a goal. To further define an example, a user could be in the middle of a session and decide to change the Dim level. Without interrupting the current task, the user could momentarily hold the Monitor mode key with one hand and with the other hand, quickly adjust the Dim Level. When finished, the user only needs to release the Monitor key to resume whatever they were working on. Latching the Dim button on the Monitor controls will now reduce the Control Room monitors to the newly defined Dim level.
TIP: Setting monitor levels is an example of how different areas of the Fairlight Audio Editor work together to quickly achieve a goal. To further define an example, a user could be in the middle of a session and decide to change the Dim level. Without interrupting the current task, the user could momentarily hold the Monitor mode key with one hand and with the other hand, quickly adjust the Dim Level. When finished, the user only needs to release the Monitor key to resume whatever they were working on. Latching the Dim button on the Monitor controls will now reduce the Control Room monitors to the newly defined Dim level.
Monitor Mode Key
Numeric Keypad
![]()
For the most part, the numeric keypad on the Fairlight Audio Editor is self explanatory and functions exactly the same as the numeric keypad on an extended keyboard for entering timecode and number values. There are, however a few specialized keys, such as Colon (:), Clear, and GoTo, that can be used to expedite timecode entry, set locators, and quickly move the playhead or clip to a specific time.
Additionally, there are some user-definable operations, such as Review, where you can combine a momentary hold on the Review key plus a Number Key (1 to 9) to set the number of seconds you’d like the playhead to jump back for the Review operation. The timecode is displayed in the Timecode field in the upper-left corner of the Timeline on the computer display, so you can always see the new timecode values as you type.
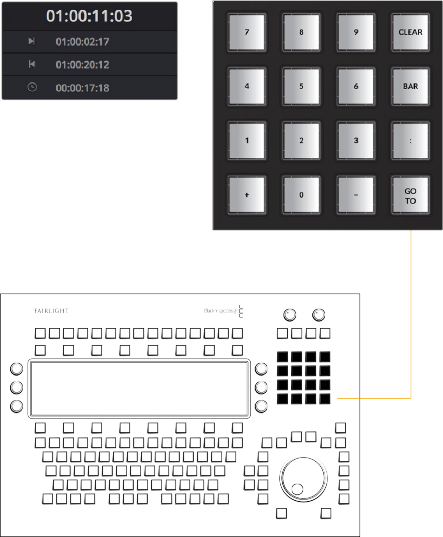
Corresponding Timecode Display and Range buttons on Fairlight page Timeline
Corresponding Timecode Display and Range buttons on Fairlight page Timeline
Corresponding Timecode Display and Range buttons on Fairlight page Timeline
Numeric keypad
Numeric keypad
Numeric keypad
— Number Keys 0 to 9 : Used for entering number values and timecode entry. Timecode entry requires latching the GoTo Key first.
— GoTo: When latched, the numeric keypad is in GoTo entry mode and numbers you enter determine where the playhead will move when you unlatch the GoTo key. Numeric entry can include numbers, timecode, or timecode increments. Positive numbers move forward in the Timeline and negative numbers move back.
— Use a momentary press on the GoTo key to jump to one of the three user-definable locator positions in the Timeline.
— Additionally, when the GoTo key is latched, the standard Play and Stop transport keys become GoTo Play and GoTo Stop keys. This can save a keystroke for the operator so they can type in timecode and immediately go to that location and play or stop without first unlatching the GoTo key.
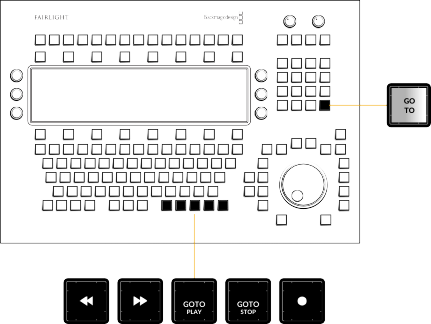
Transport controls while GoTo key is latched on the numeric keypad
— Plus (+): Used in typing or to increment numbers. Typing a Plus before entering a numeric timecode value moves the playhead forward by that value. For example, latching the GoTo key, then typing +0500 and unlatching the GoTo key moves the playhead forward five seconds. When typing values with Plus or Minus keys, the values are entered as timecode from right to left. In this example, +0500 = move playhead 05:00 later.
— Minus (-): This key is used in typing or to increment numbers. Typing a Minus before entering a number value moves the playhead forward by that value. For example, latching the GoTo key, then typing -0500 and unlatching the GoTo key moves the playhead back five seconds earlier in the Timeline. When typing values with Plus or Minus keys, the values are entered as timecode from right to left. In this example, -0500 = move playhead 05:00 earlier.
— Clear: Clears the current number or timecode entry while in GoTo entry mode. The Clear key can also be used to clear user-defined number values, such as locators.
— Colon (:): This key can be used to separate Hours:Minutes:Seconds:Frames in timecode entry, or as a numeric shortcut key that represents a timecode position and replaces 00 when entering timecode. When you type two numbers, a colon is automatically added before the third number. Likewise, typing two numbers followed by a colon also places the colon directly after the two numbers you just typed. This follows standard timecode entry rules for typing in timecode numbers. In this case, to substitute 00 with the colon key, you need to type a second colon. Subsequent typed colons in the same timecode entry event will automatically substituted 00.
![]()
The number of colons typed before or after a number indicates the timecode position of the number in the GoTo command. For example, latching GoTo then typing 02:::02 (zero, two, colon, colon, colon, zero, two), then unlatching GoTo moves the playhead to 02:00:00:02. Additionally, the Colon key is
a real time saver for navigating to specific areas of the Timeline without the need to type the entire number. The position of the Colon in the numeric shorthand value typed determines if the numbers entered as timecode start from the right as frames, or if you keep the current timecode and move to a designated hour from the left.

TIP: Timecode entry appears in the upper-left corner of the Fairlight Timeline on the computer screen. If you wish to change the timecode to display subframes, you can right- click the timecode display and choose the display setting you wish from the drop-down menu. You can also open a floating Timecode window that displays the playhead position (CTI) from the Workspace menu.
TIP: Timecode entry appears in the upper-left corner of the Fairlight Timeline on the computer screen. If you wish to change the timecode to display subframes, you can right- click the timecode display and choose the display setting you wish from the drop-down menu. You can also open a floating Timecode window that displays the playhead position (CTI) from the Workspace menu.
TIP: Timecode entry appears in the upper-left corner of the Fairlight Timeline on the computer screen. If you wish to change the timecode to display subframes, you can right- click the timecode display and choose the display setting you wish from the drop-down menu. You can also open a floating Timecode window that displays the playhead position (CTI) from the Workspace menu.
For example, if the playhead is currently positioned at 01:00:00:00 and you latch GoTo, then type :20 (colon, two, zero) when you unlatch GoTo, the playhead will move to 01:00:00:20. However, if you then latch GoTo and type 02: (zero, two, colon), then unlatch GoTo, the timecode entry is incremental from right to left, so the result is 01:00:02:00.
Numeric Keypad Locators
The Fairlight Audio Editor includes three user-defined locators that are used to quickly move the playhead to a stored timecode location. These non-permanent locators are designed to use freely in editing and mixing, but are not saved with the project. A momentary-press on the GoTo key is required to use, set, or clear the locators, which are assigned to the 1, 2 and 3 keys on the numeric
keypad. Navigating with locators is a fast and easy way to jump to key positions in the Timeline. Setting a locator based on the current timecode position is often the first and last operation when recording macros so that the macro can start and end at the current timecode position. At this time, locators are only available in the Fairlight Audio Editor.
1 Move the playhead to the timecode position that you wish to save as a locator position. In this example you will assign the current playhead position to the first locator on the 1 key.
2 Momentary-press the GoTo key. This illuminates the 1, 2, and 3 keys on the numeric keypad. Continue to hold the GoTo key.
3 Momentary-press the 1 key until it tallys on to show that it has been set.
4 Release both the GoTo and 1 keys. You can follow the same steps to set the second and third locators that are assigned to the number 2 and 3 keys. Locators can be set to new timecode positions anytime while you work and do not have to be cleared before setting a new location.
1 Momentary-press the GoTo key. The number keys, 1, 2, and 3 illuminate. In this example, you will go to locator number 2.
2 Continue to press the GoTo key. Quickly press and release the 2 key.

NOTE: You need to first set a locator before it can be used. Locators are not saved with the project.
NOTE: You need to first set a locator before it can be used. Locators are not saved with the project.
NOTE: You need to first set a locator before it can be used. Locators are not saved with the project.
3 Release the GoTo key. The playhead jumps to the second locator timecode position.