< Previous | Contents | Next >
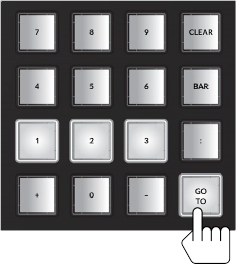
1 Momentary-press the GoTo and Clear keys. The number keys, 1, 2, and 3 illuminate, but continue pressing the GoTo and Clear keys.
2 Long press each of the 1, 2, and 3 number keys to tally them on.
3 Release the GoTo and Clear keys. The locators are now clear and will not affect the playhead position until they are set to new timecode locations.
Numeric keypad with Locator keys illuminated during momentary hold of the GoTo key
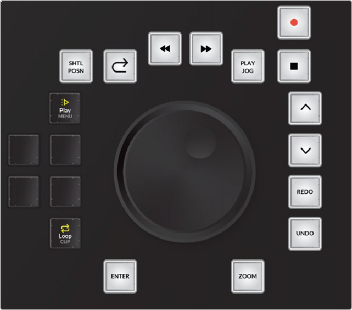
Jog Wheel with Fixed Keys and Soft Menu Picture Keys
The jog wheel and surrounding Fixed keys offer a complete set of transport commands, designed to let you keep your hand in one position while editing. Here you can not only navigate the Timeline from end to end or anywhere in between in seconds, but also go from seeing all tracks to a focused zoom on a single clip at the sample level faster than you could reach over and pick up a traditional mouse.
![]()
Shuttle/jog wheel with Fixed keys and default Play menu and Loop picture keys
The combination of the jog wheel and Fixed keys offer standard and advanced playback and navigation options that can be defined in Setup mode and with the adjacent picture keys. The soft menu picture keys to the left of the jog wheel display menu options related to Fixed key and Shuttle functions. Since this section of the Fairlight Audio Editor includes such an extensive set of features and functionality, let’s start with the jog wheel as a means of navigation and playback, then move on to the Play menu picture keys, Fixed keys, and subsequent additional soft menu picture keys.
Shuttle/Jog Wheel
The jog wheel is the most versatile control on the Fairlight Audio Editor, and is designed for ease-of- use with all of the associated keys within reach. As a means of navigation and playback, the wheel has two modes of operation, shuttle and jog, that are initiated by the respective Shuttle Position and Play Jog keys above the wheel.
In Shuttle mode, turning the wheel forward (clockwise) or back (counter-clockwise) starts playback in fast forward or rewind at variable speeds based on the amount the wheel is turned. Releasing the wheel while shuttling forward or back will continue constant playback at the current speed until the playhead reaches the beginning or end of the project.

TIP: Holding CTRL and Play/Jog puts the wheel into Shuttle mode. This maneuver also initiates Free shuttle movement even if the Editor setup controls are set to Fixed Shuttle. Thus, pressing CTRL + Play/Jog is a common audio editor shortcut for Free Shuttle control. Additionally, holding CTRL while turning the jog wheel increases the speed 8X. Releasing CTRL returns the wheel to standard jog speed.
TIP: Holding CTRL and Play/Jog puts the wheel into Shuttle mode. This maneuver also initiates Free shuttle movement even if the Editor setup controls are set to Fixed Shuttle. Thus, pressing CTRL + Play/Jog is a common audio editor shortcut for Free Shuttle control. Additionally, holding CTRL while turning the jog wheel increases the speed 8X. Releasing CTRL returns the wheel to standard jog speed.
TIP: Holding CTRL and Play/Jog puts the wheel into Shuttle mode. This maneuver also initiates Free shuttle movement even if the Editor setup controls are set to Fixed Shuttle. Thus, pressing CTRL + Play/Jog is a common audio editor shortcut for Free Shuttle control. Additionally, holding CTRL while turning the jog wheel increases the speed 8X. Releasing CTRL returns the wheel to standard jog speed.
In Jog mode, the playhead movement is contingent on the movement of the wheel, so you can freely jog forward or in reverse at variable speeds while turning the wheel and playback stops immediately when the wheel is released. Jog mode is generally used to scrub a specific area to focus on audible cues for editing and trimming, or for subframe loop-jog scrubbing to pinpoint issues and fine-tune edits. Shuttle mode is used to quickly navigate to a specific location or start playback at a variable speed. Additionally, the wheel can be used for common functions such as zooming, quickly scrolling track selection to different tracks, changing clip volume levels or even dialing the shape of clip fades.
Soft Menu Picture Keys
The six picture keys to the left of the jog wheel display soft menu options when you momentarily press the Play/Jog, Rewind, Fast Forward, and Zoom keys. The default soft menu keys that are always available are the Play Menu and Loop keys. Latching the Play Menu key shows six specialized playback options and likewise a long-press on the Loop key shows the Loop Playback options keys that change the looped playback mode assigned to the Loop key.
— Play Again: Plays from the same place as the last time, such as the timecode where the transport last entered Play. This could also include Play and Record at the same time. This key is the same as the Play Menu key so when the Play Menu keys are not displayed, you can simply press Play Menu twice for Play Again.
— Play Range: This operation plays from the In Point (beginning) to the Out Point (end) of a range in the Timeline.
— Play Clip: This plays the clip beneath the playhead on the active selected track. If there is no clip beneath the playhead, the next clip on selected track is played.
— Play In: Plays from one second before the In Point of a range in the Timeline.
— Play Out: Plays from one second before the Out Point of a range in the Timeline.
— Exit: Exits the Play Menu.
— Loop Range: Loops playback around the marked range, from In Point to Out Point in the Timeline.
— Loop Clip: This operation loops playback around the clip beneath the playhead on the most- recently-selected track. If there is not a clip beneath the playhead on the active track, the next clip in the track is played. If a track is not selected, this key has no affect on playback.
— Loop +/- 1: This creates a two second playback loop around the current playhead position that starts one second before the playhead and ends one second after the playhead.
— Loop +/- 3: This creates a six second loop around the current playhead position that starts three seconds before the playhead and ends three seconds after.
— Exit: Exits the Loop Options menu without changing the current loop playback mode.

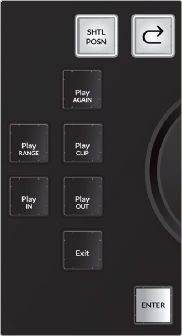
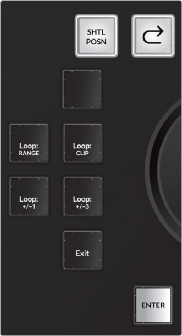
(Left) Default soft menu keys with Play Menu key unlatched with Loop key set to Loop Clip, (Center) Play Menu key latched, showing Playback Options keys, (Right) Loop key latched, showing Loop Options menu for assigning Loop Playback mode
Fixed Keys in Clockwise Order Starting in the Upper-left Above the Jog Wheel:
— Shuttle/Position: Latch this key to engage the wheel as a shuttle control for navigation and playback. Unlatch or press Stop to stop playback and disengage the shuttle wheel. While Shuttle is active, the Rewind and Fast Forward transport keys light up to indicate which direction the transport is moving. In the Setup mode, Editor Setup keys you can change the shuttle to either Free or Fixed mode.
— Free Shuttle mode: When engaged, the shuttle wheel turns freely clockwise or counter- clockwise, can change direction instantaneously, and shuttles at variable speeds based on the amount and direction you turn the wheel.
— Fixed Shuttle mode: Turning the wheel forward or back starts fast-forward or reverse playback at a fixed speed with built-in stops whenever you change direction.

TIP: When the shuttle is set to Fixed Shuttle mode you can temporarily override the fixed setting with a long-press on the Shuttle/Position key after it is latched.
TIP: When the shuttle is set to Fixed Shuttle mode you can temporarily override the fixed setting with a long-press on the Shuttle/Position key after it is latched.
TIP: When the shuttle is set to Fixed Shuttle mode you can temporarily override the fixed setting with a long-press on the Shuttle/Position key after it is latched.
— Position mode: Hold the Shuttle/Position key while turning the wheel to quickly position the playhead (CTI) in the Timeline. In position mode, you can move the playhead from the beginning to the end of the Timeline in a single rotation of the wheel.
— Review: This key jumps the playhead back a number of second, then plays. Press this key repeatedly to make multiple jumps. The default review jump back time is four seconds. You can change this setting to any number of seconds by long-pressing the Review button and pressing any button between one and nine on the numeric keypad.
— Rewind/Jump Back: This key can operate as either a Rewind key or Jump Back key. You can toggle between key functions in the Setup mode, Editor Setup option keys.
— Rewind key: The operation works exactly as the Rewind key in the Transport keys section of the keyboard; you can press the Rewind key repeatedly to increase speed.
— Jump Back: Use this key to jump back to the previous target based on user selection in the Jump soft menu picture keys to the left of the shuttle wheel. Press and hold either the Fast Forward or Rewind key to choose jump to targets, including To Clip, To Mark, and To
Fade from the soft menu picture keys. Jump Back moves to the previous Clip or Fade based on track selection.
— Fast Forward/Jump Forward: This key can operate as either a Fast Forward key or Jump Forward key. You can toggle between key functions in the Setup mode, Editor Setup option keys. Since there is already a dedicated Fast Forward key, as well as a shuttle wheel for engaging variable speed Fast Forward, this key is often set to Jump Forward instead.
![]()
— Fast Forward: This operation works exactly as the Fast Forward key in the Transport keys section of the picture keyboard. You can press the Fast Forward key repeatedly to increase speed.
— Jump Forward: You can use this key to Jump forward to the next target based on user selection in the Jump soft menu picture keys to the left of the shuttle wheel. Press and hold the Jump Forward key to choose jump to targets, including Clip, Marker, and Fade. Jump forward to the next Clip and Fade targets are based on track selection. Marker targets can be either Timeline markers or Clip markers.
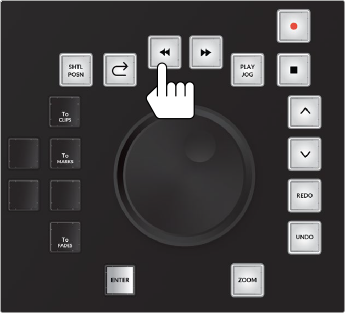
Momentary-press on Rewind or Fast Forward fixed keys shows jump targets in the soft menu keys: To Clips, To Marks and To Fades; latch the jump targets you wish to use for navigation with the Jump Forward and Jump Back keys
— Play/Jog: Use this key to start playback or engage the jog wheel for manual jog control. By default, the first press of the Play/Jog key engages the jog wheel. The second press latches the key in Play mode and starts playback. If the Play/Jog key is latched, unlatching the key re-engages the jog wheel. Once the key has been latched, it toggles between Play and Jog. To disable the jog
wheel, press the Stop key. Press and hold Play/Jog to show the associated soft menu options in the adjacent picture keys on the left side of the jog wheel.
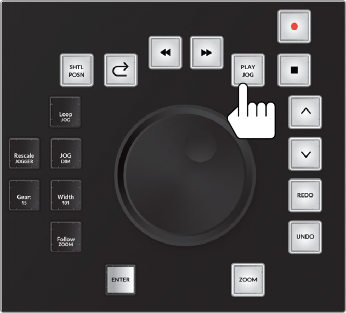
Play/Jog soft menu keys with Momentary-press on Play/Jog key: Loop Jog, Rescale Jogger, Jog DIM, Gear, Width, and Follow Zoom.
— Loop Jog: This key toggles Loop Jog on and off. When Loop Jog is on, the transport plays a small length of audio (between 5ms and 2000ms), repeatedly, at play speed. The loop moves as you jog the transport forward or backward. This is a great tool for editing, because it maintains the correct pitch of the audio, allowing you to hear clicks, pops, sibilants in the middle of words, and so on. Some of the other soft keys in this menu control additional Loop Jog parameters.
— Rescale Jogger: Use this key to change the gear ratio based on the current zoom level so that three revolutions a second of the jog wheel reaches normal play speed.
— Jog DIM: Toggles Jog Dim on and off. When on, it causes the monitoring level to automatically dim during Loop Jog to the user-defined value set in the Monitor mode Dim level.
— Gear: This changes the “gear ratio” when jogging between 1 and 20. In other words, it determines how quickly the transport moves in response to turning the jog wheel. You can change the Gear ratio by pressing the Gear key while turning the jog wheel. The lower
the Gear number, the slower the transport will go; the higher the Gear number, the faster the transport will go.
— Width: Sets the width for the Loop Jog in milliseconds between 5ms and 2000ms. This is the amount of audio that is repeated in each loop. You can set this amount by holding the Width key and turning the jog wheel.
— Follow Zoom: This toggles Follow Zoom on or off. When on, the gear ratio of the jog wheel is affected by the Zoom setting. The default setting for this control is toggled on.
— Record: Latch this key along with the Play key in the standard Transport keys to begin recording to the armed track or tracks. Press the Stop key to stop recording. To arm a track for recording, press and hold the Record key, then press the Track Selection key for the track you want to arm. Tracks must be patched to an input before they can be armed for recording.
— Stop: As you may have guessed, this key stops playback or recording.
— Up: You can use this key to move the track selection up to the previous track in the Timeline.
— Down: Use this key to move the track selection down to the next track in the Timeline.
— Redo: Reverses the effect of the last Undo. This can be used repeatedly to step forward through the editing history.

NOTE: Undo and Redo works on all editing actions while in Editing mode. While in Mix mode, you can choose either Undo All or Undo Editor. The default Undo setting for mixing is Undo Editor, which limits Undo to editing functions and disables Undo for mixing and automation in Mix mode. The Undo settings can be changed in the
Setup mode. For more information about Undo and Redo operations in DaVinci Resolve,
see Chapter 1, “Introduction to DaVinci Resolve.”
![]()
— Undo: Reverses the effect of the last edit and can be used repeatedly to step back through the editing history. Also returns to the location and track selection of the edit being undone. A list of the actions can be seen in the Edit menu > History. There you can also Open History Window to see a full edit history list.
— Zoom: The Zoom key in combination with the jog wheel and modifier keys offers numerous quick zooming and scaling options while you work.
— Hold Zoom and turn the jog wheel to change the horizontal scale of the Timeline on the computer screen.
— Hold Control + Zoom and turn the jog wheel to change the vertical scale of the Timeline, which in turn, changes the height of the tracks and the subsequent number of tracks visible in the Timeline. Horizontal scaling always zooms around the playhead, while vertical zooming focuses on the active selected track.
— Double-tap Zoom to zoom your entire program to fit within the current visible width of the Timeline.
— Press and hold Zoom to show the Zoom menu option keys in the adjacent picture keys. These Zoom menu option keys are a fast way to change vertical scaling while zooming horizontally with the jog wheel for dynamic scaling while you work.
These options are:
1 Track | Vertically scales the Timeline tracks to show only the active track. |
2 Tracks | Vertically scales the Timeline to show two tracks, including the active track. |
4 Tracks | Vertically scales the Timeline to show four tracks, including the active track. |
8 Tracks | Vertically scales the Timeline to show eight tracks, including the active track. |
16 Tracks | Vertically scales the Timeline tracks to show sixteen tracks, including the active track. |
All Tracks | Vertically scales the Timeline tracks to show all tracks. |
![]()
— Hold Control + Zoom to show a secondary set of Zoom menu option keys, including the following:
32 Tracks | Vertically scales the Timeline to show 32 tracks, including the active track. |
48 Tracks | Vertically scales the Timeline tracks to show 48 tracks, including the active track. |
U1 | Scales the Timeline to a user-defined view. |
U2 | Scales the Timeline to a user-defined view. |
U3 | Scales the Timeline to a user-defined view. |
U4 | Scales the Timeline to a user-defined view. |
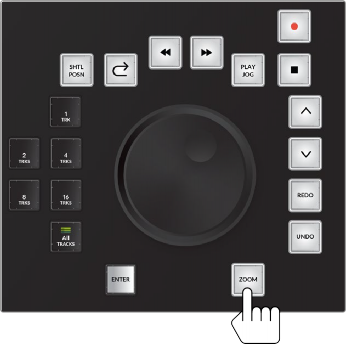
Zoom soft menu picture keys, including 1 Track,
2 Tracks, 4 Tracks, 8 Tracks, 16 Tracks, and All Tracks
— Enter: When using the Fairlight Audio Editor for Cut, Copy, and Paste operations, the Enter key functions as a Paste key. Additionally, the Enter key completes and executes many operations.
For example, if you are renaming a track using the QWERTY picture keyboard, pressing Enter after typing the name updates the track name, clears the keyboard, and returns to the previous

NOTE: In DaVinci Resolve 16.2 and later, a second Zoom button was added to the left side of the picture keyboard while in Mix and Edit mode, so editors can easily reach it with either the left or right hand while working.
NOTE: In DaVinci Resolve 16.2 and later, a second Zoom button was added to the left side of the picture keyboard while in Mix and Edit mode, so editors can easily reach it with either the left or right hand while working.
NOTE: In DaVinci Resolve 16.2 and later, a second Zoom button was added to the left side of the picture keyboard while in Mix and Edit mode, so editors can easily reach it with either the left or right hand while working.
Editor mode.
The Review, Shuttle mode, Rewind, and Fast Forward keys can all be customized and used in a variety of ways.
1 Momentary-press the Review key to illuminate the current Review setting in the numeric keypad.
2 Long-press a different number of seconds from 1 to 9 on the numeric keypad until it tallys on to set a new review duration.
3 Release the number and the Review key.
a) Free Shuttle mode: When engaged, the shuttle wheel turns freely clockwise or counter- clockwise, can change direction instantaneously, and shuttles at variable speeds based on the amount and direction you turn the wheel.
b) Fixed Shuttle mode: Turning the wheel forward or back starts fast-forward or reverse playback at a fixed speed with built-in stops whenever you change direction.